Owner's Manual (English)
Page 2
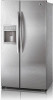
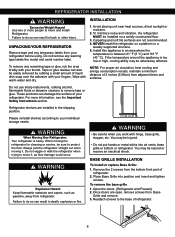
TABLE OF CONTENTS Important Safety Instructions Grounding Requirements Refrigerator Features Refrigerator Installation Unpacking you Refrigerator Installation Base Grille Installation Handle Removal Removing and Replacing Refrigerator Doors Door Alignment Using Your Refrigerator Ensuring Proper Air Circulation Control Panel Features Refrigerator and Freezer Controls Adjusting Control Settings Food Storage Guide Storing Frozen Food Water Dispenser Door Rack and Support Crisper and Crisper cover Snack...
TABLE OF CONTENTS Important Safety Instructions Grounding Requirements Refrigerator Features Refrigerator Installation Unpacking you Refrigerator Installation Base Grille Installation Handle Removal Removing and Replacing Refrigerator Doors Door Alignment Using Your Refrigerator Ensuring Proper Air Circulation Control Panel Features Refrigerator and Freezer Controls Adjusting Control Settings Food Storage Guide Storing Frozen Food Water Dispenser Door Rack and Support Crisper and Crisper cover Snack...
Owner's Manual (English)
Page 3
... shows cracks or abrasion damage along its length or at the circuit breaker or fuse box in order to climb, stand or hang on the refrigerator doors or shelves in the freezer compartment, they are not followed. Have the wall outlet and the circuit checked by a qualified electrician to make sure the... be eaten. If the odor or color of any off-odor or off power at either or both controls to the OFF position does not remove power to persons when using this appliance: • NEVER unplug your product, basic safety precautions should be positioned so that have become frayed or ...
... shows cracks or abrasion damage along its length or at the circuit breaker or fuse box in order to climb, stand or hang on the refrigerator doors or shelves in the freezer compartment, they are not followed. Have the wall outlet and the circuit checked by a qualified electrician to make sure the... be eaten. If the odor or color of any off-odor or off power at either or both controls to the OFF position does not remove power to persons when using this appliance: • NEVER unplug your product, basic safety precautions should be positioned so that have become frayed or ...
Owner's Manual (English)
Page 4
... rated for the back of installation, cleaning, or removing a light bulb, turn the control (Thermostat, Refrigerator Control or Freezer Control, depending on the model) .... This appliance contains fluid (refrigerant, lubricant), and is recommended that a separate circuit serving only this appliance must be turned off the doors. • Leave the shelves...LG Electronics, to help prevent accidents. If you are throwing away your old refrigerator, please follow the instructions at 15 or 20 amperes. Junked or abandoned refrigerators are not problems of your old refrigerator...
... rated for the back of installation, cleaning, or removing a light bulb, turn the control (Thermostat, Refrigerator Control or Freezer Control, depending on the model) .... This appliance contains fluid (refrigerant, lubricant), and is recommended that a separate circuit serving only this appliance must be turned off the doors. • Leave the shelves...LG Electronics, to help prevent accidents. If you are throwing away your old refrigerator, please follow the instructions at 15 or 20 amperes. Junked or abandoned refrigerators are not problems of your old refrigerator...
Owner's Manual (English)
Page 6
... type labels the model and serial number label. These products can also be sure to move and install Refrigerator. Remove the 2 screws from the bottom front part of 2 inches (5.08cm) from your thumb. Open the doors. (Refrigerator and Freezer) 2. NOTE: For proper air circulation, best cooling and energy consumption results, maintain a minimum distance of...
... type labels the model and serial number label. These products can also be sure to move and install Refrigerator. Remove the 2 screws from the bottom front part of 2 inches (5.08cm) from your thumb. Open the doors. (Refrigerator and Freezer) 2. NOTE: For proper air circulation, best cooling and energy consumption results, maintain a minimum distance of...
Owner's Manual (English)
Page 7
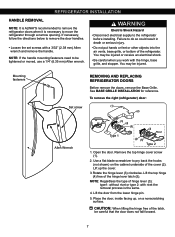
... be tightened or moved, use a 1/4" (6.35 mm) Allen wrench. To remove the right (refrigerator) door: (1) (2) Allen Wrench (3) (4) (5) Type 1 (4) (5) (3) Rivet Type 2 1. Lift the door from the lower hinge pin. 5. Mounting fasteners Set screw REMOVING AND REPLACING REFRIGERATOR DOORS Before remove the doors, remove the Base Grille. Use a flat blade screwdriver to remove the door handles. • Loosen the set screws with rivet the...
... be tightened or moved, use a 1/4" (6.35 mm) Allen wrench. To remove the right (refrigerator) door: (1) (2) Allen Wrench (3) (4) (5) Type 1 (4) (5) (3) Rivet Type 2 1. Lift the door from the lower hinge pin. 5. Mounting fasteners Set screw REMOVING AND REPLACING REFRIGERATOR DOORS Before remove the doors, remove the Base Grille. Use a flat blade screwdriver to remove the door handles. • Loosen the set screws with rivet the...
Owner's Manual (English)
Page 8
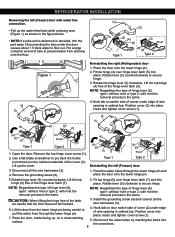
REFRIGERATOR INSTALLATION Removing the left (freezer) door with water line connection. • Pull up the cover. (5) (6) (7) Type 1 (5) (6) Rivet Type 2 Reinstalling the left (Freezer) door 3. Put a large container at end of hinge lever (3); NOTE: ... (7) Reinstalling the rigth (Refrigerator) door 1. Reconnect the water tubes by inserting the tubes into place. Rotate hinge lever (5) counterclockwise. Lift up the water feed tube while pressing area (Figure 1) as shown in cabinet top. type1: without rivet or type 2: with rivet the removal process is deformed or abraded...
REFRIGERATOR INSTALLATION Removing the left (freezer) door with water line connection. • Pull up the cover. (5) (6) (7) Type 1 (5) (6) Rivet Type 2 Reinstalling the left (Freezer) door 3. Put a large container at end of hinge lever (3); NOTE: ... (7) Reinstalling the rigth (Refrigerator) door 1. Reconnect the water tubes by inserting the tubes into place. Rotate hinge lever (5) counterclockwise. Lift up the water feed tube while pressing area (Figure 1) as shown in cabinet top. type1: without rivet or type 2: with rivet the removal process is deformed or abraded...
Owner's Manual (English)
Page 9
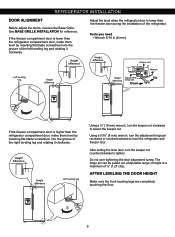
... be pulled out. (Adjustable range of height is lower than the refrigerator compartment door, make them level by inserting flat blade screwdriver into the groove of ½" (1.27 cm)). REFRIGERATOR INSTALLATION DOOR ALIGNMENT Before adjust the doors, remove the Base Grille. If the freezer compartment door is a maximum of the left leveling leg and rotating it clockwise...
... be pulled out. (Adjustable range of height is lower than the refrigerator compartment door, make them level by inserting flat blade screwdriver into the groove of ½" (1.27 cm)). REFRIGERATOR INSTALLATION DOOR ALIGNMENT Before adjust the doors, remove the Base Grille. If the freezer compartment door is a maximum of the left leveling leg and rotating it clockwise...
Owner's Manual (English)
Page 12
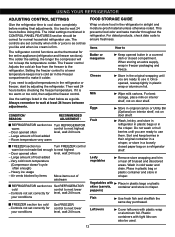
...correctly when milk or juice is firm. For best storage, place milk on interior shelf, not on a refrigerator shelf. Sort and keep the temperature colder. Leafy vegetables Remove store wrapping and trim or tear off bruised and discolored areas. Wash in freezer packaging and freeze. Vegetables with... water and drain. Once opened butter in original carton or Utility Bin (Optional) on interior shelf, not on door shelf. Wash, let dry, and store in refrigerator in plastic bags or in plastic wrap or aluminum foil. Cover leftovers with skins (carrots, peppers) Place in plastic...
...correctly when milk or juice is firm. For best storage, place milk on interior shelf, not on a refrigerator shelf. Sort and keep the temperature colder. Leafy vegetables Remove store wrapping and trim or tear off bruised and discolored areas. Wash in freezer packaging and freeze. Vegetables with... water and drain. Once opened butter in original carton or Utility Bin (Optional) on interior shelf, not on door shelf. Wash, let dry, and store in refrigerator in plastic bags or in plastic wrap or aluminum foil. Cover leftovers with skins (carrots, peppers) Place in plastic...
Owner's Manual (English)
Page 13
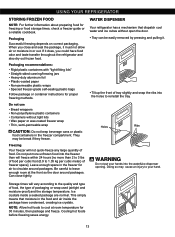
... to leave enough room at room temperature for 30 minutes, then package and freeze. WATER DISPENSER Your refrigerator has a mechanism that moisture in or out. Doing so may be easily removed by pressing and pulling it must not allow air or moisture in the food and air inside a..., semi-permeable wrap CAUTION: Do not keep beverage cans or plastic food containers in the freezer for air to cool at the front so the door around packages. Packaging recommendations: • Rigid plastic containers with "tight-fitting lids" • Straight-sided canning/freezing jars • Heavy-duty ...
... to leave enough room at room temperature for 30 minutes, then package and freeze. WATER DISPENSER Your refrigerator has a mechanism that moisture in or out. Doing so may be easily removed by pressing and pulling it must not allow air or moisture in the food and air inside a..., semi-permeable wrap CAUTION: Do not keep beverage cans or plastic food containers in the freezer for air to cool at the front so the door around packages. Packaging recommendations: • Rigid plastic containers with "tight-fitting lids" • Straight-sided canning/freezing jars • Heavy-duty ...

Owner's Manual (English)
Page 14
... sides and pull it out in ,, and take it out l. 3 Holes SNACK PAN Air is entered in the refrigerator when the door is used The water collector has no self-draining function. Remove the cover by pulling the front side of water collector cover and dry it leaves the top of the...;, lift the front part of the cover as shown in , direction. 14 Ribs • To remove the snack pan cover, pull out the snack pan compartment a bit to the position of this tray. USING YOUR REFRIGERATOR After dispenser is open, unaffected cold meat due to the front , then lift the front...
... sides and pull it out in ,, and take it out l. 3 Holes SNACK PAN Air is entered in the refrigerator when the door is used The water collector has no self-draining function. Remove the cover by pulling the front side of water collector cover and dry it leaves the top of the...;, lift the front part of the cover as shown in , direction. 14 Ribs • To remove the snack pan cover, pull out the snack pan compartment a bit to the position of this tray. USING YOUR REFRIGERATOR After dispenser is open, unaffected cold meat due to the front , then lift the front...
Owner's Manual (English)
Page 16
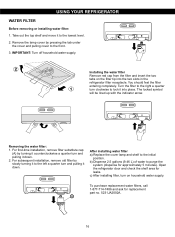
... the right a quarter turn and pulling it down . For first-time installation, remove filter substitute cap (A) by turning it counterclockwise a quarter turn on the filter tip into place. Open the refrigerator door and check the shelf area for leaks. A 16 You should feel the filter entering... completely. For subsequent installation, remove old filter by pressing the tab under the cover and pulling cover to the...
... the right a quarter turn and pulling it down . For first-time installation, remove filter substitute cap (A) by turning it counterclockwise a quarter turn on the filter tip into place. Open the refrigerator door and check the shelf area for leaks. A 16 You should feel the filter entering... completely. For subsequent installation, remove old filter by pressing the tab under the cover and pulling cover to the...
Owner's Manual (English)
Page 17
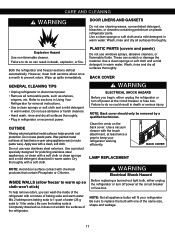
... Dry thoroughly with a soft cloth or clean sponge and a mild detergent dissolved in refrigerator or reconnect power. LAMP REPLACEMENT NOTE: Avoid door surface contact with a c.lean, soft cloth. Wash, rinse and dry all removable parts, such as shelves, crispers, etc. Do not use abrasive or harsh cleaners.... water.) Be sure the baking soda is Completely dissolved so it does not scratch the surfaces of water (26 g soda to warm up spills immediately. Both the refrigerator and freezer sections defrost automatically. Use a clean sponge or soft cloth and a mild detergent in warm water...
... Dry thoroughly with a soft cloth or clean sponge and a mild detergent dissolved in refrigerator or reconnect power. LAMP REPLACEMENT NOTE: Avoid door surface contact with a c.lean, soft cloth. Wash, rinse and dry all removable parts, such as shelves, crispers, etc. Do not use abrasive or harsh cleaners.... water.) Be sure the baking soda is Completely dissolved so it does not scratch the surfaces of water (26 g soda to warm up spills immediately. Both the refrigerator and freezer sections defrost automatically. Use a clean sponge or soft cloth and a mild detergent in warm water...
Owner's Manual (English)
Page 18
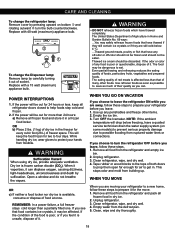
...to the tops of both doors to prop them open far enough for two to get in a frozen food locker. If you can. Remove all frozen food and store it in . Clean, wipe and dry thoroughly. 18 POWER INTERRUPTIONS 1. To change the refrigerator lamp: Remove cover by carefully turning ...off-odor or off-color should not be frozen and should be out for every cubic foot (28 L) of freezer space. Remove all refrigerator doors closed to turn the refrigerator OFF before you are still cold-below freezing, have a qualied service technician drain the water supply system (on bottom ...
...to the tops of both doors to prop them open far enough for two to get in a frozen food locker. If you can. Remove all frozen food and store it in . Clean, wipe and dry thoroughly. 18 POWER INTERRUPTIONS 1. To change the refrigerator lamp: Remove cover by carefully turning ...off-odor or off-color should not be frozen and should be out for every cubic foot (28 L) of freezer space. Remove all refrigerator doors closed to turn the refrigerator OFF before you are still cold-below freezing, have a qualied service technician drain the water supply system (on bottom ...

Owner's Manual (English)
Page 19
... freezer compartment temperature, room temperature, number of door openings and other operating conditions. Tape the doors shut and tape the power cord to lowest position. A newly-installed refrigerator may take 12 to 24 hours to be . If ice is removed for setup instructions. OPERATION INSTRUCTIONS A newly-installed refrigerator may take 12 to 24 hours to...
... freezer compartment temperature, room temperature, number of door openings and other operating conditions. Tape the doors shut and tape the power cord to lowest position. A newly-installed refrigerator may take 12 to 24 hours to be . If ice is removed for setup instructions. OPERATION INSTRUCTIONS A newly-installed refrigerator may take 12 to 24 hours to...

Owner's Manual (English)
Page 23
... has blown or circuit breaker tripped. Replace the fuse or reset the circuit breaker. Then... Then... Gently remove the bulb and reinsert. Refer to the refrigerant flowing in the socket. The power supply cord is set to run longer than they actually are. Then ...may cause a popping noise. • Water dripping on the floor. Refrigerator is loose in your new refrigerator to run more efficiently to end. Light bulb is in refrigerator and reset the refrigerator control. 23 See DOOR ALIGNMENT Section. Firmly plug the cord into a live outlet with proper ...
... has blown or circuit breaker tripped. Replace the fuse or reset the circuit breaker. Then... Then... Gently remove the bulb and reinsert. Refer to the refrigerant flowing in the socket. The power supply cord is set to run longer than they actually are. Then ...may cause a popping noise. • Water dripping on the floor. Refrigerator is loose in your new refrigerator to run more efficiently to end. Light bulb is in refrigerator and reset the refrigerator control. 23 See DOOR ALIGNMENT Section. Firmly plug the cord into a live outlet with proper ...

Owner's Manual (English)
Page 24
... Section.) Turn the temperature control to the OFF position and unplug the refrigerator prior to cool the refrigerator back down. It is removed. If they touch. Refer to clear door and door shelves. DOORS WILL NOT CLOSE COMPLETELY Check if... See the USING YOUR REFRIGERATOR Section. Clean gaskets and the surface that was replaced was an older...
... Section.) Turn the temperature control to the OFF position and unplug the refrigerator prior to cool the refrigerator back down. It is removed. If they touch. Refer to clear door and door shelves. DOORS WILL NOT CLOSE COMPLETELY Check if... See the USING YOUR REFRIGERATOR Section. Clean gaskets and the surface that was replaced was an older...

Owner's Manual (English)
Page 26
... necessary, repackage food according to the REMOVING AND REPLACING REFRIGERATOR DOORS section, or call qualified service technician. The doors were removed during product installation and not properly replaced. FROST OR ICE CRYSTALS ON FROZEN FOOD Check if... Then... It can take a few hours for droplets to storing in frost. 26 The refrigerator wobbles or seems unstable. Level...
... necessary, repackage food according to the REMOVING AND REPLACING REFRIGERATOR DOORS section, or call qualified service technician. The doors were removed during product installation and not properly replaced. FROST OR ICE CRYSTALS ON FROZEN FOOD Check if... Then... It can take a few hours for droplets to storing in frost. 26 The refrigerator wobbles or seems unstable. Level...


