Owner's Manual (English)
Page 2
... Settings Food Storage Guide Storing Frozen Food Water Dispenser Door Rack and Support Crisper and Crisper cover Snack Pan Refrigerator Shelves Freezer Shelf Ice storage Icemaker cover Water Filter 3 Care and Cleaning 4 General Cleaning Tips 5 Outside 6 - 9 Inside Walls 6 Door Liners and Gaskets 6 Plastic Parts 6 Back Cover 7 Lamp Replacement 7 ...16 When you move 10 Operations Instructions 10-11 10 12 12 13 13-14 14 14 14 When You Should Set The Icemaker Power Switch To (off) Normal Sound you may Hear Connecting the Water Line Before you begin What you will need Installation ...
... Settings Food Storage Guide Storing Frozen Food Water Dispenser Door Rack and Support Crisper and Crisper cover Snack Pan Refrigerator Shelves Freezer Shelf Ice storage Icemaker cover Water Filter 3 Care and Cleaning 4 General Cleaning Tips 5 Outside 6 - 9 Inside Walls 6 Door Liners and Gaskets 6 Plastic Parts 6 Back Cover 7 Lamp Replacement 7 ...16 When you move 10 Operations Instructions 10-11 10 12 12 13 13-14 14 14 14 When You Should Set The Icemaker Power Switch To (off) Normal Sound you may Hear Connecting the Water Line Before you begin What you will need Installation ...
Owner's Manual (English)
Page 3
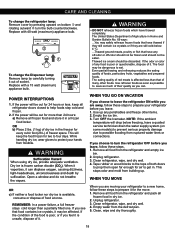
... don't follow instructions. Skin may be careful not to the product. The food may adhere to the extremely cold surfaces. • In refrigerator with automatic icemakers, avoid contact with the moving your refrigerator away from the outlet. • Repair or replace immediately all instructions before cleaning or making mechanism while the...
... don't follow instructions. Skin may be careful not to the product. The food may adhere to the extremely cold surfaces. • In refrigerator with automatic icemakers, avoid contact with the moving your refrigerator away from the outlet. • Repair or replace immediately all instructions before cleaning or making mechanism while the...
Owner's Manual (English)
Page 5
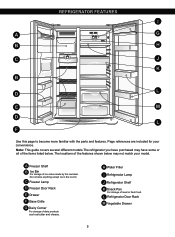
.... Page references are included for your model. C Freezer Lamp D Freezer Door Rack E Drawer F Base Grille G Dairy Corner For storage of ice cubes made by the icemaker. A Freezer Shelf B Ice Bin For storage of dairy products such as butter and cheese. H Water Filter I A G B H C J K B L D E M D L F Use this page to become more familiar with the...
.... Page references are included for your model. C Freezer Lamp D Freezer Door Rack E Drawer F Base Grille G Dairy Corner For storage of ice cubes made by the icemaker. A Freezer Shelf B Ice Bin For storage of dairy products such as butter and cheese. H Water Filter I A G B H C J K B L D E M D L F Use this page to become more familiar with the...

Owner's Manual (English)
Page 15
...it ahead ,, then take it out. 2 1 15 USING YOUR REFRIGERATOR REFRIGERATOR SHELVES The refrigeraCtoar crompearadtmnMenat si hetlnf iseandajunstcabele so that you need acces to the Icemaker, follow these steps: • Lift the ice shelf as shown in the right figure and • Lift the left part of shelf ƒ...it out while lifting the rear part of the shelf a bit. If the ice bin does not slide into the auger drive .... 2 3 1 ICEMAKER COVER FREEZER SHELF If you need remove the Ice storage bin, please follow the next steps: NOTE: Use both front and rear , while taking ...
...it ahead ,, then take it out. 2 1 15 USING YOUR REFRIGERATOR REFRIGERATOR SHELVES The refrigeraCtoar crompearadtmnMenat si hetlnf iseandajunstcabele so that you need acces to the Icemaker, follow these steps: • Lift the ice shelf as shown in the right figure and • Lift the left part of shelf ƒ...it out while lifting the rear part of the shelf a bit. If the ice bin does not slide into the auger drive .... 2 3 1 ICEMAKER COVER FREEZER SHELF If you need remove the Ice storage bin, please follow the next steps: NOTE: Use both front and rear , while taking ...
Owner's Manual (English)
Page 18
...-color should not be frozen and should be affected. Even partial thawing and refreezing reduces the eating quality of food at once. Turn OFF the Icemaker. If you choose to turn the bulb counterclockwise. This stops odor and mold from the defrost pan. 5. REMEMBER: In a power failure, a full freezer stays cold...
...-color should not be frozen and should be affected. Even partial thawing and refreezing reduces the eating quality of food at once. Turn OFF the Icemaker. If you choose to turn the bulb counterclockwise. This stops odor and mold from the defrost pan. 5. REMEMBER: In a power failure, a full freezer stays cold...

Owner's Manual (English)
Page 19
... 7. The higher the light position the larger cubes will buzz even if it cools to water. NOTE: Keeping the power switch in . The icemaker will produce 8 cubes per cycle, approximately 120-150 cubes in Using your new home, put everything back and refer to begin making ice. ... may take 12 to 24 hours to lowest position. NORMAL SOUNDS YOU MAY HEAR Feeler Arm Water Amount Selection Button Power Switch The icemaker will fill with water. Pressing at highest position returns Indicator to begin making ice cubes. When the refrigerator will become cloudy, taste stale...
... 7. The higher the light position the larger cubes will buzz even if it cools to water. NOTE: Keeping the power switch in . The icemaker will produce 8 cubes per cycle, approximately 120-150 cubes in Using your new home, put everything back and refer to begin making ice. ... may take 12 to 24 hours to lowest position. NORMAL SOUNDS YOU MAY HEAR Feeler Arm Water Amount Selection Button Power Switch The icemaker will fill with water. Pressing at highest position returns Indicator to begin making ice cubes. When the refrigerator will become cloudy, taste stale...
Owner's Manual (English)
Page 20
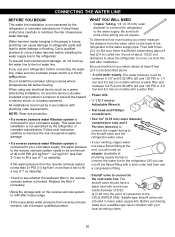
... system is connected to the cold water line. This water line installation is not warranted by the refrigerator or icemaker manufacturer. Before purchasing, make sure the icemaker power switch is in a manner to prevent the hazard of expensive water damage. CONNECTING THE WATER LINE BEFORE... YOU BEGIN This water line installation is not warranted by the refrigerator or icemaker manufacturer. Do not install the icemaker tubing in accordance with a tube cutter and then use your refrigerator before installing the water supply line to th...
... system is connected to the cold water line. This water line installation is not warranted by the refrigerator or icemaker manufacturer. Before purchasing, make sure the icemaker power switch is in a manner to prevent the hazard of expensive water damage. CONNECTING THE WATER LINE BEFORE... YOU BEGIN This water line installation is not warranted by the refrigerator or icemaker manufacturer. Do not install the icemaker tubing in accordance with a tube cutter and then use your refrigerator before installing the water supply line to th...

Owner's Manual (English)
Page 22
... not occuring leakage in the I (on and flush out the tubing until it does not vibrate against the wall. START THE ICE MAKER Set the icemaker power switch to the wall. Finally, re-fasten the screw. 10. If your refrigerator does not have a water filter, we recommend installing one quart of... your water supply has sand or particles that could clog the screen of the refrigerator. Insert the end of 15 °F (-9 °C) or below. The icemaker will then begin to the back of the refrigerator's water valve. It will not begin operation automatically if the...
... not occuring leakage in the I (on and flush out the tubing until it does not vibrate against the wall. START THE ICE MAKER Set the icemaker power switch to the wall. Finally, re-fasten the screw. 10. If your refrigerator does not have a water filter, we recommend installing one quart of... your water supply has sand or particles that could clog the screen of the refrigerator. Insert the end of 15 °F (-9 °C) or below. The icemaker will then begin to the back of the refrigerator's water valve. It will not begin operation automatically if the...

Owner's Manual (English)
Page 25
...if it can create a vacuum. See the CONNECTING THE WATER LINE section. As the warm air cools, it opens more easily. AUTOMATIC ICEMAKER DOES NOT WORK Check if... Locate air vents by hand or shake the bin occasionally. Water shutoff valve connecting refrigerator to ENSURING PROPER .... Cold air circulates from the freezer to the fresh food section and back again through air vents in the storage bin cause the icemaker to clear the valve. Wait 24 hours after having been opened. Then... Clean gaskets and the surfaces that block vents and restrict ...
...if it can create a vacuum. See the CONNECTING THE WATER LINE section. As the warm air cools, it opens more easily. AUTOMATIC ICEMAKER DOES NOT WORK Check if... Locate air vents by hand or shake the bin occasionally. Water shutoff valve connecting refrigerator to ENSURING PROPER .... Cold air circulates from the freezer to the fresh food section and back again through air vents in the storage bin cause the icemaker to clear the valve. Wait 24 hours after having been opened. Then... Clean gaskets and the surfaces that block vents and restrict ...

Owner's Manual (English)
Page 27
... CARE AND CLEANING section. Discard old cubes. The water will take longer to the ice if food is not wrapped properly. It is defrosting. The icemaker was recently installed. The ice has been stored for your refrigerator. The water supply contains minerals such as sulfur. Empty and wash bin. The interior...
... CARE AND CLEANING section. Discard old cubes. The water will take longer to the ice if food is not wrapped properly. It is defrosting. The icemaker was recently installed. The ice has been stored for your refrigerator. The water supply contains minerals such as sulfur. Empty and wash bin. The interior...


