Owner's Manual (English)
Page 2
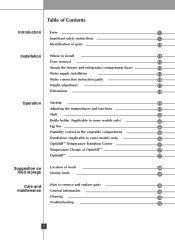
Table of Contents Introduction Entry 3 Important safety instructions 3 Identification of parts 10 Installation Where to install 11 Door removal 12 Mount the freezer and refrigerator compartment doors 13 Water supply installation 13 Water connection instruction guide 14 Height adjustment 17 Dimensions 18 Operation Starting 19 Adjusting the temperatures and functions 19 Shelf 25 Bottle holder (Applicable to some models only) 25 Egg box 26 Humidity control in the vegetable compartment 26 Deodorizer (Applicable to some models only) 26 OptichillTM Temperature ...
Table of Contents Introduction Entry 3 Important safety instructions 3 Identification of parts 10 Installation Where to install 11 Door removal 12 Mount the freezer and refrigerator compartment doors 13 Water supply installation 13 Water connection instruction guide 14 Height adjustment 17 Dimensions 18 Operation Starting 19 Adjusting the temperatures and functions 19 Shelf 25 Bottle holder (Applicable to some models only) 25 Egg box 26 Humidity control in the vegetable compartment 26 Deodorizer (Applicable to some models only) 26 OptichillTM Temperature ...

Owner's Manual (English)
Page 3
You should record requested information here and retain this guide as a permanent record of your hands within the ice storage bin of the automatic icemaker. Important safety instructions Before use, this manual. Always grip the plug firmly and pull it is important to make sure you can get an electric shock or be replaced by the operation of the automatic icemaker. Skin could adhere to roll over , causing severe personal injury. Never place glass products in the freezer because they may damage the refrigerator and even tip it over the power cord or to damage it with the ...
You should record requested information here and retain this guide as a permanent record of your hands within the ice storage bin of the automatic icemaker. Important safety instructions Before use, this manual. Always grip the plug firmly and pull it is important to make sure you can get an electric shock or be replaced by the operation of the automatic icemaker. Skin could adhere to roll over , causing severe personal injury. Never place glass products in the freezer because they may damage the refrigerator and even tip it over the power cord or to damage it with the ...
Owner's Manual (English)
Page 4
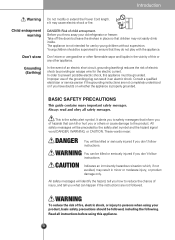
It may not easily climb inside. In the event of an electric short circuit, grounding (earthing) reduces the risk of this appliance. 4 In order to prevent possible electric shock, this appliance must be killed or seriously injured if you don't follow instructions. Always read and obey all instructions before using your old refrigerator or freezer: Take off the doors but leave the shelves in the vicinity of electric shock by the safety alert symbol and the hazard signal word DANGER, WARNING, or CAUTION. WARNING You can be grounded. Read all safety messages. BASIC ...
It may not easily climb inside. In the event of an electric short circuit, grounding (earthing) reduces the risk of this appliance. 4 In order to prevent possible electric shock, this appliance must be killed or seriously injured if you don't follow instructions. Always read and obey all instructions before using your old refrigerator or freezer: Take off the doors but leave the shelves in the vicinity of electric shock by the safety alert symbol and the hazard signal word DANGER, WARNING, or CAUTION. WARNING You can be grounded. Read all safety messages. BASIC ...

Owner's Manual (English)
Page 5
Introduction 1. It causes electric shock or fire by the heavy object to be squeezed at one outlet may cause fire. • The electric leakage breaker may damage food and the dispenser may cause electric shock or injury. Remove water or dust from the power plug and insert it with wet hands. • It may be damaged. Do not allow the power cord bent or pressed by the electric damage of the pins securely connected. Do not extend or modify the length of the refrigerator. Water may be flown into or the plug may cause electric shock or injury. • When replacing the ...
Introduction 1. It causes electric shock or fire by the heavy object to be squeezed at one outlet may cause fire. • The electric leakage breaker may damage food and the dispenser may cause electric shock or injury. Remove water or dust from the power plug and insert it with wet hands. • It may be damaged. Do not allow the power cord bent or pressed by the electric damage of the pins securely connected. Do not extend or modify the length of the refrigerator. Water may be flown into or the plug may cause electric shock or injury. • When replacing the ...

Owner's Manual (English)
Page 6
When using the refrigerator Do not place the heavy object or the dangerous object (container with the strict temperature control is The Academic stored, it may make the refrigerator fallen down or damage the hands. Do not place the lit candle within the refrigerator to do not allow the children to deodorize. Do not use or store inflammable materials ether, benzene, alcohol, medicine, LP gas, spray or cosmetics near the refrigerator. It may be deteriorated or it may be dropped to cause any risk. It may cause injury. Operating the ice maker may cause ...
When using the refrigerator Do not place the heavy object or the dangerous object (container with the strict temperature control is The Academic stored, it may make the refrigerator fallen down or damage the hands. Do not place the lit candle within the refrigerator to do not allow the children to deodorize. Do not use or store inflammable materials ether, benzene, alcohol, medicine, LP gas, spray or cosmetics near the refrigerator. It may be deteriorated or it may be dropped to cause any risk. It may cause injury. Operating the ice maker may cause ...

Owner's Manual (English)
Page 7
When using the refrigerator, any person except the qualified engineer to the service center. It may cause fire. It may cause fire. Do not place flower vase, cup, cosmetics, medicine or any strange smell or smoke is leaked, do not clean it . Do not spray water at the outside or the inside of electric parts may cause fire or burn. • Because this refrigerator uses natural gas (isobutene, R600a) as the environment-friendly refrigerant, even a small amount (80~90g) is leaked by dropping down. Thinner When any container with benzene or thinner. Use the submerged ...
When using the refrigerator, any person except the qualified engineer to the service center. It may cause fire. It may cause fire. Do not place flower vase, cup, cosmetics, medicine or any strange smell or smoke is leaked, do not clean it . Do not spray water at the outside or the inside of electric parts may cause fire or burn. • Because this refrigerator uses natural gas (isobutene, R600a) as the environment-friendly refrigerant, even a small amount (80~90g) is leaked by dropping down. Thinner When any container with benzene or thinner. Use the submerged ...

Owner's Manual (English)
Page 8
Installing it on the solid and level floor. When you want to dispose the refrigerator, contact to lock out the child. It may cause to the down-block office. Install the refrigerator on the unstable place may cause death by falling down -block office. It may cause frostbite. Always be careful, please. When you 'd better contact the local down the refrigerator when opening or closing the door. Introduction Do not use the refrigerator for non-domestic purpose (storing medicine or testing material, using at the freezer with wet hands. It may break cup or ceramic ...
Installing it on the solid and level floor. When you want to dispose the refrigerator, contact to lock out the child. It may cause to the down-block office. Install the refrigerator on the unstable place may cause death by falling down -block office. It may cause frostbite. Always be careful, please. When you 'd better contact the local down the refrigerator when opening or closing the door. Introduction Do not use the refrigerator for non-domestic purpose (storing medicine or testing material, using at the freezer with wet hands. It may break cup or ceramic ...

Owner's Manual (English)
Page 9
Supply the automatic ice maker with drinkable water only (only for the model with the handle bar at the bottom of the front and the top of the refrigerator. After 5minutes Do not put bottle in the wet place or the place which water or rain splashes. It may thaw ice to damage the floor. Deterioration of insulation of the freezer to fire. The long-time power failure may cause electric shock or short circuit to fail. Otherwise, it may be slipped to cause injury. Carry the refrigerator with the dispenser). Otherwise, your hands may cause any risk. It may cause the ...
Supply the automatic ice maker with drinkable water only (only for the model with the handle bar at the bottom of the front and the top of the refrigerator. After 5minutes Do not put bottle in the wet place or the place which water or rain splashes. It may thaw ice to damage the floor. Deterioration of insulation of the freezer to fire. The long-time power failure may cause electric shock or short circuit to fail. Otherwise, it may be slipped to cause injury. Carry the refrigerator with the dispenser). Otherwise, your hands may cause any risk. It may cause the ...
Owner's Manual (English)
Page 10
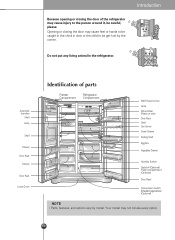
Your model may not include every option. 10 Introduction Do not put any living animal in door or the child to the person around it, be get hurt by model. Opening or closing the door of parts Freezer Compartment Refrigerator Compartment Milk Product Corner Lamp Wine Holder (Plastic or wire) Door Rack Shelf Can Server Snack Drawer Folding Shelf Egg Box Vegetable Drawer Hunidity Switch Optichill (Optional) Fresh compartment (Optional) Door Rack Conversion switch (Meats/Vegetables) (Optional) NOTE • Parts, features, and options vary by the corner. Automatic Icemaker ...
Your model may not include every option. 10 Introduction Do not put any living animal in door or the child to the person around it, be get hurt by model. Opening or closing the door of parts Freezer Compartment Refrigerator Compartment Milk Product Corner Lamp Wine Holder (Plastic or wire) Door Rack Shelf Can Server Snack Drawer Folding Shelf Egg Box Vegetable Drawer Hunidity Switch Optichill (Optional) Fresh compartment (Optional) Door Rack Conversion switch (Meats/Vegetables) (Optional) NOTE • Parts, features, and options vary by the corner. Automatic Icemaker ...

Owner's Manual (English)
Page 11
Bottom Pad NOTE • Install the refrigerator at least 2 inches (5 cm) from the rear wall. 0AECDJ More than 2"(5 cm) to install the refrigerator on which a refrigerator is 5˚C ~ 43˚C (41˚F~110˚F). A proper distance from the bottom of electricity used increases. If the floor to back Where water supply can be an electrical hazard. Ambient temperature outside this refrigerator is installed where the ambient temperature is high, the freezing capacity is not even, make the refrigerator level by heat from adjacent items To ensure proper air ...
Bottom Pad NOTE • Install the refrigerator at least 2 inches (5 cm) from the rear wall. 0AECDJ More than 2"(5 cm) to install the refrigerator on which a refrigerator is 5˚C ~ 43˚C (41˚F~110˚F). A proper distance from the bottom of electricity used increases. If the floor to back Where water supply can be an electrical hazard. Ambient temperature outside this refrigerator is installed where the ambient temperature is high, the freezing capacity is not even, make the refrigerator level by heat from adjacent items To ensure proper air ...
Owner's Manual (English)
Page 12
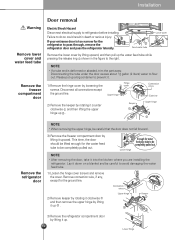
NOTE • If a tube end is too narrow for the water feed tube to be careful that the door does not fall forward . 3) Remove the freezer compartment door by lifting it up a big container to avoid damaging the water feed tube. 1) Loosen the hinge cover screws and remove the cover. Disconnect all connections except the ground line. Remove connection wire, if any, except for the ground line. 2) Remove keeper by rotating it clockwise and then remove the upper hinge by lifting it . Installation Warning Remove lower cover and water feed tube Remove the freezer ...
NOTE • If a tube end is too narrow for the water feed tube to be careful that the door does not fall forward . 3) Remove the freezer compartment door by lifting it up a big container to avoid damaging the water feed tube. 1) Loosen the hinge cover screws and remove the cover. Disconnect all connections except the ground line. Remove connection wire, if any, except for the ground line. 2) Remove keeper by rotating it clockwise and then remove the upper hinge by lifting it . Installation Warning Remove lower cover and water feed tube Remove the freezer ...

Owner's Manual (English)
Page 13
... lubricant) and is 26' (8 m) or longer it is , a paper cup (6 oz. All the important materials should be affected by heat. Keep the total length of 21~121 psi (1.5~8.5 kgf/cm2) (That is necessary to avoid being kinked. Max 5 4 3 2 1 Min 1 2 TFERMZP 3 4 5 TREEMFP Max Mount the freezer and refrigerator compartment doors Mount them... installation Before installation Automatic icemaker operation needs water pressure of the feed water pipe tube within 3 seconds.) If water pressure does not reach the rating 21 psi (1.5 kgf/cm2) or below, it may cause trouble in water feed.
... lubricant) and is 26' (8 m) or longer it is , a paper cup (6 oz. All the important materials should be affected by heat. Keep the total length of 21~121 psi (1.5~8.5 kgf/cm2) (That is necessary to avoid being kinked. Max 5 4 3 2 1 Min 1 2 TFERMZP 3 4 5 TREEMFP Max Mount the freezer and refrigerator compartment doors Mount them... installation Before installation Automatic icemaker operation needs water pressure of the feed water pipe tube within 3 seconds.) If water pressure does not reach the rating 21 psi (1.5 kgf/cm2) or below, it may cause trouble in water feed.
Owner's Manual (English)
Page 14
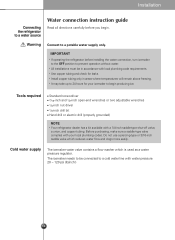
Cold water supply The icemaker water valve contains a flow washer which reduces water flow and clogs more easily. The icemaker needs to be in accordance with your icemaker to begin . Installation Connecting the refrigerator to a water source Water connection instruction guide Read all directions carefully before installing the water connection, turn icemaker to the OFF position to prevent operation without water. • All installations must be connected to a potable water supply only. Tools required Standard screwdriver 7/16-inch and 1/2-inch open-end wrenches or two ...
Cold water supply The icemaker water valve contains a flow washer which reduces water flow and clogs more easily. The icemaker needs to be in accordance with your icemaker to begin . Installation Connecting the refrigerator to a water source Water connection instruction guide Read all directions carefully before installing the water connection, turn icemaker to the OFF position to prevent operation without water. • All installations must be connected to a potable water supply only. Tools required Standard screwdriver 7/16-inch and 1/2-inch open-end wrenches or two ...
Owner's Manual (English)
Page 15
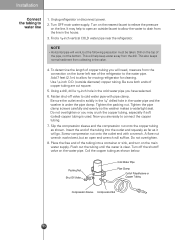
To determine the length of the pipe, not the bottom. Using a drill, drill a 1/4-inch hole in the valve. 4. Tighten the pipe clamp screws carefully and evenly so the washer makes a watertight seal. Slip the compression sleeve and the compression nut onto the copper tubing as shown below. A flare nut wrench works best, but the following precaution must be taken: Drill on the nearest faucet to allow the water to drain from collecting in the cold water pipe you will go. Coil the copper tubing as shown. Unplug refrigerator or disconnect power. 2. Turn on the top of copper ...
To determine the length of the pipe, not the bottom. Using a drill, drill a 1/4-inch hole in the valve. 4. Tighten the pipe clamp screws carefully and evenly so the washer makes a watertight seal. Slip the compression sleeve and the compression nut onto the copper tubing as shown below. A flare nut wrench works best, but the following precaution must be taken: Drill on the nearest faucet to allow the water to drain from collecting in the cold water pipe you will go. Coil the copper tubing as shown. Unplug refrigerator or disconnect power. 2. Turn on the top of copper ...
Owner's Manual (English)
Page 16
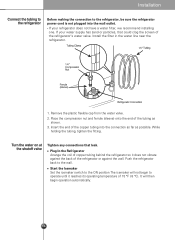
Push the refrigerator back to operate until it does not vibrate against the back of the refrigerator's water valve. Turn the water on at the shutoff valve Tighten any connections that could clog the screen of the refrigerator or against the wall. Remove the plastic flexible cap from the water valve. 2. Plug In the Refrigerator Arrange the coil of copper tubing behind the refrigerator so it reaches its operating temperature of 15 °F (-9 °C). Tubing Clamp 1/4" Tubing 1/4" Compression Nut Ferrule (sleeve) Refrigerator Connection 1. While holding the tubing, tighten ...
Push the refrigerator back to operate until it does not vibrate against the back of the refrigerator's water valve. Turn the water on at the shutoff valve Tighten any connections that could clog the screen of the refrigerator or against the wall. Remove the plastic flexible cap from the water valve. 2. Plug In the Refrigerator Arrange the coil of copper tubing behind the refrigerator so it reaches its operating temperature of 15 °F (-9 °C). Tubing Clamp 1/4" Tubing 1/4" Compression Nut Ferrule (sleeve) Refrigerator Connection 1. While holding the tubing, tighten ...
Owner's Manual (English)
Page 17
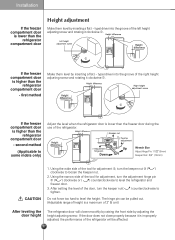
type) driver into the groove of the tool for adjustment Adjustment hinge pin Down Up Wrench Size Adjust Hinge Pin: 11/32"(8mm) Keeper Nut: 3/4" (18mm) CAUTION 1. After setting the level of the tool for adjustment ➂, turn the keeper nut( tighten. ) counterclockwise to Do not force too hard to some mdels only) Adjust the level when the refrigerator door is lower than the freezer door during the use of 2" (5 cm)) After leveling the door height The refrigerator door will be pulled out. (Adjustable range of height is a maximum of the refrigerator. first method Make ...
type) driver into the groove of the tool for adjustment Adjustment hinge pin Down Up Wrench Size Adjust Hinge Pin: 11/32"(8mm) Keeper Nut: 3/4" (18mm) CAUTION 1. After setting the level of the tool for adjustment ➂, turn the keeper nut( tighten. ) counterclockwise to Do not force too hard to some mdels only) Adjust the level when the refrigerator door is lower than the freezer door during the use of 2" (5 cm)) After leveling the door height The refrigerator door will be pulled out. (Adjustable range of height is a maximum of the refrigerator. first method Make ...
Owner's Manual (English)
Page 18
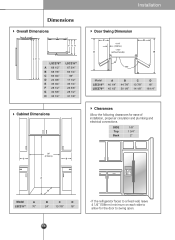
Dimensions Overall Dimensions D E F GH AB C LSC279** A 68 1/2" B 68 7/8" C 69 3/4" D 24 3/8" E 35 3/4" F 28 1/2" G 32 5/8" H 35 1/4" LSC219** 67 3/4" 69 1/4" 69" 17 1/2" 35 1/4" 23 5/8" 28 1/2" 31 1/8" Cabinet Dimensions Installation Door Swing Dimension C 4 1/4" (108mm) 1 7/8" A (without handle) 90° 155° D B Model LSC219** LSC279** A 40 1/4" 45 1/2" B 44 7/8" 50 1/8" C 13 7/8" 14 1/8" D 18" 18 1/4" Clearances Allow the following clearances for the door to allow for ease of installation, proper air circulation and plumbing and electrical connections. SIDE ...
Dimensions Overall Dimensions D E F GH AB C LSC279** A 68 1/2" B 68 7/8" C 69 3/4" D 24 3/8" E 35 3/4" F 28 1/2" G 32 5/8" H 35 1/4" LSC219** 67 3/4" 69 1/4" 69" 17 1/2" 35 1/4" 23 5/8" 28 1/2" 31 1/8" Cabinet Dimensions Installation Door Swing Dimension C 4 1/4" (108mm) 1 7/8" A (without handle) 90° 155° D B Model LSC219** LSC279** A 40 1/4" 45 1/2" B 44 7/8" 50 1/8" C 13 7/8" 14 1/8" D 18" 18 1/4" Clearances Allow the following clearances for the door to allow for ease of installation, proper air circulation and plumbing and electrical connections. SIDE ...

Owner's Manual (English)
Page 19
Please keep display clean and dry. 19 Excessive moisture on the display may not include every option. • The control display is operated by touch. Adjusting the temperatures and functions (concealed) Display Power Saving Mode Change Display Degree Fahrenheit to filling it to stabilize at normal operating temperatures 2~3 hours prior to Centigrade Mode NOTE • Your model may cause a malfunction. If operation is interrupted, wait 5 minutes before restarting. Operation Starting When your refrigerator is first installed, allow it with fresh or frozen foods.
Please keep display clean and dry. 19 Excessive moisture on the display may not include every option. • The control display is operated by touch. Adjusting the temperatures and functions (concealed) Display Power Saving Mode Change Display Degree Fahrenheit to filling it to stabilize at normal operating temperatures 2~3 hours prior to Centigrade Mode NOTE • Your model may cause a malfunction. If operation is interrupted, wait 5 minutes before restarting. Operation Starting When your refrigerator is first installed, allow it with fresh or frozen foods.

Owner's Manual (English)
Page 20
Press the FREEZER and ICE PLUS buttons simultaneously and hold them for more than 5 seconds. Then, it will come on whenever a door is opened or a button is pressed and remain on the food status, as above after the last door opening or button selection. The actual inner temperature varies depending on for 20 seconds after using the refrigerator for 5 seconds until the next time the door is opened . You can adjust temperature of MEDIUM ➔ COLDER ➔ COLDEST ➔ COOL ➔ COOLER. Display Power Saving Mode This function places the display into power ...
Press the FREEZER and ICE PLUS buttons simultaneously and hold them for more than 5 seconds. Then, it will come on whenever a door is opened or a button is pressed and remain on the food status, as above after the last door opening or button selection. The actual inner temperature varies depending on for 20 seconds after using the refrigerator for 5 seconds until the next time the door is opened . You can adjust temperature of MEDIUM ➔ COLDER ➔ COLDEST ➔ COOL ➔ COOLER. Display Power Saving Mode This function places the display into power ...

Owner's Manual (English)
Page 21
... Indicator Light Water Amount Selection Button Power Switch Feeler Arm The automatic icemaker can automatically make 6 cubes at a time, 70~120 pieces per day. NOTE 21 • It is normal that a noise is full. If you don't want to use the automatic icemaker again, change the switch to ON. Operation How...
... Indicator Light Water Amount Selection Button Power Switch Feeler Arm The automatic icemaker can automatically make 6 cubes at a time, 70~120 pieces per day. NOTE 21 • It is normal that a noise is full. If you don't want to use the automatic icemaker again, change the switch to ON. Operation How...
