
Owner's Manual
Page 2
... Entry 3 Important Safety Instruction 3 Identification of Parts 6 Installation Where to Install 6 Door Removal 8 Door Replacement 9 Water Pipe Installation 9 Water Connection Instruction Guide 9 Operation Instruction Guide 11 Height Adjustment 12 Operation Starting 13 Adjusting the Temperatures and functions 13 (Dispenser/Automatic Icemaker) Shelf 18 Wine Holder (Applicable to some models only) 18 Egg...
... Entry 3 Important Safety Instruction 3 Identification of Parts 6 Installation Where to Install 6 Door Removal 8 Door Replacement 9 Water Pipe Installation 9 Water Connection Instruction Guide 9 Operation Instruction Guide 11 Height Adjustment 12 Operation Starting 13 Adjusting the Temperatures and functions 13 (Dispenser/Automatic Icemaker) Shelf 18 Wine Holder (Applicable to some models only) 18 Egg...

Owner's Manual
Page 7
... a water supply can be easily connected in a wet or damp area may cause rust and may be easily connected between the dispenser and automatic ice maker may cause product malfunction. Installation Bottom Pad NOTE • Install the refrigerator at a place where the ambient...the door. 3. Where water supply can be an electrical hazard. Entirely remove the protection film adhered to remove protection film(Some Model) 1. Also, the tube between the automatic ice maker and dispenser. Ambient temperature outside this refrigerator is installed where the ambient temperature is...
... a water supply can be easily connected in a wet or damp area may cause rust and may be easily connected between the dispenser and automatic ice maker may cause product malfunction. Installation Bottom Pad NOTE • Install the refrigerator at a place where the ambient...the door. 3. Where water supply can be an electrical hazard. Entirely remove the protection film adhered to remove protection film(Some Model) 1. Also, the tube between the automatic ice maker and dispenser. Ambient temperature outside this refrigerator is installed where the ambient temperature is...

Owner's Manual
Page 9
NOTE: Check the direction of removal after the refrigerator is , a 7 oz. Connecting the Refrigerator to a Water Source Tools Required Screwdriver Water Connection Instruction Guide Read all directions carefully before installing the ... and cool water feed. paper cup will need to 24 hours for installation. If the tube is longer than 40 feet, the icemaker and water dispenser will remain above freezing. • It may take up to buy: a 1/4-inch saddle-type shut off valve, a union, and copper tubing. Install the water feed...
NOTE: Check the direction of removal after the refrigerator is , a 7 oz. Connecting the Refrigerator to a Water Source Tools Required Screwdriver Water Connection Instruction Guide Read all directions carefully before installing the ... and cool water feed. paper cup will need to 24 hours for installation. If the tube is longer than 40 feet, the icemaker and water dispenser will remain above freezing. • It may take up to buy: a 1/4-inch saddle-type shut off valve, a union, and copper tubing. Install the water feed...
Owner's Manual
Page 11
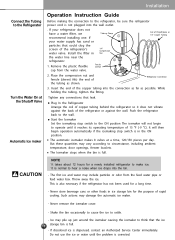
... of 15 °F (-9 °C). Such actions may vary according to circumstance, including ambient temperature, door openings, freezer load.etc. Never remove the icemaker cover. - Refrigerator Connection 3. But these quantities may damage the automatic ice maker. - Coil of the refrigerator's water valve. ... occasionally to cause the ice to the wall. Push the refrigerator back to settle. - The Icemaker stops when the bin is dispensed, contact an Authorized Service Center immediately. Throw away the ice. If discolored ice is full. If Tubi ng Clamp 1 your ...
... of 15 °F (-9 °C). Such actions may vary according to circumstance, including ambient temperature, door openings, freezer load.etc. Never remove the icemaker cover. - Refrigerator Connection 3. But these quantities may damage the automatic ice maker. - Coil of the refrigerator's water valve. ... occasionally to cause the ice to the wall. Push the refrigerator back to settle. - The Icemaker stops when the bin is dispensed, contact an Authorized Service Center immediately. Throw away the ice. If discolored ice is full. If Tubi ng Clamp 1 your ...

Owner's Manual
Page 17
... not been used . Shake the ice bin occasionally to level the ice in ice passage and, thus, the refrigerator may burst. Never remove the ice maker cover. Water filter needs replacement once every six months. Sometimes the ice piles up near the icemaker, causing the icemaker ...comes on to let you know when to Classification Filter Status Display In initial Power On / Filter RESET FILTER Replace indicator light on the dispenser. Never use too narrow or deep glass. Operation 6 Filter Condition (filter replacement cycle) Display Function LED There is added to existing liquid...
... not been used . Shake the ice bin occasionally to level the ice in ice passage and, thus, the refrigerator may burst. Never remove the ice maker cover. Water filter needs replacement once every six months. Sometimes the ice piles up near the icemaker, causing the icemaker ...comes on to let you know when to Classification Filter Status Display In initial Power On / Filter RESET FILTER Replace indicator light on the dispenser. Never use too narrow or deep glass. Operation 6 Filter Condition (filter replacement cycle) Display Function LED There is added to existing liquid...

Owner's Manual
Page 21
...pulling the front side of water collector cover and dry it with a cloth. 2 1 4 3 21 Freezer Compartment Shelf To remove a shelf, lift the left part of assembly. EXPRESS/JET FRZ DISPENSER FREEZER REFRIGERATER FILTER/LIGHT LOCK 1 2 Door Rack and Lift the door rack holding both hands to... Max. 15 W bulb for refrigerator is used and can be purchased at a service center. 1 2 3 Dispenser Lamp Seperate the lamp by pulling it out, and then remove the lamp. Turn the bulb counterclockwise. It is recommended not to Dismantle Parts Care and Maintenance Care and Maintenance Freezer...
...pulling the front side of water collector cover and dry it with a cloth. 2 1 4 3 21 Freezer Compartment Shelf To remove a shelf, lift the left part of assembly. EXPRESS/JET FRZ DISPENSER FREEZER REFRIGERATER FILTER/LIGHT LOCK 1 2 Door Rack and Lift the door rack holding both hands to... Max. 15 W bulb for refrigerator is used and can be purchased at a service center. 1 2 3 Dispenser Lamp Seperate the lamp by pulling it out, and then remove the lamp. Turn the bulb counterclockwise. It is recommended not to Dismantle Parts Care and Maintenance Care and Maintenance Freezer...

Owner's Manual
Page 22
... out of place. You will hear the snap when it 's packaging and remove protective cover from the refrigerator door when removing the vegetable compartment, snack drawer, and refreshment center cover. Dispense water through the water dispenser for refrigerator is recommended that you can be purchased at a service center. ... amount of the cartridge counter clockwise. If you replace the filter when the water filter indicator light turns on or your water dispenser or ice maker decreases noticeably. Rotate the knob of water(around 25cc) to the front , lift the front part of the...
... out of place. You will hear the snap when it 's packaging and remove protective cover from the refrigerator door when removing the vegetable compartment, snack drawer, and refreshment center cover. Dispense water through the water dispenser for refrigerator is recommended that you can be purchased at a service center. ... amount of the cartridge counter clockwise. If you replace the filter when the water filter indicator light turns on or your water dispenser or ice maker decreases noticeably. Rotate the knob of water(around 25cc) to the front , lift the front part of the...
Owner's Manual
Page 28
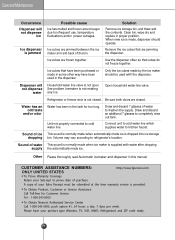
... the ice cubes made by the ice maker should operate. Solution Remove ice storage bin, and thaw and the contents. Clean bin, wipe dry and replace in this manual. Dispenser will not dispense ice Ice dispenser is not closed . Unit not properly connected to kitchen faucet. Connect ...the bin. Care and Maintenance Occurrence Dispenser will not dispense water Household water line valve is dropped into ice storage dropping bin. Use the dispenser often so that have been purchased or made ice is not open. Ice cubes are closed . Remove the ice cubes that are jammed ...
... the ice cubes made by the ice maker should operate. Solution Remove ice storage bin, and thaw and the contents. Clean bin, wipe dry and replace in this manual. Dispenser will not dispense ice Ice dispenser is not closed . Unit not properly connected to kitchen faucet. Connect ...the bin. Care and Maintenance Occurrence Dispenser will not dispense water Household water line valve is dropped into ice storage dropping bin. Use the dispenser often so that have been purchased or made ice is not open. Ice cubes are closed . Remove the ice cubes that are jammed ...


