
Owners Manual
Page 7
... manufacturer without prior notice for easy access to commonly used food items. g LED Light Lights up when the freezer door is only available on some models. h Refrigerator Fresh food compartment i Freezer Frozen food compartment c EZ Handle Easily opens the freezer door. b Filtered Water and Ice Dispenser Dispenses purified water and ice...
... manufacturer without prior notice for easy access to commonly used food items. g LED Light Lights up when the freezer door is only available on some models. h Refrigerator Fresh food compartment i Freezer Frozen food compartment c EZ Handle Easily opens the freezer door. b Filtered Water and Ice Dispenser Dispenses purified water and ice...
Owners Manual
Page 9
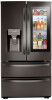
... pad. j Adjustable Refrigerator Shelf The refrigerator shelves are closed. ENGLISH PRODUCT OVERVIEW 9 d In-Door Icemaker (Refrigerator) This is where ice is only available on some models. f Humidity Controlled Crisper Helps vegetables and fruit to meet individual storage needs. h Auto-Closing Hinge† The refrigerator doors and freezer drawers close automatically when...
... pad. j Adjustable Refrigerator Shelf The refrigerator shelves are closed. ENGLISH PRODUCT OVERVIEW 9 d In-Door Icemaker (Refrigerator) This is where ice is only available on some models. f Humidity Controlled Crisper Helps vegetables and fruit to meet individual storage needs. h Auto-Closing Hinge† The refrigerator doors and freezer drawers close automatically when...
Owners Manual
Page 10
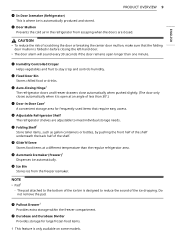
water pressure: 20 - 120 psi (138 - 827 kPa) Model LFXS28596* LMXS28596* LMRS28596* LFXS26596* LFXC22596* Description Standard-depth, InstaView Door-in-Door French door refrigerator, bottom freezer, Sabbath Mode Standard-depth, InstaView Door-in-Door ...
water pressure: 20 - 120 psi (138 - 827 kPa) Model LFXS28596* LMXS28596* LMRS28596* LFXS26596* LFXC22596* Description Standard-depth, InstaView Door-in-Door French door refrigerator, bottom freezer, Sabbath Mode Standard-depth, InstaView Door-in-Door ...

Owners Manual
Page 12
... products can result in the shipping position. Failure to do so can damage the surface of the refrigerator. • To remove any warning labels, the model and serial number label, or the Tech Sheet that is heavy. 12 INSTALLATION Unpacking the Refrigerator WARNING • Use two or more people to move...
... products can result in the shipping position. Failure to do so can damage the surface of the refrigerator. • To remove any warning labels, the model and serial number label, or the Tech Sheet that is heavy. 12 INSTALLATION Unpacking the Refrigerator WARNING • Use two or more people to move...
Owners Manual
Page 16
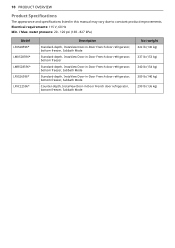
... Drawers If the entrance door is too narrow for the refrigerator to detach the water supply line as the handle may vary depending on some models. WARNING • Use two or more people to remove and install the refrigerator doors and freezer drawer. • Disconnect the electrical supply ...8226; Do not hold the handle when removing or replacing the doors and drawer as shown. • Connections may vary by model. † This feature is only available on the model. 1 The water supply is connected to the refrigerator before installing. • Do not put hands, feet or other objects ...
... Drawers If the entrance door is too narrow for the refrigerator to detach the water supply line as the handle may vary depending on some models. WARNING • Use two or more people to remove and install the refrigerator doors and freezer drawer. • Disconnect the electrical supply ...8226; Do not hold the handle when removing or replacing the doors and drawer as shown. • Connections may vary by model. † This feature is only available on the model. 1 The water supply is connected to the refrigerator before installing. • Do not put hands, feet or other objects ...
Owners Manual
Page 17
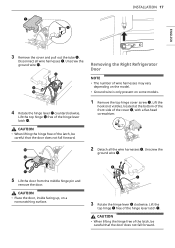
...ENGLISH 3 Remove the cover and pull out the tube h. CAUTION • When lifting the hinge free of wire harnesses may vary depending on the model. • Ground wire is only present on a nonscratching surface. 3 Rotate the hinge lever e clockwise. CAUTION • Place the door, inside facing up,... on some models. 1 Remove the top hinge cover screw a. Unscrew the ground wire d. 5 Lift the door from the middle hinge pin and remove the door. Unscrew...
...ENGLISH 3 Remove the cover and pull out the tube h. CAUTION • When lifting the hinge free of wire harnesses may vary depending on the model. • Ground wire is only present on a nonscratching surface. 3 Rotate the hinge lever e clockwise. CAUTION • Place the door, inside facing up,... on some models. 1 Remove the top hinge cover screw a. Unscrew the ground wire d. 5 Lift the door from the middle hinge pin and remove the door. Unscrew...
Owners Manual
Page 18
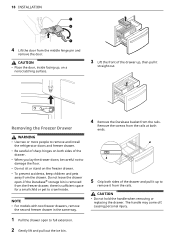
... a small child or pet to full extension. 2 Gently lift and pull out the ice bin. 4 Remove the Durabase basket from the drawer. NOTE • For models with two freezer drawers, remove the second freezer drawer in the same way. 1 Pull the drawer open . Do not leave the drawer open to crawl...
... a small child or pet to full extension. 2 Gently lift and pull out the ice bin. 4 Remove the Durabase basket from the drawer. NOTE • For models with two freezer drawers, remove the second freezer drawer in the same way. 1 Pull the drawer open . Do not leave the drawer open to crawl...

Owners Manual
Page 19
... both rails and push them in simultaneously. 3 Lower the door into the rail tabs located on both sides. Assembling the Freezer Drawer NOTE • For models with two freezer drawers, assemble the second freezer drawer in the same way. 1 Pull out both rails simultaneously, until they are fully extended. 4 Insert the...
... both rails and push them in simultaneously. 3 Lower the door into the rail tabs located on both sides. Assembling the Freezer Drawer NOTE • For models with two freezer drawers, assemble the second freezer drawer in the same way. 1 Pull out both rails simultaneously, until they are fully extended. 4 Insert the...

Owners Manual
Page 20
... the hinge a over the hinge lever latch b and slot it into place. NOTE • The number of wire harnesses may vary depending on some models. 1 Make sure that the plastic sleeve is inserted in the bottom of the door. Assembling the Left Refrigerator Door CAUTION • Install the left refrigerator... door after the right door is inserted in the bottom of wire harnesses may vary depending on the model. • Ground wire is only present on the model. 1 Make sure that the plastic sleeve is installed. 2 Fit the hinge a over the hinge lever latch b and slot ...
... the hinge a over the hinge lever latch b and slot it into place. NOTE • The number of wire harnesses may vary depending on some models. 1 Make sure that the plastic sleeve is inserted in the bottom of the door. Assembling the Left Refrigerator Door CAUTION • Install the left refrigerator... door after the right door is inserted in the bottom of wire harnesses may vary depending on the model. • Ground wire is only present on the model. 1 Make sure that the plastic sleeve is installed. 2 Fit the hinge a over the hinge lever latch b and slot ...

Owners Manual
Page 21
... ENGLISH Type B† INSTALLATION 21 3 Connect all the wire harnesses and the ground screw. Insert and tighten the cover screw j. Insert the clip on some models. 6 Set the cover i in place. e Collet f Tube g Insert line h Clip • Gently press the collet and insert the tube until only...tube. 5 Hold the water supply connection and gently push in the collet d to fasten the tube in place. • Connections may vary by model. † This feature is only available on the joint to connect the water supply line as shown. Type C† NOTE • Disassembling/Assembling...
... ENGLISH Type B† INSTALLATION 21 3 Connect all the wire harnesses and the ground screw. Insert and tighten the cover screw j. Insert the clip on some models. 6 Set the cover i in place. e Collet f Tube g Insert line h Clip • Gently press the collet and insert the tube until only...tube. 5 Hold the water supply connection and gently push in the collet d to fasten the tube in place. • Connections may vary by model. † This feature is only available on the joint to connect the water supply line as shown. Type C† NOTE • Disassembling/Assembling...
Owners Manual
Page 22
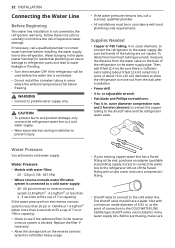
or adjustable wrench. • Flat-blade and Phillips screwdrivers. • Two ¼ in . Water Pressure • Models with a tube cutter and use a compression fitting. • Shutoff valve to connect to the cold water line. Follow these instructions carefully to minimize the risk ...
or adjustable wrench. • Flat-blade and Phillips screwdrivers. • Two ¼ in . Water Pressure • Models with a tube cutter and use a compression fitting. • Shutoff valve to connect to the cold water line. Follow these instructions carefully to minimize the risk ...
Owners Manual
Page 25
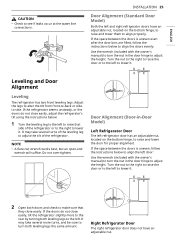
... is uneven, follow the instructions below to align the left door: Use the wrench (included with the owner's manual) to turn the nut in -Door Model) Left Refrigerator Door The left and right refrigerator doors have an adjustable nut. INSTALLATION 25 Door Alignment (Standard Door... Model) Both the left refrigerator door has an adjustable nut, located on the bottom hinge, to raise and lower them to the rear by turning both ...
... is uneven, follow the instructions below to align the left door: Use the wrench (included with the owner's manual) to turn the nut in -Door Model) Left Refrigerator Door The left and right refrigerator doors have an adjustable nut. INSTALLATION 25 Door Alignment (Standard Door... Model) Both the left refrigerator door has an adjustable nut, located on the bottom hinge, to raise and lower them to the rear by turning both ...

Owners Manual
Page 27
... dust that contains alcohol, a flammable liquid or an abrasive when removing any adhesive tape from the refrigerator. Remove adhesive residue by wiping it off the model or serial number label or the technical information on while the refrigerator is not connected to remain inside the refrigerator. This is turned on the...
... dust that contains alcohol, a flammable liquid or an abrasive when removing any adhesive tape from the refrigerator. Remove adhesive residue by wiping it off the model or serial number label or the technical information on while the refrigerator is not connected to remain inside the refrigerator. This is turned on the...

Owners Manual
Page 28
... vice versa) press and hold the Refrigerator and Freezer buttons simultaneously for 24 hours. 28 OPERATION Control Panel Depending on the model, some of the following functions may differ from model to model. Control Panel Features a Ice Plus This function increases both ice making and freezing capabilities. Stop the function manually by pressing...
... vice versa) press and hold the Refrigerator and Freezer buttons simultaneously for 24 hours. 28 OPERATION Control Panel Depending on the model, some of the following functions may differ from model to model. Control Panel Features a Ice Plus This function increases both ice making and freezing capabilities. Stop the function manually by pressing...
Owners Manual
Page 29
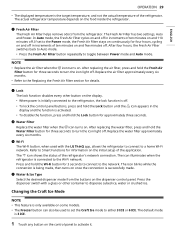
... to the network. The icon illuminates when the refrigerator is connected to toggle between Power mode and Auto mode. Press the dispenser switch with the LG ThinQ app, allows the refrigerator to connect to either 3 ICE or 6 ICE. If set the Craft Ice mode to a home Wi-Fi network. NOTE &#...; This feature is only available on the dispenser control panel. e Fresh Air Filter The Fresh Air Filter helps remove odors from the buttons on some models. • The Freezer button can also be used with a glass or other button on the display. • When power is initially connected to the ...
... to the network. The icon illuminates when the refrigerator is connected to toggle between Power mode and Auto mode. Press the dispenser switch with the LG ThinQ app, allows the refrigerator to connect to either 3 ICE or 6 ICE. If set the Craft Ice mode to a home Wi-Fi network. NOTE &#...; This feature is only available on the dispenser control panel. e Fresh Air Filter The Fresh Air Filter helps remove odors from the buttons on some models. • The Freezer button can also be used with a glass or other button on the display. • When power is initially connected to the ...
Owners Manual
Page 31
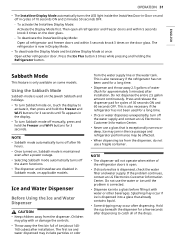
... seconds OFF. The first ice and water dispensed may include particles or odor from the dispenser. If the problem continues, contact an LG Electronics Customer Information Center. Splashing may occur after installation. Sabbath Mode This feature is maintained even after 96 hours. • Once ...; If discolored ice is corrected. • Dispense ice into a glass that is also necessary if the refrigerator has not been used on some models. Do not dispense the entire 2.5 gallon amount continuously. This is also necessary if the refrigerator has not been used for a long time. &#...
... seconds OFF. The first ice and water dispensed may include particles or odor from the dispenser. If the problem continues, contact an LG Electronics Customer Information Center. Splashing may occur after installation. Sabbath Mode This feature is maintained even after 96 hours. • Once ...; If discolored ice is corrected. • Dispense ice into a glass that is also necessary if the refrigerator has not been used on some models. Do not dispense the entire 2.5 gallon amount continuously. This is also necessary if the refrigerator has not been used for a long time. &#...

Owners Manual
Page 34
... • In the event of ice dropping into the ice bin is normal. • If the ice bin is only available on some models. The function increases both ice making and freezing capabilities. This amount may clump together and be difficult to the environment (ambient temperature around the appliance..., frequency of the door being opened , amount of ice may vary depending on some models. NOTE • Throw away the first bin full of ice after the appliance is only available on model purchased. Type A† • The amount and shape of food stored in the ice ...
... • In the event of ice dropping into the ice bin is normal. • If the ice bin is only available on some models. The function increases both ice making and freezing capabilities. This amount may clump together and be difficult to the environment (ambient temperature around the appliance..., frequency of the door being opened , amount of ice may vary depending on some models. NOTE • Throw away the first bin full of ice after the appliance is only available on model purchased. Type A† • The amount and shape of food stored in the ice ...

Owners Manual
Page 37
NOTE • The Door-in-Door feature is only available on some models. 5 Slightly tilt up the front, insert the crisper into the frame and push it detaches from the back wall of the unit. This can control ... letting you easily control humidity inside the drawer. OPERATION 37 Humidity Controlled Crispers Using the Humidity Controlled Crispers This feature is only available on some models. ENGLISH • If the refrigerator is kept in a hot and humid place, frequent opening of the door or storing a lot of vegetables in the refrigerator...
NOTE • The Door-in-Door feature is only available on some models. 5 Slightly tilt up the front, insert the crisper into the frame and push it detaches from the back wall of the unit. This can control ... letting you easily control humidity inside the drawer. OPERATION 37 Humidity Controlled Crispers Using the Humidity Controlled Crispers This feature is only available on some models. ENGLISH • If the refrigerator is kept in a hot and humid place, frequent opening of the door or storing a lot of vegetables in the refrigerator...

Owners Manual
Page 38
... the Glide'N'Serve 1 To remove the Glide'N'Serve, pull out the drawer until it stops, lift the front up the tabs on some models. Using the Variable Temperature Control This feature is only available on the Door-in-Door case with a variable temperature control that require high humidity...to fit items of the shelf This feature provides storage space with the slots on some models. 38 OPERATION 6 Line up , and pull straight out. CAUTION • Do not place any items on some models. Refrigerator Shelves The shelves in -Door feature is only available on the Glide'N'Serve cover...
... the Glide'N'Serve 1 To remove the Glide'N'Serve, pull out the drawer until it stops, lift the front up the tabs on some models. Using the Variable Temperature Control This feature is only available on the Door-in-Door case with a variable temperature control that require high humidity...to fit items of the shelf This feature provides storage space with the slots on some models. 38 OPERATION 6 Line up , and pull straight out. CAUTION • Do not place any items on some models. Refrigerator Shelves The shelves in -Door feature is only available on the Glide'N'Serve cover...

Owners Manual
Page 39
Shelves may result in the shelf falling or spilled food. InstaView Door-in -Door Compartment The InstaView function on some models. ENGLISH CAUTION • Glass shelves are cold. Detaching/Assembling the Shelf CAUTION • Do not clean glass shelves with warm water while they are heavy. ...
Shelves may result in the shelf falling or spilled food. InstaView Door-in -Door Compartment The InstaView function on some models. ENGLISH CAUTION • Glass shelves are cold. Detaching/Assembling the Shelf CAUTION • Do not clean glass shelves with warm water while they are heavy. ...


