
Owners Manual
Page 7
... access to change by the manufacturer without prior notice for product improvement purposes. i Freezer Frozen food compartment † This feature is only available on some models. d Handle Opens and closes the refrigerator door. PRODUCT OVERVIEW PRODUCT OVERVIEW 7 Product Features The images in this guide may be different from the actual components...
... access to change by the manufacturer without prior notice for product improvement purposes. i Freezer Frozen food compartment † This feature is only available on some models. d Handle Opens and closes the refrigerator door. PRODUCT OVERVIEW PRODUCT OVERVIEW 7 Product Features The images in this guide may be different from the actual components...

Owners Manual
Page 10
water pressure: 20 - 120 psi (138 - 827 kPa) Model LRMDS3006* LRMVS3006* LRMVC2306* LRMDC2306* Description Standard-depth, Door-in-Door French Door Refrigerator, Bottom Freezer Standard-depth, InstaView Door-in-Door French Door Refrigerator, Bottom Freezer Counter-depth, InstaView Door-in-Door French door Refrigerator, Bottom Freezer Counter-depth, Door-in-Door French Door Refrigerator, Bottom Freezer Net weight 357 lb (162 kg) 368 lb (167 kg) 333 lb (151 kg) 322 lb (146 kg) 10 PRODUCT OVERVIEW Electrical requirements: 115 V, 60 Hz Min. / Max.
water pressure: 20 - 120 psi (138 - 827 kPa) Model LRMDS3006* LRMVS3006* LRMVC2306* LRMDC2306* Description Standard-depth, Door-in-Door French Door Refrigerator, Bottom Freezer Standard-depth, InstaView Door-in-Door French Door Refrigerator, Bottom Freezer Counter-depth, InstaView Door-in-Door French door Refrigerator, Bottom Freezer Counter-depth, Door-in-Door French Door Refrigerator, Bottom Freezer Net weight 357 lb (162 kg) 368 lb (167 kg) 333 lb (151 kg) 322 lb (146 kg) 10 PRODUCT OVERVIEW Electrical requirements: 115 V, 60 Hz Min. / Max.
Owners Manual
Page 12
... Temperature Install this appliance in a wet or damp area. These products can damage the surface of the refrigerator. • To remove any warning labels, the model and serial number label, or the Tech Sheet that is not recommended. If required, adjust the leveling legs to your refrigerator before using. 12 INSTALLATION...
... Temperature Install this appliance in a wet or damp area. These products can damage the surface of the refrigerator. • To remove any warning labels, the model and serial number label, or the Tech Sheet that is not recommended. If required, adjust the leveling legs to your refrigerator before using. 12 INSTALLATION...

Owners Manual
Page 16
... the wire harnesses a. NOTE • The number of the hinge lever latch e. Lift the top hinge d free of wire harnesses may vary depending on some models. If the Durabase® storage bin is only present on the model. • Ground wire is removed from the middle hinge pin and remove the door.
... the wire harnesses a. NOTE • The number of the hinge lever latch e. Lift the top hinge d free of wire harnesses may vary depending on some models. If the Durabase® storage bin is only present on the model. • Ground wire is removed from the middle hinge pin and remove the door.

Owners Manual
Page 19
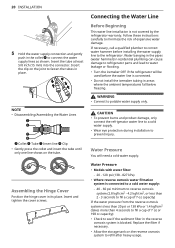
... the water supply lines into place. NOTE • The number of wire harnesses may vary depending on the model. • Ground wire is only present on the top case and pull them through the backplate. INSTALLATION 19 Assembling the Left Refrigerator Door CAUTION • ...
... the water supply lines into place. NOTE • The number of wire harnesses may vary depending on the model. • Ground wire is only present on the top case and pull them through the backplate. INSTALLATION 19 Assembling the Left Refrigerator Door CAUTION • ...
Owners Manual
Page 20
... (15 mm) into the connector. Insert and tighten the cover screws. WARNING • Connect to minimize the risk of expensive water damage. Water Pressure • Models with water filter: - 20 - 120 psi (138 - 827 kPa) • Where reverse osmosis water filtration system is connected to a cold water supply: - 40 - 60 psi...
... (15 mm) into the connector. Insert and tighten the cover screws. WARNING • Connect to minimize the risk of expensive water damage. Water Pressure • Models with water filter: - 20 - 120 psi (138 - 827 kPa) • Where reverse osmosis water filtration system is connected to a cold water supply: - 40 - 60 psi...
Owners Manual
Page 24
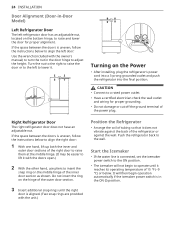
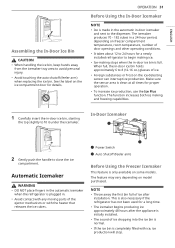
24 INSTALLATION Door Alignment (Door-in-Door Model) Left Refrigerator Door The left refrigerator door has an adjustable nut, located on the bottom hinge, to raise and lower the door for proper grounding. &#...
24 INSTALLATION Door Alignment (Door-in-Door Model) Left Refrigerator Door The left refrigerator door has an adjustable nut, located on the bottom hinge, to raise and lower the door for proper grounding. &#...

Owners Manual
Page 25
... thoroughly and wipe off the icemaker. CAUTION • Do not scratch the refrigerator with your thumb or dish detergent. • Do not peel off the model or serial number label or the technical information on while the refrigerator is not yet connected to ensure proper cooling. Connect the power supply. The...
... thoroughly and wipe off the icemaker. CAUTION • Do not scratch the refrigerator with your thumb or dish detergent. • Do not peel off the model or serial number label or the technical information on while the refrigerator is not yet connected to ensure proper cooling. Connect the power supply. The...
Owners Manual
Page 26
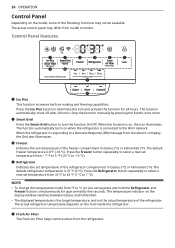
...Air Filter The Fresh Air Filter helps remove odors from the electric company, the Grid text illuminates. The function automatically turns on the model, some of the refrigerator. The default refrigerator temperature is 0°F (-18 °C). 26 OPERATION Control Panel Depending on when the ... a new set temperature from °F to -15 °C). Press the Freezer button repeatedly to select a new set temperature from model to illuminate the icon and activate the function for approximately five seconds. Control Panel Features a Ice Plus This function increases both ice...
...Air Filter The Fresh Air Filter helps remove odors from the electric company, the Grid text illuminates. The function automatically turns on the model, some of the refrigerator. The default refrigerator temperature is 0°F (-18 °C). 26 OPERATION Control Panel Depending on when the ... a new set temperature from °F to -15 °C). Press the Freezer button repeatedly to select a new set temperature from model to illuminate the icon and activate the function for approximately five seconds. Control Panel Features a Ice Plus This function increases both ice...
Owners Manual
Page 27
...automatically. Changing the Craft Ice Mode NOTE • This feature is successfully made , then turns on once the connection is only available on some models. • The Freezer button can also be used with a glass or other button on the display. • When power is initially connected to...control panel beeps and the current ice mode appears. The icon blinks while the connection is being made . Press the dispenser switch with the LG ThinQ app, allows the refrigerator to connect to the network. Replace the air filter approximately every six months. g Water Filter Replace the ...
...automatically. Changing the Craft Ice Mode NOTE • This feature is successfully made , then turns on once the connection is only available on some models. • The Freezer button can also be used with a glass or other button on the display. • When power is initially connected to...control panel beeps and the current ice mode appears. The icon blinks while the connection is being made . Press the dispenser switch with the LG ThinQ app, allows the refrigerator to connect to the network. Replace the air filter approximately every six months. g Water Filter Replace the ...
Owners Manual
Page 28
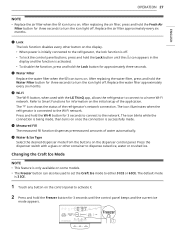
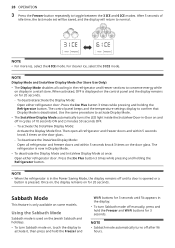
... store. Using the Sabbath Mode Sabbath mode is deactivated. 28 OPERATION 3 Press the Freezer button repeatedly to confirm that Display Mode is used on some models.
... store. Using the Sabbath Mode Sabbath mode is deactivated. 28 OPERATION 3 Press the Freezer button repeatedly to confirm that Display Mode is used on some models.
Owners Manual
Page 29
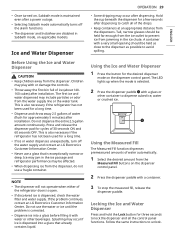
... the controls. • Throw away the first bin full of water automatically. 1 Select the desired amount from jamming in Sabbath mode, on applicable models. A container with a container. 3 To stop the measured fill, release the dispenser paddle. Using the Ice and Water Dispenser 1 Press the button... on, Sabbath mode is maintained even after a power outage. • Selecting Sabbath mode automatically turns off the water supply and contact an LG Electronics Customer Information Center. • Never use the water or ice until the problem is corrected. • Dispense ice into a glass ...
... the controls. • Throw away the first bin full of water automatically. 1 Select the desired amount from jamming in Sabbath mode, on applicable models. A container with a container. 3 To stop the measured fill, release the dispenser paddle. Using the Ice and Water Dispenser 1 Press the button... on, Sabbath mode is maintained even after a power outage. • Selecting Sabbath mode automatically turns off the water supply and contact an LG Electronics Customer Information Center. • Never use the water or ice until the problem is corrected. • Dispense ice into a glass ...
Owners Manual
Page 31
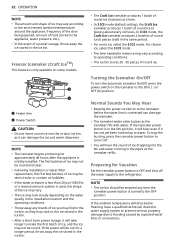
... bin holds approximately 6 to begin making ice. • Ice-making and freezing capabilities. 1 Carefully insert the in a 24-hour period, depending on model purchased. In-Door Icemaker 2 Gently push the handle to the dispenser. a Power Switch b Auto Shutoff (feeler arm) Before Using the Freezer Icemaker This... normal. • If the ice bin is initially installed. • The sound of ice. • Foreign substances or frost on some models. NOTE • Throw away the first bin full of ice after the appliance is completely filled with the heater that releases the ice cubes....
... bin holds approximately 6 to begin making ice. • Ice-making and freezing capabilities. 1 Carefully insert the in a 24-hour period, depending on model purchased. In-Door Icemaker 2 Gently push the handle to the dispenser. a Power Switch b Auto Shutoff (feeler arm) Before Using the Freezer Icemaker This... normal. • If the ice bin is initially installed. • The sound of ice. • Foreign substances or frost on some models. NOTE • Throw away the first bin full of ice after the appliance is completely filled with the heater that releases the ice cubes....
Owners Manual
Page 32
... round ice. If the icemaker power button is used, the shape of the ice may vary. • The ice may look cloudy depending on some models. • The Craft Ice icemaker produces 1 batch of round ice (3 pieces) at a time. • In 3 ICE mode (default setting), the Craft Ice icemaker produces 1 batch...
... round ice. If the icemaker power button is used, the shape of the ice may vary. • The ice may look cloudy depending on some models. • The Craft Ice icemaker produces 1 batch of round ice (3 pieces) at a time. • In 3 ICE mode (default setting), the Craft Ice icemaker produces 1 batch...

Owners Manual
Page 34
... crispers by letting you easily control humidity inside the drawer. Humidity Controlled Crispers Using the Humidity Controlled Crispers This feature is only available on some models. 2 Lift the front of the cover up and pull out the Door-in-Door case. You can increase the running costs of the unit.... of the refrigerator. Clean the interior, and leave the door open to form. Vegetables should be washed, and food packaging should be left on some models. NOTE • The Door-in-Door feature is kept in a hot and humid place, frequent opening of the door or storing a lot of ...
... crispers by letting you easily control humidity inside the drawer. Humidity Controlled Crispers Using the Humidity Controlled Crispers This feature is only available on some models. 2 Lift the front of the cover up and pull out the Door-in-Door case. You can increase the running costs of the unit.... of the refrigerator. Clean the interior, and leave the door open to form. Vegetables should be washed, and food packaging should be left on some models. NOTE • The Door-in-Door feature is kept in a hot and humid place, frequent opening of the door or storing a lot of ...

Owners Manual
Page 35
... back half of different heights will make finding the exact item you want easier. Using the Folding Shelf This feature is only available on some models. CAUTION • Glass shelves are cold. Shelves may break if exposed to meet individual storage needs. Use special care when removing them. &#... Detaching/Assembling the Shelf OPERATION 35 ENGLISH 4 To reassemble, slightly tilt up the tabs on the Door-in -Door feature is only available on some models. Adjusting the shelves to a full shelf. 6 Line up the front, insert the crisper into the frame and push it back into place. 5 ...
... back half of different heights will make finding the exact item you want easier. Using the Folding Shelf This feature is only available on some models. CAUTION • Glass shelves are cold. Shelves may break if exposed to meet individual storage needs. Use special care when removing them. &#... Detaching/Assembling the Shelf OPERATION 35 ENGLISH 4 To reassemble, slightly tilt up the tabs on the Door-in -Door feature is only available on some models. Adjusting the shelves to a full shelf. 6 Line up the front, insert the crisper into the frame and push it back into place. 5 ...

Owners Manual
Page 36
InstaView Door-in-Door Compartment The InstaView function on some models. Door-in -Door compartment allows for two seconds after 10 seconds. 3 To assemble, tilt the front of the shelf up . 2 Pull the shelf out. The ... Door-in -Door This feature is only available on the right refrigerator door handle. InstaView Door-in -Door compartment, lightly press the button on some models. Failure to do so may break if exposed to sudden temperature changes or impact. 1 To detach, tilt up the front of the shelf and lift...
InstaView Door-in-Door Compartment The InstaView function on some models. Door-in -Door compartment allows for two seconds after 10 seconds. 3 To assemble, tilt the front of the shelf up . 2 Pull the shelf out. The ... Door-in -Door This feature is only available on the right refrigerator door handle. InstaView Door-in -Door compartment, lightly press the button on some models. Failure to do so may break if exposed to sudden temperature changes or impact. 1 To detach, tilt up the front of the shelf and lift...

Owners Manual
Page 37
...-in-Door Bin The Door-in above the desired support and push down until it snaps into place. The case is only available on some models. CAUTION • Empty contents of the bin and lift. 1 To remove the case, lift up and down until it clicks into place. OPERATION 37 ENGLISH...
...-in-Door Bin The Door-in above the desired support and push down until it snaps into place. The case is only available on some models. CAUTION • Empty contents of the bin and lift. 1 To remove the case, lift up and down until it clicks into place. OPERATION 37 ENGLISH...

Owners Manual
Page 40
... the door remains open for product improvement purposes without notice to communicate with Wi-Fi. The application is only available on some models. LG ThinQ Application Features • Smart Care+† - NOTE • If you change for more personalized experience based on the ...- NOTE • To verify the Wi-Fi connection, check that f icon on models with the appliance using a smartphone. The LG ThinQ application allows you to users. 40 SMART FUNCTIONS SMART FUNCTIONS LG ThinQ Application This feature is finished, you will receive a push message. Activates or ...
... the door remains open for product improvement purposes without notice to communicate with Wi-Fi. The application is only available on some models. LG ThinQ Application Features • Smart Care+† - NOTE • If you change for more personalized experience based on the ...- NOTE • To verify the Wi-Fi connection, check that f icon on models with the appliance using a smartphone. The LG ThinQ application allows you to users. 40 SMART FUNCTIONS SMART FUNCTIONS LG ThinQ Application This feature is finished, you will receive a push message. Activates or ...

Owners Manual
Page 41
... and ENGLISH Operation is subject to Part 15 of the FCC Rules. This equipment has been tested and found on some models. Follow instructions to radio communications. This equipment generates, uses, and can be turned off. FCC Notice The following measures:...this product. Change the security protocol (WPA2 is connected to the Wi-Fi network. • Initial Appliance Registration Run the LG ThinQ application and follow the instructions in the application to provide reasonable protection against harmful interference in the application to register the ...
... and ENGLISH Operation is subject to Part 15 of the FCC Rules. This equipment has been tested and found on some models. Follow instructions to radio communications. This equipment generates, uses, and can be turned off. FCC Notice The following measures:...this product. Change the security protocol (WPA2 is connected to the Wi-Fi network. • Initial Appliance Registration Run the LG ThinQ application and follow the instructions in the application to provide reasonable protection against harmful interference in the application to register the ...


