Owner's Manual
Page 2
... Range combines precision cooking features with many years of reliable service. INTRODUCTION IMPORTANT SAFETY INFORMATION Important Safety Instructions 3 What to the LG family. By following the operating and care instructions in this manual, your purchase and welcome to Do if You Smell Gas 4 Basic... 26-27 Using the Favorite Feature 28 Setting the Warm Feature 28 Setting the Proof Feature 29 Special Features of Your Oven Control 30-32 Using the Electric Warming Drawer (on your range will provide you with simple operation and stylish design. Congratulations on some models ...
... Range combines precision cooking features with many years of reliable service. INTRODUCTION IMPORTANT SAFETY INFORMATION Important Safety Instructions 3 What to the LG family. By following the operating and care instructions in this manual, your purchase and welcome to Do if You Smell Gas 4 Basic... 26-27 Using the Favorite Feature 28 Setting the Warm Feature 28 Setting the Proof Feature 29 Special Features of Your Oven Control 30-32 Using the Electric Warming Drawer (on your range will provide you with simple operation and stylish design. Congratulations on some models ...
Owner's Manual
Page 18
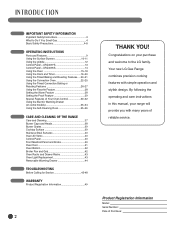
...) D about 1 lb. 2 (1" thick) about E 1 lb E 1 whole B 2 to 8 patties may survive." (Source: Safe Food Book, Your Kitchen Guide, USDA Rev. Broil skin-side-down first. 25-30 13-16 10-15 Do not turn very carefully. Brush with melted butter. means some food poisoning organisms may be affected by the size, weight...
...) D about 1 lb. 2 (1" thick) about E 1 lb E 1 whole B 2 to 8 patties may survive." (Source: Safe Food Book, Your Kitchen Guide, USDA Rev. Broil skin-side-down first. 25-30 13-16 10-15 Do not turn very carefully. Brush with melted butter. means some food poisoning organisms may be affected by the size, weight...

Owner's Manual
Page 19
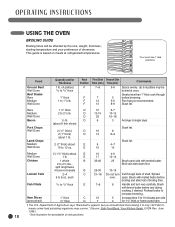
... the timer is touched. NOTE: If you touch the "CLOCK" pad, the display reverts to start the countdown. If number pads are not touched within 30 seconds after you make a mistake, press the "TIMER ON/OFF" pad and begin again. ᕣ Touch the "TIMER ON/OFF" pad to the original setting...
... the timer is touched. NOTE: If you touch the "CLOCK" pad, the display reverts to start the countdown. If number pads are not touched within 30 seconds after you make a mistake, press the "TIMER ON/OFF" pad and begin again. ᕣ Touch the "TIMER ON/OFF" pad to the original setting...

Owner's Manual
Page 20
... set the desired length of time, then turn off , the cook end melody will speed harmful bacteria growth. Room temperature promotes the growth of 1 hr 30 minutes, touch 1, 3, 0. Touch the "CLOCK" pad once to clear the display. The oven will continue to set is off . 20 If a flashing time is touched...
... set the desired length of time, then turn off , the cook end melody will speed harmful bacteria growth. Room temperature promotes the growth of 1 hr 30 minutes, touch 1, 3, 0. Touch the "CLOCK" pad once to clear the display. The oven will continue to set is off . 20 If a flashing time is touched...

Owner's Manual
Page 21
... oven turns off , the end-of time, then turn on at 100°F(38°C). Be sure the clock shows the correct time of 1 hr 30 minutes, touch 1, 3, 0. NOTE: If you would like to check the times you have set, touch the "START TIME" pad to clear the display. The oven...
... oven turns off , the end-of time, then turn on at 100°F(38°C). Be sure the clock shows the correct time of 1 hr 30 minutes, touch 1, 3, 0. NOTE: If you would like to check the times you have set, touch the "START TIME" pad to clear the display. The oven...

Owner's Manual
Page 25
...-24 24-28 28-32 20-24 24-28 28-32 10-14 14-18 35-45 23-27 23-27 30-35 total 35-40 total 40-45 total 14-18 14-18 14-18 17-20 20-24 17-20 20-24... 30-40 total 20-25 total 24-26 50-55 total 55-60 total 24-26 8-11 7-10 16-19 Oven ...;F(175°C) 325°F(160°C) 325°F(160°C) 325°F(160°C) 325°F(160°C) * Stuffed birds generally require 30-45 minutes additional roasting time. Department of skin. † The U.S. Shield legs and breast with foil to prevent overbrowning and drying of Agriculture...
...-24 24-28 28-32 20-24 24-28 28-32 10-14 14-18 35-45 23-27 23-27 30-35 total 35-40 total 40-45 total 14-18 14-18 14-18 17-20 20-24 17-20 20-24... 30-40 total 20-25 total 24-26 50-55 total 55-60 total 24-26 8-11 7-10 16-19 Oven ...;F(175°C) 325°F(160°C) 325°F(160°C) 325°F(160°C) 325°F(160°C) * Stuffed birds generally require 30-45 minutes additional roasting time. Department of skin. † The U.S. Shield legs and breast with foil to prevent overbrowning and drying of Agriculture...

Owner's Manual
Page 26
... the oven. more than 1 hour before or after the oven turns off. ᕥ Touch the "START" pad. 26 Room temperature promotes the growth of 1 hr 30 minutes, touch 1, 3, 0. HOW TO SET AN IMMEDIATE START AND AUTOMATIC STOP The oven will show the cooking time countdown and the changing temperature starting at...
... the oven. more than 1 hour before or after the oven turns off. ᕥ Touch the "START" pad. 26 Room temperature promotes the growth of 1 hr 30 minutes, touch 1, 3, 0. HOW TO SET AN IMMEDIATE START AND AUTOMATIC STOP The oven will show the cooking time countdown and the changing temperature starting at...

Owner's Manual
Page 27
... set or touch the "COOK TIME" pad to check the times you have set . NOTE: If you would like to check the length of 1 hr 30 minutes, touch 1, 3, 0. See the "SETTING THE WARM FEATURE" section. or ᕡ Touch the "CONV. ROAST" pad. ᕢ Touch the number pads to set , the display...
... set or touch the "COOK TIME" pad to check the times you have set . NOTE: If you would like to check the length of 1 hr 30 minutes, touch 1, 3, 0. See the "SETTING THE WARM FEATURE" section. or ᕡ Touch the "CONV. ROAST" pad. ᕢ Touch the number pads to set , the display...

Owner's Manual
Page 30
... "WARM" pad for 3 seconds. ᕢ Touch the number 1 pad to ENABLE or 2 pad to DISABLE. ᕣ Touch the "START" pad to accept the desired change. 30 When the display shows your choice, touch the "START" pad. The special features will show the actual converted (reduced) temperature. or This feature is showing...
... "WARM" pad for 3 seconds. ᕢ Touch the number 1 pad to ENABLE or 2 pad to DISABLE. ᕣ Touch the "START" pad to accept the desired change. 30 When the display shows your choice, touch the "START" pad. The special features will show the actual converted (reduced) temperature. or This feature is showing...
Owner's Manual
Page 38
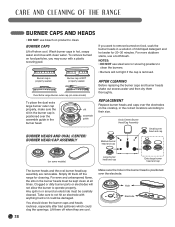
.../CAP ASSEMBLY AFTER CLEANING Before replacing the burner caps and burner heads shake out excess water and then dry them off the range for 20-30 minutes. Oval (Center) Burner Head/Cap Assembly Small burner head and cap Medium burner head and cap (on or around an electrode must be damaged...
.../CAP ASSEMBLY AFTER CLEANING Before replacing the burner caps and burner heads shake out excess water and then dry them off the range for 20-30 minutes. Oval (Center) Burner Head/Cap Assembly Small burner head and cap Medium burner head and cap (on or around an electrode must be damaged...