
User Guide
Page 2
... 22 Egg Box 22 I_ Freezer section Tilting Door 22 Ice Bin 22 Freezer Wire Door Rack 23 Durabase 23 Durabase Divider 23 Pull out Drawer 23 Water Filter 24 Care and Cleaning General Cleaning Tips Outside Inside Walls Door Liner and Gaskets 25-26 25 25 25 25 Plastic Parts...
... 22 Egg Box 22 I_ Freezer section Tilting Door 22 Ice Bin 22 Freezer Wire Door Rack 23 Durabase 23 Durabase Divider 23 Pull out Drawer 23 Water Filter 24 Care and Cleaning General Cleaning Tips Outside Inside Walls Door Liner and Gaskets 25-26 25 25 25 25 Plastic Parts...

User Guide
Page 7
... Bins (p.21) Shelves (p.18) Optibin Crisper (p.19) (Keeps fruits and vegetable fresh and crisper) _Glide N Serve (p.21) Customcube Icemaker (p.27) _lce Bin (p.22) _lPull out Drawer (p.23) 0 Durabase (p.23) 0 Divider (p.23) 0 Freezer Door Rack (Tilting-LRFD258 .... only) (p.23) _)Dairy Bin (p.22) Egg Box (p.22) OWine Holder (p.18) Use this page to...
... Bins (p.21) Shelves (p.18) Optibin Crisper (p.19) (Keeps fruits and vegetable fresh and crisper) _Glide N Serve (p.21) Customcube Icemaker (p.27) _lce Bin (p.22) _lPull out Drawer (p.23) 0 Durabase (p.23) 0 Divider (p.23) 0 Freezer Door Rack (Tilting-LRFD258 .... only) (p.23) _)Dairy Bin (p.22) Egg Box (p.22) OWine Holder (p.18) Use this page to...

User Guide
Page 8
... reinstall shelves according to your refrigerator run for use sharp instruments, rubbing alcohol, flammable fluids or abrasive cleaners to lower it , as ice cube bin, drawers, shelves, etc., in an area where the temperature is between 55°F (13°C) and 110°F (43°C.) If the temperature around the appliance...
... reinstall shelves according to your refrigerator run for use sharp instruments, rubbing alcohol, flammable fluids or abrasive cleaners to lower it , as ice cube bin, drawers, shelves, etc., in an area where the temperature is between 55°F (13°C) and 110°F (43°C.) If the temperature around the appliance...
User Guide
Page 9
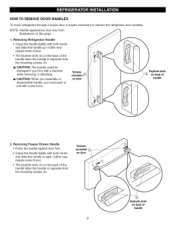
Removing Freezer Drawer Handle • Press the handle against door first. • Grasp the handle tightly with both hands and slide the handle to right (1)(this may require ...
Removing Freezer Drawer Handle • Press the handle against door first. • Grasp the handle tightly with both hands and slide the handle to right (1)(this may require ...

User Guide
Page 10
...8226; Align keyhole slots (4) on the right and left (6). ® Screws mounted on door 10 Keyhole slots on the front of the drawer. • Press the handle against the drawer front, making sure that the screws (5) go into the keyhole slots (4). • Holding the handle with both hands, press it firmly ...against the front of the drawer and slide the handle to the left sides of the back of the handle with the screws (5) mounted on back of the door and slide...
...8226; Align keyhole slots (4) on the right and left (6). ® Screws mounted on door 10 Keyhole slots on the front of the drawer. • Press the handle against the drawer front, making sure that the screws (5) go into the keyhole slots (4). • Holding the handle with both hands, press it firmly ...against the front of the drawer and slide the handle to the left sides of the back of the handle with the screws (5) mounted on back of the door and slide...

User Guide
Page 13
... instructions. 2. HOW TO REMOVE AND INSTALL THE PULLOUT DRAWER IMPORTANT: To avoid possible injury, product or property damage, you remove the drawer, do not hold handle. Installing Pullout Drawer • Pull both rails (1) out to full extension. Removing Pullout Drawer • Pull the drawer open to full extension. 1. Lift door up to ... out to play inside of door to unhook door supports from each side of rail system. • Lift the top of drawer. If it comes off, it doesn't move forward. ! DO NOT allow them to full extension, insert the lower basket (5) in the rail assembly...
... instructions. 2. HOW TO REMOVE AND INSTALL THE PULLOUT DRAWER IMPORTANT: To avoid possible injury, product or property damage, you remove the drawer, do not hold handle. Installing Pullout Drawer • Pull both rails (1) out to full extension. Removing Pullout Drawer • Pull the drawer open to full extension. 1. Lift door up to ... out to play inside of door to unhook door supports from each side of rail system. • Lift the top of drawer. If it comes off, it doesn't move forward. ! DO NOT allow them to full extension, insert the lower basket (5) in the rail assembly...

User Guide
Page 14
...one on doors to get them to close completely. If your doors is uniquely designed with unit.) 2. To remove the base cover 1. Once drawer is open there is sufficient clearance to remove screws on top of the refrigerator. NOTE: Your new refrigerator is uneven, follow the instructions below :... turns of the leveling screw to the rear by turning both leveling screws clockwise. With one another. This makes it . Open the Freezer Drawer. (Drawer not shown for clarity.) 2. If not, tilt the refrigerator slightly more turns, and you want the doors to close easily. Replace the base...
...one on doors to get them to close completely. If your doors is uniquely designed with unit.) 2. To remove the base cover 1. Once drawer is open there is sufficient clearance to remove screws on top of the refrigerator. NOTE: Your new refrigerator is uneven, follow the instructions below :... turns of the leveling screw to the rear by turning both leveling screws clockwise. With one another. This makes it . Open the Freezer Drawer. (Drawer not shown for clarity.) 2. If not, tilt the refrigerator slightly more turns, and you want the doors to close easily. Replace the base...

User Guide
Page 19
...: 1) a humidity control knob at the front of the crisper cover and 2) a large lattice on the inner surface of the crisper, then pull straight out. 3. Pull drawer out to full extension. 2. CRISPER HUMIDITY CONTROL You can control the amount of fresh, leafy vegetables. To remove, pull... drawer out to full extension. 2. OPTIBIN CRISPERS • Crispers with rails To remove crisper: 1. To install, slightly tilt up the front and push back until it ...
...: 1) a humidity control knob at the front of the crisper cover and 2) a large lattice on the inner surface of the crisper, then pull straight out. 3. Pull drawer out to full extension. 2. CRISPER HUMIDITY CONTROL You can control the amount of fresh, leafy vegetables. To remove, pull... drawer out to full extension. 2. OPTIBIN CRISPERS • Crispers with rails To remove crisper: 1. To install, slightly tilt up the front and push back until it ...

User Guide
Page 21
...keeps the compartment colder than refrigerator temperature. Push metal rails to provide normal refrigerator temperature. Sharp corners on it falls into place. This drawer can be hurt if door bins are frozen, they are not firmly assembled. WARNING: Somebody can be damaged at the coldest setting....the back of the refrigerator. 2. To remove Glide N Serve: -lilt up and pull straight out. 2. Place drawer onto rails and slide drawer back until it in the drawer. GLIDE N SERVE The Glide N Serve provides storage space with food. Refrigerator control may be used for large party ...
...keeps the compartment colder than refrigerator temperature. Push metal rails to provide normal refrigerator temperature. Sharp corners on it falls into place. This drawer can be hurt if door bins are frozen, they are not firmly assembled. WARNING: Somebody can be damaged at the coldest setting....the back of the refrigerator. 2. To remove Glide N Serve: -lilt up and pull straight out. 2. Place drawer onto rails and slide drawer back until it in the drawer. GLIDE N SERVE The Glide N Serve provides storage space with food. Refrigerator control may be used for large party ...

User Guide
Page 23
... sure back of basket into one of compartment. 23 DURABASE DIVIDER The Durabase divider allows you to the back of the brackets upward. 2. PULL OUT DRAWER 1. Push bracket down into sections. 1. To remove, lift basket up . 2. DURABASE 1. Insert bracket into bracket. 2. To install, hook top corners ...the Durabase and pull straight out. 2. To remove the Durabase, push it back to full extension. Tilt up the front of the freezer drawer is removed, children may crawl inside. To replace basket 1. To remove, pull divider staight up and pull straight out. Hook the basket ...
... sure back of basket into one of compartment. 23 DURABASE DIVIDER The Durabase divider allows you to the back of the brackets upward. 2. PULL OUT DRAWER 1. Push bracket down into sections. 1. To remove, lift basket up . 2. DURABASE 1. Insert bracket into bracket. 2. To install, hook top corners ...the Durabase and pull straight out. 2. To remove the Durabase, push it back to full extension. Tilt up the front of the freezer drawer is removed, children may crawl inside. To replace basket 1. To remove, pull divider staight up and pull straight out. Hook the basket ...


