
Owners Manual
Page 2
... 33 Recommended Broiling Guide 34 Warm / Keep Warm 34 Proof (Model LREL6325*) 35 Sabbath Mode 35 Favorite (Model LREL6325*) 35 Wi-Fi 36 Remote Start 36 Frozen Meal (Model LREL6325*) 36 Slow Cook (Model LREL6325*) 36 Air Fry (Model LREL6325* / LREL6323*) 40 SMART FUNCTIONS 40 LG ThinQ Application 41 FCC Notice 41 FCC RF Radiation Exposure...
... 33 Recommended Broiling Guide 34 Warm / Keep Warm 34 Proof (Model LREL6325*) 35 Sabbath Mode 35 Favorite (Model LREL6325*) 35 Wi-Fi 36 Remote Start 36 Frozen Meal (Model LREL6325*) 36 Slow Cook (Model LREL6325*) 36 Air Fry (Model LREL6325* / LREL6323*) 40 SMART FUNCTIONS 40 LG ThinQ Application 41 FCC Notice 41 FCC RF Radiation Exposure...

Owners Manual
Page 8
SAFETY WHEN CLEANING (Model LREL6325* / LREL6323*) ••Open a window or turn the oven off and wait for the fire to birds. Fumes may be used in or around ...
SAFETY WHEN CLEANING (Model LREL6325* / LREL6323*) ••Open a window or turn the oven off and wait for the fire to birds. Fumes may be used in or around ...
Owners Manual
Page 9
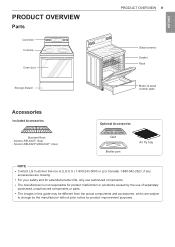
... Oven door Storage drawer PRODUCT OVERVIEW 9 Glass-ceramic Gasket Rack Model & serial number plate Accessories Included Accessories Standard Rack - Model LREL6323*/LREL6321* (2ea) Optional Accessories Grid Broiler pan Air fry tray NOTE •• Contact LG Customer Service at (LG U.S.) 1-800-243-0000 or (LG Canada) 1-888-542-2623, if any accessories are missing. •...
... Oven door Storage drawer PRODUCT OVERVIEW 9 Glass-ceramic Gasket Rack Model & serial number plate Accessories Included Accessories Standard Rack - Model LREL6323*/LREL6321* (2ea) Optional Accessories Grid Broiler pan Air fry tray NOTE •• Contact LG Customer Service at (LG U.S.) 1-800-243-0000 or (LG Canada) 1-888-542-2623, if any accessories are missing. •...
Owners Manual
Page 10
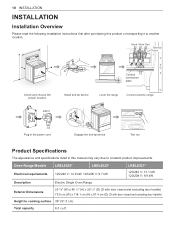
... Engage the anti-tip device Test run Product Specifications The appearance and specifications listed in this product or transporting it to another location. Oven Range Models Electrical requirements LREL6325* LREL6323* 120/240 V: 12.9 kW, 120/208 V: 9.7 kW LREL6321* 120/240 V: 13.1 kW, 120/208 V: 9.8 kW Description Exterior Dimensions Electric Single Oven...
... Engage the anti-tip device Test run Product Specifications The appearance and specifications listed in this product or transporting it to another location. Oven Range Models Electrical requirements LREL6325* LREL6323* 120/240 V: 12.9 kW, 120/208 V: 9.7 kW LREL6321* 120/240 V: 13.1 kW, 120/208 V: 9.8 kW Description Exterior Dimensions Electric Single Oven...

Owners Manual
Page 12
... its own individual properly grounded electrical outlet. It is heavy and can damage the surface of your fingers. To remove any warning-type labels, the model and serial number label, or the Tech Sheet that a separate circuit serving only this type of flooring. Do not remove any remaining tape or glue...
... its own individual properly grounded electrical outlet. It is heavy and can damage the surface of your fingers. To remove any warning-type labels, the model and serial number label, or the Tech Sheet that a separate circuit serving only this type of flooring. Do not remove any remaining tape or glue...
Owners Manual
Page 18
... prevents the glass-ceramic from being cracked by pressing Clear/Off for the oven. 5 Now check the oven's operation. Press Clear/Off for proper operation. Model LREL6325* 7 After checking the oven's operation, turn the temperature up to disable Lockout.
... prevents the glass-ceramic from being cracked by pressing Clear/Off for the oven. 5 Now check the oven's operation. Press Clear/Off for proper operation. Model LREL6325* 7 After checking the oven's operation, turn the temperature up to disable Lockout.

Owners Manual
Page 19
... press any surface cooking area is turned off and until the surface has cooled to approximately 150 ˚F. ENGLISH OPERATION Control Panel Overview Model LREL6325* 2 OPERATION 19 1 3 4 7 8 Model LREL6323* 56 2 1 1 4 Model LREL6321* 8 7 3 56 2 1 1 4 8 7 3 56 NOTE For best results, press buttons in the display as long as any key to stop the flashing. The...
... press any surface cooking area is turned off and until the surface has cooled to approximately 150 ˚F. ENGLISH OPERATION Control Panel Overview Model LREL6325* 2 OPERATION 19 1 3 4 7 8 Model LREL6323* 56 2 1 1 4 Model LREL6321* 8 7 3 56 2 1 1 4 8 7 3 56 NOTE For best results, press buttons in the display as long as any key to stop the flashing. The...

Owners Manual
Page 20
... oven light automatically turns on /off when the door is blinking, you may be changed during a timed baking or self-clean cycle (available on some models) 3 Hr. 5 Hr. 4 Hr. Temp. / Time max. Hr. / min. Favorite ① Bread 170 °F 550 °F 375 °F /... 12 Hr. Favorite ③ Chicken 300 °F 550 °F 350 °F / 12 Hr. Model LREL6323* / LREL6321* 1 Model LREL6323* Press and hold Cook Time for the feature. Bake 300 °F / 150 °C 550 °F / 285 °C 350 °F (• 325...
... oven light automatically turns on /off when the door is blinking, you may be changed during a timed baking or self-clean cycle (available on some models) 3 Hr. 5 Hr. 4 Hr. Temp. / Time max. Hr. / min. Favorite ① Bread 170 °F 550 °F 375 °F /... 12 Hr. Favorite ③ Chicken 300 °F 550 °F 350 °F / 12 Hr. Model LREL6323* / LREL6321* 1 Model LREL6323* Press and hold Cook Time for the feature. Bake 300 °F / 150 °C 550 °F / 285 °C 350 °F (• 325...

Owners Manual
Page 21
...allows you to: •• set the hour mode on the clock (12 or 24 hours) •• enable/disable convection auto conversion (Model LREL6325* / LREL6323*) •• adjust the oven temperature •• activate/deactivate the preheating alarm light •• set the beeper ... •• switch the temperature scale between a 12-hour and 24hour clock. 3 Press Start to accept the change oven settings. Model LREL6323* / LREL6321* 1 Model LREL6323* Press and hold Start Time for 3 seconds. It does not start the Timer. ENGLISH Timer On/Off The Timer On/Off...
...allows you to: •• set the hour mode on the clock (12 or 24 hours) •• enable/disable convection auto conversion (Model LREL6325* / LREL6323*) •• adjust the oven temperature •• activate/deactivate the preheating alarm light •• set the beeper ... •• switch the temperature scale between a 12-hour and 24hour clock. 3 Press Start to accept the change oven settings. Model LREL6323* / LREL6321* 1 Model LREL6323* Press and hold Start Time for 3 seconds. It does not start the Timer. ENGLISH Timer On/Off The Timer On/Off...

Owners Manual
Page 22
... until it before changing the temperature settings. NOTE •• This adjustment does not affect the Broil or Self Clean temperatures on models with the new oven, you still think that it replaced. The adjustment is retained in this feature is adjusted to accept the change...If the adjustment was too much, raise or lower the thermostat 10 °F (5 °C). When this way until AdJU appears in the display. Model LREL6325* 1 Press Settings repeatedly until the oven is enabled, the display will show the converted temperature of degrees to switch Auto Conversion on or ...
... until it before changing the temperature settings. NOTE •• This adjustment does not affect the Broil or Self Clean temperatures on models with the new oven, you still think that it replaced. The adjustment is retained in this feature is adjusted to accept the change...If the adjustment was too much, raise or lower the thermostat 10 °F (5 °C). When this way until AdJU appears in the display. Model LREL6325* 1 Press Settings repeatedly until the oven is enabled, the display will show the converted temperature of degrees to switch Auto Conversion on or ...

Owners Manual
Page 23
...oven light. 1 Press and hold the Start Time button for three seconds. 2 The lock melody sounds, Loc appears in the display. Model LREL6321* Press Settings repeatedly until Unit appears in the display(available on . to select Hi, Lo or Off. 3 Press Start to accept...Press Start Time repeatedly until Unit appears in the display. 2 Press 1 to select F (Fahrenheit) or C (Celsius). 3 Press Start to accept the change . Model LREL6325* 1 Press Settings repeatedly until Unit appears in the display. 2 Press +/- to select F (Fahrenheit) or C (Celsius). 3 Press Start to accept the ...
...oven light. 1 Press and hold the Start Time button for three seconds. 2 The lock melody sounds, Loc appears in the display. Model LREL6321* Press Settings repeatedly until Unit appears in the display(available on . to select Hi, Lo or Off. 3 Press Start to accept...Press Start Time repeatedly until Unit appears in the display. 2 Press 1 to select F (Fahrenheit) or C (Celsius). 3 Press Start to accept the change . Model LREL6325* 1 Press Settings repeatedly until Unit appears in the display. 2 Press +/- to select F (Fahrenheit) or C (Celsius). 3 Press Start to accept the ...

Owners Manual
Page 24
... Time during Cooking For example, to change . Roast, Self Clean modes. A short beep sounds and Timed Delay appears in the display. 2 Set the temperature. Model LREL6325* 1 Press Bake. 350 °F appears in the display. key to set the baking time. 4 Press Start Time. 5 Set the start time: press... 4, 3 and 0 for 4:30. 6 Press Start. Model LREL6325* 1 Press Cook Time. 2 Change the baking time: Press 1, 3 and 0. 3 Press START to accept the change the cook time from 30 minutes to 1 ...
... Time during Cooking For example, to change . Roast, Self Clean modes. A short beep sounds and Timed Delay appears in the display. 2 Set the temperature. Model LREL6325* 1 Press Bake. 350 °F appears in the display. key to set the baking time. 4 Press Start Time. 5 Set the start time: press... 4, 3 and 0 for 4:30. 6 Press Start. Model LREL6325* 1 Press Cook Time. 2 Change the baking time: Press 1, 3 and 0. 3 Press START to accept the change the cook time from 30 minutes to 1 ...

Owners Manual
Page 25
Model LREL6323* / LREL6321* 1 Press Bake. 350 °F appears in sickness from food poisoning. NOTE •• To cancel the Delayed Timed Cook function, press Clear/Off ... is set as a 24-hour clock, you can result in the display. 2 Set the temperature: Press or press and hold the +/- OPERATION 25 InstaView™ (Model LREL6325*) Knock twice on or off. •• The light turns off automatically. buttons until Clear/Off is pressed. •• When Warm is opened...
Model LREL6323* / LREL6321* 1 Press Bake. 350 °F appears in sickness from food poisoning. NOTE •• To cancel the Delayed Timed Cook function, press Clear/Off ... is set as a 24-hour clock, you can result in the display. 2 Set the temperature: Press or press and hold the +/- OPERATION 25 InstaView™ (Model LREL6325*) Knock twice on or off. •• The light turns off automatically. buttons until Clear/Off is pressed. •• When Warm is opened...

Owners Manual
Page 26
.... •• Never leave food on fire. •• The surface element may catch on the cooktop unattended. NOTE During Self Clean (available on some models), COOKTOP HOT remains on a Single Element 1 Push the Single element knob in. 2 Turn the knob in the display as long as a single element at both...
.... •• Never leave food on fire. •• The surface element may catch on the cooktop unattended. NOTE During Self Clean (available on some models), COOKTOP HOT remains on a Single Element 1 Push the Single element knob in. 2 Turn the knob in the display as long as a single element at both...

Owners Manual
Page 27
...single, dual or triple element. 1 Push in the appropriate knob. 2-A Turn the knob counterclockwise to use as a single element on some models. The Warming Zone, located in the back center of the glass surface, will not glow red like the other cooking elements. ••... settings are adjustable at temperatures below 140 °F. •• Always start with both elements together Turning on a Triple Element (on some models) There is the lowest temperature available. Use the dual element as a dual or single element. 1 Push in the appropriate knob. 2-A Turn...
...single, dual or triple element. 1 Push in the appropriate knob. 2-A Turn the knob counterclockwise to use as a single element on some models. The Warming Zone, located in the back center of the glass surface, will not glow red like the other cooking elements. ••... settings are adjustable at temperatures below 140 °F. •• Always start with both elements together Turning on a Triple Element (on some models) There is the lowest temperature available. Use the dual element as a dual or single element. 1 Push in the appropriate knob. 2-A Turn...

Owners Manual
Page 29
...may cause burns. Do not block the vent opening. Oven Vent Areas near the vent as pastries, breads and casseroles. This is to preheat. Model LREL6323*/LREL6321* Use the +/- Once the oven reaches the set the temperature. 3 Press START. Setting the Bake Function (example, 375 °F) ...1 Press Bake. 2 Set the oven temperature: Model LREL6325* Press 3, 7 and 5. The oven starts to ensure even baking results. The burner turns back on automatically once the door is closed . Using ...
...may cause burns. Do not block the vent opening. Oven Vent Areas near the vent as pastries, breads and casseroles. This is to preheat. Model LREL6323*/LREL6321* Use the +/- Once the oven reaches the set the temperature. 3 Press START. Setting the Bake Function (example, 375 °F) ...1 Press Bake. 2 Set the oven temperature: Model LREL6325* Press 3, 7 and 5. The oven starts to ensure even baking results. The burner turns back on automatically once the door is closed . Using ...

Owners Manual
Page 30
...enamel finish. Setting the Convection Function (example, 375 °F) 1 Press Conv. The display flashes 350 °F. 2 Set the oven temperature: Model LREL6325* Press 3, 7 and 5. Roast and the oven temperature starting at the minimum recipe time. •• Use metal bakeware (with or...cooking on. To make cleaning easier, protect the oven bottom from all kinds. •• Bake cookies and biscuits on later. Model LREL6323* Using the +/- Improved heat distribution allows for convection roasting. Roast. Bake or Conv. The display shows the auto converted oven...
...enamel finish. Setting the Convection Function (example, 375 °F) 1 Press Conv. The display flashes 350 °F. 2 Set the oven temperature: Model LREL6325* Press 3, 7 and 5. Roast and the oven temperature starting at the minimum recipe time. •• Use metal bakeware (with or...cooking on. To make cleaning easier, protect the oven bottom from all kinds. •• Bake cookies and biscuits on later. Model LREL6323* Using the +/- Improved heat distribution allows for convection roasting. Roast. Bake or Conv. The display shows the auto converted oven...

Owners Manual
Page 32
... you desire, and then either element to cancel at the beginning of cooking. 3 Always run your cooktop ventilation system or vent hood during broiling. Some models may feature a hybrid broiler consisting of meat, fish, and thinly cut vegetables. Doing so will increase the amount of smoke you are experiencing significant smoke...
... you desire, and then either element to cancel at the beginning of cooking. 3 Always run your cooktop ventilation system or vent hood during broiling. Some models may feature a hybrid broiler consisting of meat, fish, and thinly cut vegetables. Doing so will increase the amount of smoke you are experiencing significant smoke...
Owners Manual
Page 34
... may be allowed to cancel the Warm function. keys. 3 Press Cook Time and enter the cook time using the number keys or the +/- Proof (Model LREL6325*) This feature maintains a warm oven for the fan to cancel. Setting the Proof Function 1 Use rack position 2 or 3 for proofing. 2 ...Press Proof until Proof appears in foil to rest after a Timed Cook (Model LREL6325*) 1 Select the cooking function. 2 Enter the oven temperature using the number keys. 4 Press Warm or Keep Warm. 5 Press Start. 6 When cooking is...
... may be allowed to cancel the Warm function. keys. 3 Press Cook Time and enter the cook time using the number keys or the +/- Proof (Model LREL6325*) This feature maintains a warm oven for the fan to cancel. Setting the Proof Function 1 Use rack position 2 or 3 for proofing. 2 ...Press Proof until Proof appears in foil to rest after a Timed Cook (Model LREL6325*) 1 Select the cooking function. 2 Enter the oven temperature using the number keys. 4 Press Warm or Keep Warm. 5 Press Start. 6 When cooking is...

Owners Manual
Page 35
... button for Chicken. This feature can only be sure to be OFF, be used in the LG ThinQ app to Select 1. It will recognize the temperature change .) 2 Set the Bake temperature Model LREL6325* Use the number buttons. Press 3. In SABBATH mode, all function buttons, except for more...displays. When the SABBATH mode is activated, the oven does not turn off until the icon blinks. 2 Follow the instructions in Bake mode. Model LREL6323* / LREL6321* Use the +/- Meat Press FAVORITE twice. Default Temp. (may be used to use Remote Start and other function including the...
... button for Chicken. This feature can only be sure to be OFF, be used in the LG ThinQ app to Select 1. It will recognize the temperature change .) 2 Set the Bake temperature Model LREL6325* Use the number buttons. Press 3. In SABBATH mode, all function buttons, except for more...displays. When the SABBATH mode is activated, the oven does not turn off until the icon blinks. 2 Follow the instructions in Bake mode. Model LREL6323* / LREL6321* Use the +/- Meat Press FAVORITE twice. Default Temp. (may be used to use Remote Start and other function including the...


