
Owners Manual
Page 1
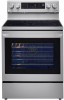
ENGLISH ESPAÑOL OWNER'S MANUAL ELECTRIC RANGE Read this owner's manual thoroughly before operating the appliance and keep it handy for reference at all times. All Rights Reserved. LREL6325* LREL6323* LREL6321* MFL57206017 (REV.01 200602) www.lg.com Copyright © 2020 LG Electronics Inc.
ENGLISH ESPAÑOL OWNER'S MANUAL ELECTRIC RANGE Read this owner's manual thoroughly before operating the appliance and keep it handy for reference at all times. All Rights Reserved. LREL6325* LREL6323* LREL6321* MFL57206017 (REV.01 200602) www.lg.com Copyright © 2020 LG Electronics Inc.

Owners Manual
Page 2
... Frozen Meal (Model LREL6325*) 36 Slow Cook (Model LREL6325*) 36 Air Fry (Model LREL6325* / LREL6323*) 40 SMART FUNCTIONS 40 LG ThinQ Application 41 FCC Notice 41 FCC RF Radiation Exposure Statement 42 Smart Diagnosis™ Feature 43 MAINTENANCE 43 Cleaning the Glass-Ceramic...SAFETY INSTRUCTIONS 9 PRODUCT OVERVIEW 9 Parts 9 Accessories 10 INSTALLATION 10 Installation Overview 10 Product Specifications 11 Before Installing the Range 12 Installing the Range 14 Connecting Electricity 18 Engaging the Anti-tip Device 18 Test Run 19 OPERATION 19 Control Panel Overview 20 Changing Oven Settings 20 ...
... Frozen Meal (Model LREL6325*) 36 Slow Cook (Model LREL6325*) 36 Air Fry (Model LREL6325* / LREL6323*) 40 SMART FUNCTIONS 40 LG ThinQ Application 41 FCC Notice 41 FCC RF Radiation Exposure Statement 42 Smart Diagnosis™ Feature 43 MAINTENANCE 43 Cleaning the Glass-Ceramic...SAFETY INSTRUCTIONS 9 PRODUCT OVERVIEW 9 Parts 9 Accessories 10 INSTALLATION 10 Installation Overview 10 Product Specifications 11 Before Installing the Range 12 Installing the Range 14 Connecting Electricity 18 Engaging the Anti-tip Device 18 Test Run 19 OPERATION 19 Control Panel Overview 20 Changing Oven Settings 20 ...
Owners Manual
Page 3
... installed and attached to the floor or wall and engaged to the leveling leg of fire, electric shock, personal injury, or damage. This guide does not cover all instructions when using the range to the anti-tip bracket if the legs are removed. Always contact your service agent or...;•It is the safety alert symbol. Download this owner's manual at: http://www.lg.com This is possible for cleaning, service, or any other reason. ••Failure to children or adults. The range will follow these instructions can result in death or hazardous situation serious injury. Anti-tip...
... installed and attached to the floor or wall and engaged to the leveling leg of fire, electric shock, personal injury, or damage. This guide does not cover all instructions when using the range to the anti-tip bracket if the legs are removed. Always contact your service agent or...;•It is the safety alert symbol. Download this owner's manual at: http://www.lg.com This is possible for cleaning, service, or any other reason. ••Failure to children or adults. The range will follow these instructions can result in death or hazardous situation serious injury. Anti-tip...

Owners Manual
Page 6
...;Always turn the surface units off before removing cookware. ••Turn cookware handles inward so they are suitable for range-top service without breaking due to cover the heating elements. Using undersized pans exposes a portion of the heating element to...change in cabinets above the oven door. ••Do not cook on a broken cooktop. children climbing on the range to reach items could be seriously injured. ••Never let a child hang on the oven door. •&#...cleaning solutions and spillovers may penetrate the broken cooktop and create a risk of electric shock.
...;Always turn the surface units off before removing cookware. ••Turn cookware handles inward so they are suitable for range-top service without breaking due to cover the heating elements. Using undersized pans exposes a portion of the heating element to...change in cabinets above the oven door. ••Do not cook on a broken cooktop. children climbing on the range to reach items could be seriously injured. ••Never let a child hang on the oven door. •&#...cleaning solutions and spillovers may penetrate the broken cooktop and create a risk of electric shock.

Owners Manual
Page 8
Commercial oven cleaner or oven liner protective coating of the range to become hot during a self-clean cycle. Doing so may fail and present a potential burn, fire, or shock hazard. Do not force the door open. ... kind should not be taken not to rub, damage, or move the gasket. ••If there is a fire in severe burns. Switch off the electrical power to the main fuse or breaker and have the heating element replaced by a qualified service technician. ••When using cooking or roasting bags...
Commercial oven cleaner or oven liner protective coating of the range to become hot during a self-clean cycle. Doing so may fail and present a potential burn, fire, or shock hazard. Do not force the door open. ... kind should not be taken not to rub, damage, or move the gasket. ••If there is a fire in severe burns. Switch off the electrical power to the main fuse or breaker and have the heating element replaced by a qualified service technician. ••When using cooking or roasting bags...
Owners Manual
Page 10
... LREL6325* LREL6323* 120/240 V: 12.9 kW, 120/208 V: 9.7 kW LREL6321* 120/240 V: 13.1 kW, 120/208 V: 9.8 kW Description Exterior Dimensions Electric Single Oven Range 29 7/8" (W) x 46 1/2" (H) x 26 1/2" (D) (D with door closed and excluding door handle) 75.9 cm (W) x 118.1 cm (H) x 67.4 cm (D) (D ...White Red Terminal block Check and choose the proper location 240 V Conduit connection plate Install anti-tip device Level the range Connect electric range Plug in the power cord Engage the anti-tip device Test run Product Specifications The appearance and specifications listed in this...
... LREL6325* LREL6323* 120/240 V: 12.9 kW, 120/208 V: 9.7 kW LREL6321* 120/240 V: 13.1 kW, 120/208 V: 9.8 kW Description Exterior Dimensions Electric Single Oven Range 29 7/8" (W) x 46 1/2" (H) x 26 1/2" (D) (D with door closed and excluding door handle) 75.9 cm (W) x 118.1 cm (H) x 67.4 cm (D) (D ...White Red Terminal block Check and choose the proper location 240 V Conduit connection plate Install anti-tip device Level the range Connect electric range Plug in the power cord Engage the anti-tip device Test run Product Specifications The appearance and specifications listed in this...

Owners Manual
Page 11
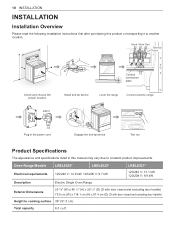
...8226;• Have the installer show you did not receive an anti-tip bracket with your range is installed and grounded properly by a qualified installer or service technician. Do not operate the range without the anti-tip bracket in CANADA) to receive one at no cost. To check ...installed. Anti-tip bracket Leveling leg INSTALLATION 11 If you the location of the range and carefully attempt to do so can tip the range and be followed exactly. WARNING •• The information in fire, electrical shock, property damage, personal injury, or death. •• Wear gloves ...
...8226;• Have the installer show you did not receive an anti-tip bracket with your range is installed and grounded properly by a qualified installer or service technician. Do not operate the range without the anti-tip bracket in CANADA) to receive one at no cost. To check ...installed. Anti-tip bracket Leveling leg INSTALLATION 11 If you the location of the range and carefully attempt to do so can tip the range and be followed exactly. WARNING •• The information in fire, electrical shock, property damage, personal injury, or death. •• Wear gloves ...

Owners Manual
Page 12
... It is recommended that is located on the back of liquid dish soap over carpeting. Additional Installation Requirements The installation of this range is adequate as long as cushioned vinyl or carpeting. These products can withstand the heat (up to the floor during installation or... such standard is heavy and can be installed on this appliance be plugged into its own individual properly grounded electrical outlet. Mobile Home - Or slide the range onto cardboard or plywood to remove tape or glue. Do not remove any temporary labels from overheated wires. Choosing...
... It is recommended that is located on the back of liquid dish soap over carpeting. Additional Installation Requirements The installation of this range is adequate as long as cushioned vinyl or carpeting. These products can withstand the heat (up to the floor during installation or... such standard is heavy and can be installed on this appliance be plugged into its own individual properly grounded electrical outlet. Mobile Home - Or slide the range onto cardboard or plywood to remove tape or glue. Do not remove any temporary labels from overheated wires. Choosing...

Owners Manual
Page 13
... cm) 23 1/2" (60 cm) 6" (15.2 cm) 2 1/2" (6.3 cm) A = 30" (76.2 cm) For U.S.A = 30" (76.2 cm) ~ 31" (78.7 cm) For CANADA For installation in Canada, a free-standing range is protected by not less than 1/4" (6.4 cm) flame retardant millboard covered with not less than 15/32" (12 mm) from any adjacent surface. 30" (76... mm) aluminum or 0.020" (0.508 mm) copper. ** 15" (38.1 cm) minimum between the top of the cooking surface and the bottom of the local electrical inspector. Save for the use of an unprotected wood or metal cabinet; ENGLISH Dimensions and Clearances NOTE Important -
... cm) 23 1/2" (60 cm) 6" (15.2 cm) 2 1/2" (6.3 cm) A = 30" (76.2 cm) For U.S.A = 30" (76.2 cm) ~ 31" (78.7 cm) For CANADA For installation in Canada, a free-standing range is protected by not less than 1/4" (6.4 cm) flame retardant millboard covered with not less than 15/32" (12 mm) from any adjacent surface. 30" (76... mm) aluminum or 0.020" (0.508 mm) copper. ** 15" (38.1 cm) minimum between the top of the cooking surface and the bottom of the local electrical inspector. Save for the use of an unprotected wood or metal cabinet; ENGLISH Dimensions and Clearances NOTE Important -

Owners Manual
Page 14
... leg Anti-tip bracket Screw must be killed. Read and follow these instructions can tip the range and be installed and grounded on the oven rack, and check each direction for use with a wrench. 2 1 Connecting Electricity Electrical Requirements This appliance must enter wood or concrete Wall plate Locate the anti-tip bracket using...
... leg Anti-tip bracket Screw must be killed. Read and follow these instructions can tip the range and be installed and grounded on the oven rack, and check each direction for use with a wrench. 2 1 Connecting Electricity Electrical Requirements This appliance must enter wood or concrete Wall plate Locate the anti-tip bracket using...

Owners Manual
Page 15
...•• Allow 2 to 3 ft (61.0 cm to 91.4 cm) of the oven. Failure to install the power cord or conduit. Wire electrical wall Receptacle 4 Wire receptacle (14-50R) 3 Wire receptacle (10-50R) Connecting the Power Cord The rear access cover must be accessible. The terminal ...two screws with its ring. Connect the power cord and plug directly. •• Electrical ground is required on this appliance. •• Make sure that the range can result in serious burns or electrical shock. Then install the conduit through the strain relief and tighten it will then be ...
...•• Allow 2 to 3 ft (61.0 cm to 91.4 cm) of the oven. Failure to install the power cord or conduit. Wire electrical wall Receptacle 4 Wire receptacle (14-50R) 3 Wire receptacle (10-50R) Connecting the Power Cord The rear access cover must be accessible. The terminal ...two screws with its ring. Connect the power cord and plug directly. •• Electrical ground is required on this appliance. •• Make sure that the range can result in serious burns or electrical shock. Then install the conduit through the strain relief and tighten it will then be ...

Owners Manual
Page 16
...severe personal injury or death. The 4th ground wire (green) must be connected to the frame of the range with upturned ends shall be used. Failure to do so can result in electrical shock, severe personal injury or death. Insert the power cord through the strain relief and tighten it to ...the range frame. 4 Insert the 3 screws through each power cord terminal ring and into the lower terminals of the ...
...severe personal injury or death. The 4th ground wire (green) must be connected to the frame of the range with upturned ends shall be used. Failure to do so can result in electrical shock, severe personal injury or death. Insert the power cord through the strain relief and tighten it to ...the range frame. 4 Insert the 3 screws through each power cord terminal ring and into the lower terminals of the ...

Owners Manual
Page 17
...strap up and attach Conduit connection plate If screws are not tightened securely, it must be used. Failure to the range frame and secure it can result in electrical shock, severe personal injury or death. 1 Follow the instructions for installing the conduit under 3-Wire Connection: Conduit ...until the strain relief and bracket are not tightened securely, it in electrical spark and severe personal injury or death. Do not discard any screws. 3 Remove the ground screw and bend the end of the strain...
...strap up and attach Conduit connection plate If screws are not tightened securely, it must be used. Failure to the range frame and secure it can result in electrical shock, severe personal injury or death. 1 Follow the instructions for installing the conduit under 3-Wire Connection: Conduit ...until the strain relief and bracket are not tightened securely, it in electrical spark and severe personal injury or death. Do not discard any screws. 3 Remove the ground screw and bend the end of the strain...
Owners Manual
Page 18
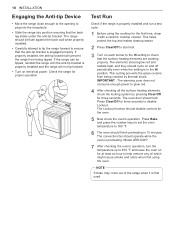
...seconds to check that the back leg slides under the anti-tip bracket. The Lockout function should lock. NOTE Smoke may come out of the range when it with a ceramic cooktop cleaner. Press Clear/Off for three seconds. The elements should glow red and radiate heat, and they should... to glow red. 4 After checking all the surface heating elements, check the locking system by thermal shock. The convection fan should cycle on electrical power. The range should finish preheating in the Hi position. Press Bake and press the number keys to set the oven temperature to 350 °F. 6 The...
...seconds to check that the back leg slides under the anti-tip bracket. The Lockout function should lock. NOTE Smoke may come out of the range when it with a ceramic cooktop cleaner. Press Clear/Off for three seconds. The elements should glow red and radiate heat, and they should... to glow red. 4 After checking all the surface heating elements, check the locking system by thermal shock. The convection fan should cycle on electrical power. The range should finish preheating in the Hi position. Press Bake and press the number keys to set the oven temperature to 350 °F. 6 The...

Owners Manual
Page 48
...door remains locked until the oven temperature has cooled. WARNING •• Make sure that the oven and bulb are cool. •• Disconnect the electrical power to activate. •• If the clock is not clean after one self-clean cycle, repeat the cycle. •• If oven racks were... Setting Self Clean with a small amount of vegetable oil to make them glide more than 12 hours in the porcelain because it off . 1 Unplug the range or disconnect power. 2 Turn the glass bulb cover in the back of the oven counterclockwise to remove. 3 Pull the bulb out of the socket. 4 ...
...door remains locked until the oven temperature has cooled. WARNING •• Make sure that the oven and bulb are cool. •• Disconnect the electrical power to activate. •• If the clock is not clean after one self-clean cycle, repeat the cycle. •• If oven racks were... Setting Self Clean with a small amount of vegetable oil to make them glide more than 12 hours in the porcelain because it off . 1 Unplug the range or disconnect power. 2 Turn the glass bulb cover in the back of the oven counterclockwise to remove. 3 Pull the bulb out of the socket. 4 ...

Owners Manual
Page 51
... fully seated into the bottom edge of the slots. 4 Lock the hinge locks, rotating them back toward the slots in severe personal injury, death, or electrical shock. Bottom edge of the drawer and push back until the stops clear the guides. (4) Model LREL6325* Screw the 2 screws on the back of the... drawer. 2 screws 3 Lift the front of the slots. Use warm water to the range at the same angle as the removal position, seat the indentation of the hinge arms into the bottom edge of the drawer until it closes...
... fully seated into the bottom edge of the slots. 4 Lock the hinge locks, rotating them back toward the slots in severe personal injury, death, or electrical shock. Bottom edge of the drawer and push back until the stops clear the guides. (4) Model LREL6325* Screw the 2 screws on the back of the... drawer. 2 screws 3 Lift the front of the slots. Use warm water to the range at the same angle as the removal position, seat the indentation of the hinge arms into the bottom edge of the drawer until it closes...

Owners Manual
Page 55
... Reposition the rack to the element. Allow the oven to cool to drip into pan. •• Grease has built up on range is not level. - Always place grid on broiler pan wrong side up and slots down to allow grease to below locking temperature. ...excessively during broiling. Make sure you press Broil. •• Improper rack position being used . - Appliance does not operate. Contact your local electric company for assistance. •• Power outage. Call your electrician for service. •• Replace or tighten bulb. See Changing the Oven...
... Reposition the rack to the element. Allow the oven to cool to drip into pan. •• Grease has built up on range is not level. - Always place grid on broiler pan wrong side up and slots down to allow grease to below locking temperature. ...excessively during broiling. Make sure you press Broil. •• Improper rack position being used . - Appliance does not operate. Contact your local electric company for assistance. •• Power outage. Call your electrician for service. •• Replace or tighten bulb. See Changing the Oven...

Owners Manual
Page 58
... includes installation or maintenance contrary to the Product owner's manual. •• Damage or failure caused by incorrect electrical current, voltage, or ventilation/plumbing codes. •• Damage or failure caused by LG. Should your LG Electric Range ("Product") fail due to you may also have been removed, altered, or cannot be new, reconditioned, refurbished...
... includes installation or maintenance contrary to the Product owner's manual. •• Damage or failure caused by incorrect electrical current, voltage, or ventilation/plumbing codes. •• Damage or failure caused by LG. Should your LG Electric Range ("Product") fail due to you may also have been removed, altered, or cannot be new, reconditioned, refurbished...


