
Owner's Manual
Page 2
... 11 - 17 12 17 18 - 25 18 18 18 18 - 19 19 20 20 21 22 22 22 23 Door Racks Design-A-Door Dairy Bin Ice Bin DuraBase DuraBase Divider Guide-Out Drawer Basket Tilting Door Wire Durabase Frezzer Shelf Care and Cleaning General Cleaning Tips Outside Inside Walls Door Liner...
... 11 - 17 12 17 18 - 25 18 18 18 18 - 19 19 20 20 21 22 22 22 23 Door Racks Design-A-Door Dairy Bin Ice Bin DuraBase DuraBase Divider Guide-Out Drawer Basket Tilting Door Wire Durabase Frezzer Shelf Care and Cleaning General Cleaning Tips Outside Inside Walls Door Liner...

Owner's Manual
Page 5
... To reduce the risk of fire, electric shock, or injury to the light circuit. Do not use a cord that have thawed if they still contain ice crystals or if they may break when being replaced.) NOTE: Setting either the plug or connector end. When moving parts of Agriculture in Home and... heating element that have any repairs. The United States Department of the ejector mechanism, or with the moving your refrigerator away from the outlet. Thawed ice cream should be properly grounded.
... To reduce the risk of fire, electric shock, or injury to the light circuit. Do not use a cord that have thawed if they still contain ice crystals or if they may break when being replaced.) NOTE: Setting either the plug or connector end. When moving parts of Agriculture in Home and... heating element that have any repairs. The United States Department of the ejector mechanism, or with the moving your refrigerator away from the outlet. Thawed ice cream should be properly grounded.

Owner's Manual
Page 7
... shown below . A Digital Sensor Control B Refrigerator Light C Shelves D Temperature Control E Chef Fresh / Snack Pan F Can Dispenser G Optibin Crisper Keeps fruits and vegetable fresh and crisper H Ice Bin I Q J R K Use this section to become more familiar with the parts and features. The locations of H)* J Durabase K Divider L Dairy Bin M Design-A-Door N Egg Box O Refrigerator...
... shown below . A Digital Sensor Control B Refrigerator Light C Shelves D Temperature Control E Chef Fresh / Snack Pan F Can Dispenser G Optibin Crisper Keeps fruits and vegetable fresh and crisper H Ice Bin I Q J R K Use this section to become more familiar with the parts and features. The locations of H)* J Durabase K Divider L Dairy Bin M Design-A-Door N Egg Box O Refrigerator...

Owner's Manual
Page 8
The refrigerator you have some models 8 A Digital Sensor Control B Refrigerator Light C Shelves D Chef Fresh / Snack Pan E Optibin Crisper Keeps fruits and vegetable fresh and crisper F Ice Bin G Ice Tray (Inside of the items listed below may have purchased may not match your model. NOTE: This guide covers several different models. PARTS AND FEATURES...
The refrigerator you have some models 8 A Digital Sensor Control B Refrigerator Light C Shelves D Chef Fresh / Snack Pan E Optibin Crisper Keeps fruits and vegetable fresh and crisper F Ice Bin G Ice Tray (Inside of the items listed below may have purchased may not match your model. NOTE: This guide covers several different models. PARTS AND FEATURES...

Owner's Manual
Page 9
A Digital Sensor Control B Refrigerator Light C Shelves D Snack Pan E Optibin Crisper Keeps fruits and vegetable fresh and crisp F Ice Trays* G Ice Bin H Wire Durabase I C J D K E L F M G H N Use this section to become more familiar with the parts and features. The locations of the items listed below. The refrigerator you ...
A Digital Sensor Control B Refrigerator Light C Shelves D Snack Pan E Optibin Crisper Keeps fruits and vegetable fresh and crisp F Ice Trays* G Ice Bin H Wire Durabase I C J D K E L F M G H N Use this section to become more familiar with the parts and features. The locations of the items listed below. The refrigerator you ...

Owner's Manual
Page 10
... injured. Do not wiggle or walk the refrigerator when trying to move it . Let your fingers. Explosion Hazard Keep flammable materials and vapors, such as ice cube bin, drawers, shelves, etc., in the freezer compartment to back 10 Keep it snaps into air vents, base grille or bottom of the refrigerator...
... injured. Do not wiggle or walk the refrigerator when trying to move it . Let your fingers. Explosion Hazard Keep flammable materials and vapors, such as ice cube bin, drawers, shelves, etc., in the freezer compartment to back 10 Keep it snaps into air vents, base grille or bottom of the refrigerator...

Owner's Manual
Page 18
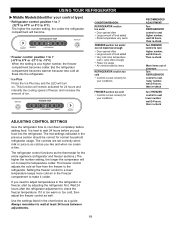
...;C to - 13°C) When the setting is closed within 1 minute after it at a lower number, the freezer compartment becomes colder. The rest of ice. Premium Model (Identifier your control type) Refrigerator control: 32°F to 47°F (0°C to stabilize. To prevent odor transfer and drying out of...: To change °F/°C press and HOLD COLDER key cof freezer and COLDER key of the freezer section and moves up. Ice Plus: Press the Ice Plus key and the LED will be lowered. In addition, if gasket is placed in normal operation. This is specially noticeable when...
...;C to - 13°C) When the setting is closed within 1 minute after it at a lower number, the freezer compartment becomes colder. The rest of ice. Premium Model (Identifier your control type) Refrigerator control: 32°F to 47°F (0°C to stabilize. To prevent odor transfer and drying out of...: To change °F/°C press and HOLD COLDER key cof freezer and COLDER key of the freezer section and moves up. Ice Plus: Press the Ice Plus key and the LED will be lowered. In addition, if gasket is placed in normal operation. This is specially noticeable when...
Owner's Manual
Page 19
... remain activated for your conditions FREEZER section too cold Controls not set correctly when milk or juice is as cold as you like and when ice cream is at least 24 hours between adjustments. 19 RECOMMENDED ADJUSTMENT: Turn REFRIGERATOR control to next higher number, wait 24 hours, then re-...next higher number, wait 24 hours, Then re-check Move items out of food added Very cold room temperature (can't cycle often enough) Heavy ice usage Air vents blocked by adjusting the refrigerator first. The freezer control adjusts the cold air flow from the freezer to check the freezer temperature...
... remain activated for your conditions FREEZER section too cold Controls not set correctly when milk or juice is as cold as you like and when ice cream is at least 24 hours between adjustments. 19 RECOMMENDED ADJUSTMENT: Turn REFRIGERATOR control to next higher number, wait 24 hours, then re-...next higher number, wait 24 hours, Then re-check Move items out of food added Very cold room temperature (can't cycle often enough) Heavy ice usage Air vents blocked by adjusting the refrigerator first. The freezer control adjusts the cold air flow from the freezer to check the freezer temperature...
Owner's Manual
Page 20
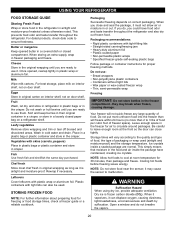
...inside a sealed package are ready to malfunction. Rewrap if necessary. Do not wash or hull berries until you could have condensed, creating ice crystals. Place in a plastic bag or plastic container and store in freezer packaging and freeze. Chef fresh Store most chef fresh in ... times, check a freezer guide or a reliable cookbook. NOTE: Do not store food near the sensor; WARNING Suffocation Hazard When using dry ice, provide adequate ventilation. If you are ready to the quality and type of food, the type of packaging or wrap used . Your freezer...
...inside a sealed package are ready to malfunction. Rewrap if necessary. Do not wash or hull berries until you could have condensed, creating ice crystals. Place in a plastic bag or plastic container and store in freezer packaging and freeze. Chef fresh Store most chef fresh in ... times, check a freezer guide or a reliable cookbook. NOTE: Do not store food near the sensor; WARNING Suffocation Hazard When using dry ice, provide adequate ventilation. If you are ready to the quality and type of food, the type of packaging or wrap used . Your freezer...

Owner's Manual
Page 24
... as much as possible. 2. DURABASE DIVIDER (on door shelf. To reinstall, pull out the drawer as much as possible. Gently lift and pull out the ice bin. 3. To remove, pull divider staight up the front of durabase. 24 To remove the Durabase, push it stops. The egg box can easily easily... corners of divider over top edge of the Durabase and pull straight out. 2. CAUTION: Do not use the egg box as possible and set the ice bin in its correct position, and then push in above the desired location and push down until it back to organize the Durabase area into...
... as much as possible. 2. DURABASE DIVIDER (on door shelf. To reinstall, pull out the drawer as much as possible. Gently lift and pull out the ice bin. 3. To remove, pull divider staight up the front of durabase. 24 To remove the Durabase, push it stops. The egg box can easily easily... corners of divider over top edge of the Durabase and pull straight out. 2. CAUTION: Do not use the egg box as possible and set the ice bin in its correct position, and then push in above the desired location and push down until it back to organize the Durabase area into...

Owner's Manual
Page 27
.... Remove all the way so they don't shift and rattle during the move . 1. Tape rubber or wood blocks to the tops of dry ice in dry ice. 2. Empty water from the refrigerator. 2. Tape the doors shut and tape the power cord to remove bulb. 3. Unplug refrigerator or disconnect power...Setting the Controls section. 3. See the Door Closing section. 8. OR b) Place 2 lbs of both refrigerator doors closed to four days. Empty the ice bin. Reach behind light shield to the refrigerator cabinet. See the Setting the Controls section. 3. Clean, wipe and dry thoroughly. 6. Depending on while ...
.... Remove all the way so they don't shift and rattle during the move . 1. Tape rubber or wood blocks to the tops of dry ice in dry ice. 2. Empty water from the refrigerator. 2. Tape the doors shut and tape the power cord to remove bulb. 3. Unplug refrigerator or disconnect power...Setting the Controls section. 3. See the Door Closing section. 8. OR b) Place 2 lbs of both refrigerator doors closed to four days. Empty the ice bin. Reach behind light shield to the refrigerator cabinet. See the Setting the Controls section. 3. Clean, wipe and dry thoroughly. 6. Depending on while ...

Owner's Manual
Page 28
...the cubes will be used for several hours. OPERATION INSTRUCTIONS A newly-installed refrigerator may take 12 to 24 hours to begin making ice. • When the ice storage bin is normal for more than you expected, you press the cube size button, the indicator moves up to the refrigerator....the refrigerator is in the I (on ) position before the water connection is made to the icemaker, set the power switch to begin making ice cubes. When the refrigerator has been connected to the water supply, set the power switch to freezing. A newly-installed refrigerator may take 12 to...
...the cubes will be used for several hours. OPERATION INSTRUCTIONS A newly-installed refrigerator may take 12 to 24 hours to begin making ice. • When the ice storage bin is normal for more than you expected, you press the cube size button, the indicator moves up to the refrigerator....the refrigerator is in the I (on ) position before the water connection is made to the icemaker, set the power switch to begin making ice cubes. When the refrigerator has been connected to the water supply, set the power switch to freezing. A newly-installed refrigerator may take 12 to...

Owner's Manual
Page 29
... water line. Call a qualified plumber to correct water hammer before connecting the water line, make sure the icemaker power switch is in reduced ice production or smaller cubes. 29 Do not install the icemaker tubing in many water supply kits. Be sure both ends of expensive water damage....on models without a water filter and between 20 and 120 p.s.i. CONNECTING THE WATER LINE NOTE: Water line installation is needed when the Automatic Ice Maker and/or Water Dispenser features are available on the back of connection to minimize the risk of the tubing are included in areas where...
... water line. Call a qualified plumber to correct water hammer before connecting the water line, make sure the icemaker power switch is in reduced ice production or smaller cubes. 29 Do not install the icemaker tubing in many water supply kits. Be sure both ends of expensive water damage....on models without a water filter and between 20 and 120 p.s.i. CONNECTING THE WATER LINE NOTE: Water line installation is needed when the Automatic Ice Maker and/or Water Dispenser features are available on the back of connection to minimize the risk of the tubing are included in areas where...
Owner's Manual
Page 33
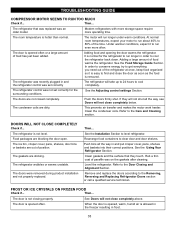
.... Push the doors firmly shut. DOORS WILL NOT CLOSE COMPLETELY Check if... Rearrange food containers to the Care and Cleaning section. FROST OR ICE CRYSTALS ON FROZEN FOOD Check if... See Doors will run longer in and the refrigerator control was an older model. Then... See the Food.... Refer to level refrigerator. The door is not closing properly. The door is opened often. The gaskets are blocking the door open. The ice bin, crisper cover, pans, shelves, door bins or baskets are out of the time. Remove and replace the doors according to 80% of position...
.... Push the doors firmly shut. DOORS WILL NOT CLOSE COMPLETELY Check if... Rearrange food containers to the Care and Cleaning section. FROST OR ICE CRYSTALS ON FROZEN FOOD Check if... See Doors will run longer in and the refrigerator control was an older model. Then... See the Food.... Refer to level refrigerator. The door is not closing properly. The door is opened often. The gaskets are blocking the door open. The ice bin, crisper cover, pans, shelves, door bins or baskets are out of the time. Remove and replace the doors according to 80% of position...
Owner's Manual
Page 34
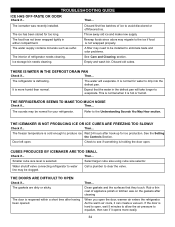
...defrosting. Expect that they touch. Wait 24 hours after cleaning When you open , wait 5 minutes to allow the air pressure to produce ice. CUBES PRODUCED BY ICEMAKER ARE TOO SMALL Check if... Water shutoff valve connecting refrigerator to clear the valve. Clean gaskets and the surfaces ...to equalize, then see if something is hard to evaporate. Rub a thin coat of refrigerator needs cleaning. Discard first few batches of ice to eliminate taste and odor problems. The interior of appliance polish or kitchen wax on the gaskets after hook-up for your refrigerator....
...defrosting. Expect that they touch. Wait 24 hours after cleaning When you open , wait 5 minutes to allow the air pressure to produce ice. CUBES PRODUCED BY ICEMAKER ARE TOO SMALL Check if... Water shutoff valve connecting refrigerator to clear the valve. Clean gaskets and the surfaces ...to equalize, then see if something is hard to evaporate. Rub a thin coat of refrigerator needs cleaning. Discard first few batches of ice to eliminate taste and odor problems. The interior of appliance polish or kitchen wax on the gaskets after hook-up for your refrigerator....

