
Owner's Manual
Page 2
TABLE OF CONTENTS English Version Spanish Version Warranty (U.S.A.) Safety Instructions Grounding Requirements Parts and Features Refrigerator Installation Unpacking Your Refrigerator Installation Base Grille Removing, Reversing and Replacing Your Refrigerator Doors Pull out Drawer ...Out Drawer Basket Tilting Door Wire Durabase Frezzer Shelf Care and Cleaning General Cleaning Tips Outside Inside Walls Door Liner and Gaskets Plastic Parts Condenser Coils Light Bulb Replacement Power Interruptions When you go on vacation About the Custom Cube Icemaker Connecting the Water Line Troubleshooting ...
TABLE OF CONTENTS English Version Spanish Version Warranty (U.S.A.) Safety Instructions Grounding Requirements Parts and Features Refrigerator Installation Unpacking Your Refrigerator Installation Base Grille Removing, Reversing and Replacing Your Refrigerator Doors Pull out Drawer ...Out Drawer Basket Tilting Door Wire Durabase Frezzer Shelf Care and Cleaning General Cleaning Tips Outside Inside Walls Door Liner and Gaskets Plastic Parts Condenser Coils Light Bulb Replacement Power Interruptions When you go on vacation About the Custom Cube Icemaker Connecting the Water Line Troubleshooting ...

Owner's Manual
Page 3
... is installed outside the normal service area, any cost of transportation involved in order to LG in the repair of the product, or the replacement of defective parts, shall be submitted at its option replace, without charge, your product type (Refrigerator), ...of original purchase. Display, discount, or refurbished units purchased with scratches, dents, or defects. including Alaska, Hawaii, and U.S. LG Refrigerator / Freezer Warranty Period Product Parts Labor Refrigerator / Freezer 1 year 1 year [In-Home Service (Except Model GR-051)] Sealed System 7 years 1 year ...
... is installed outside the normal service area, any cost of transportation involved in order to LG in the repair of the product, or the replacement of defective parts, shall be submitted at its option replace, without charge, your product type (Refrigerator), ...of original purchase. Display, discount, or refurbished units purchased with scratches, dents, or defects. including Alaska, Hawaii, and U.S. LG Refrigerator / Freezer Warranty Period Product Parts Labor Refrigerator / Freezer 1 year 1 year [In-Home Service (Except Model GR-051)] Sealed System 7 years 1 year ...

Owner's Manual
Page 5
... that shows cracks or abrasion damage along its intended purpose as you or others, or cause damage to persons when using this appliance. When moving parts of this appliance only for its length or at the circuit breaker or fuse box in minor or moderate injury, or product damage only. clearances...
... that shows cracks or abrasion damage along its intended purpose as you or others, or cause damage to persons when using this appliance. When moving parts of this appliance only for its length or at the circuit breaker or fuse box in minor or moderate injury, or product damage only. clearances...

Owner's Manual
Page 7
PARTS AND FEATURES A B C L D M E N F O G H P I Ice Tray (Inside of the features shown below . The locations of H)* J Durabase K Divider L Dairy Bin M Design-A-Door N Egg Box O Refrigerator Door Rack P Freezer ... Fresh / Snack Pan F Can Dispenser G Optibin Crisper Keeps fruits and vegetable fresh and crisper H Ice Bin I Q J R K Use this section to become more familiar with the parts and features. NOTE: This guide covers several different models. The refrigerator you have purchased may not match your model.
PARTS AND FEATURES A B C L D M E N F O G H P I Ice Tray (Inside of the features shown below . The locations of H)* J Durabase K Divider L Dairy Bin M Design-A-Door N Egg Box O Refrigerator Door Rack P Freezer ... Fresh / Snack Pan F Can Dispenser G Optibin Crisper Keeps fruits and vegetable fresh and crisper H Ice Bin I Q J R K Use this section to become more familiar with the parts and features. NOTE: This guide covers several different models. The refrigerator you have purchased may not match your model.

Owner's Manual
Page 8
... Crisper Keeps fruits and vegetable fresh and crisper F Ice Bin G Ice Tray (Inside of H)* H Durabase I O Use this section to become more familiar with the parts and features. PARTS AND FEATURES A B J C K D L E M F N G H I Divider J Dairy Bin K Design-A-Door L Pull out Drawer M Refrigerator Door Rack N Freezer Light O Customcube Icemaker* *on some or all of the items...
... Crisper Keeps fruits and vegetable fresh and crisper F Ice Bin G Ice Tray (Inside of H)* H Durabase I O Use this section to become more familiar with the parts and features. PARTS AND FEATURES A B J C K D L E M F N G H I Divider J Dairy Bin K Design-A-Door L Pull out Drawer M Refrigerator Door Rack N Freezer Light O Customcube Icemaker* *on some or all of the items...

Owner's Manual
Page 9
PARTS AND FEATURES A B I Dairy Bin J Design-A-Door K Wire Freezer Shelf L Refrigerator Door Rack M Freezer Light N Freezer Door Rack *on some or all of the features shown ... Pan E Optibin Crisper Keeps fruits and vegetable fresh and crisp F Ice Trays* G Ice Bin H Wire Durabase I C J D K E L F M G H N Use this section to become more familiar with the parts and features.
PARTS AND FEATURES A B I Dairy Bin J Design-A-Door K Wire Freezer Shelf L Refrigerator Door Rack M Freezer Light N Freezer Door Rack *on some or all of the features shown ... Pan E Optibin Crisper Keeps fruits and vegetable fresh and crisp F Ice Trays* G Ice Bin H Wire Durabase I C J D K E L F M G H N Use this section to become more familiar with the parts and features.

Owner's Manual
Page 11
... cover (4) using a slotted screwdriver and attach it . Reinstall top hinge cover (7). 9 8 10 7 11 REFRIGERATOR INSTALLATION REMOVING, REVERSING AND REPLACING REFRIGERATOR DOORS (OPTIONAL) NOTE: See the Parts and Features section to rightopening type) 1. IMPORTANT: Before you begin, turn the refrigerator OFF and unplug it fits onto the middle hinge pin (5). Install the...
... cover (4) using a slotted screwdriver and attach it . Reinstall top hinge cover (7). 9 8 10 7 11 REFRIGERATOR INSTALLATION REMOVING, REVERSING AND REPLACING REFRIGERATOR DOORS (OPTIONAL) NOTE: See the Parts and Features section to rightopening type) 1. IMPORTANT: Before you begin, turn the refrigerator OFF and unplug it fits onto the middle hinge pin (5). Install the...

Owner's Manual
Page 14
... the 2 screws (16), remove the bottom hinge (17), and attach on the left . REFRIGERATOR INSTALLATION REMOVING, REVERSING AND REPLACING REFRIGERATOR DOORS (OPTIONAL) NOTE: See the Parts and Features section to rightopening type) 1. IMPORTANT: Before you begin, turn the refrigerator OFF and unplug it . Loosen the screw (5), remove the stoppers (6) and attach...
... the 2 screws (16), remove the bottom hinge (17), and attach on the left . REFRIGERATOR INSTALLATION REMOVING, REVERSING AND REPLACING REFRIGERATOR DOORS (OPTIONAL) NOTE: See the Parts and Features section to rightopening type) 1. IMPORTANT: Before you begin, turn the refrigerator OFF and unplug it . Loosen the screw (5), remove the stoppers (6) and attach...
Owner's Manual
Page 25
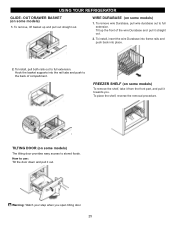
... full extension. To Install, pull both rails out to full extension. FREEZER SHELF (on some models) To remove the shelf, take it from the front part, and pull it out.E Warning: Watch your step when you . USING YOUR REFRIGERATOR GLIDE - WIRE DURABASE (on some models) 1. To install, insert the wire Durabase...
... full extension. To Install, pull both rails out to full extension. FREEZER SHELF (on some models) To remove the shelf, take it from the front part, and pull it out.E Warning: Watch your step when you . USING YOUR REFRIGERATOR GLIDE - WIRE DURABASE (on some models) 1. To install, insert the wire Durabase...
Owner's Manual
Page 26
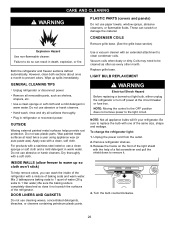
...screwdriver and pull the shield down to clean condenser coils. Do not use cleaning waxes, concentrated detergents, bleaches, or cleaners containing petroleum plastic parts. Dry thoroughly with a stainless steel exterior, use a clean sponge or soft cloth and a mild detergent in death, explosion, or fire.... Coils may need to the light circuit. Remove refrigerator shelves. 3. Turn the bulb counterclockwise. 26 CARE AND CLEANING WARNING PLASTIC PARTS (covers and panels) Do not use abrasive or harsh cleaners. However, clean both sections about once a month to replace the ...
...screwdriver and pull the shield down to clean condenser coils. Do not use cleaning waxes, concentrated detergents, bleaches, or cleaners containing petroleum plastic parts. Dry thoroughly with a stainless steel exterior, use a clean sponge or soft cloth and a mild detergent in death, explosion, or fire.... Coils may need to the light circuit. Remove refrigerator shelves. 3. Turn the bulb counterclockwise. 26 CARE AND CLEANING WARNING PLASTIC PARTS (covers and panels) Do not use abrasive or harsh cleaners. However, clean both sections about once a month to replace the ...

Owner's Manual
Page 27
... is available, consume or can perishable food at the back and then push up . Use up any perishables and freeze other items. 2. Remove all removable parts, wrap them well and tape them open far enough for air to get to your refrigerator before you are away, follow these steps to prepare...
... is available, consume or can perishable food at the back and then push up . Use up any perishables and freeze other items. 2. Remove all removable parts, wrap them well and tape them open far enough for air to get to your refrigerator before you are away, follow these steps to prepare...

Owner's Manual
Page 28
... the cube size button. NOTE: If the cube size is not used before the water line is connected can regulate the size with the moving parts of door openings and other operating conditions. Pressing at highest position returns indicator to the level of cubes dropping into the bin and water running...
... the cube size button. NOTE: If the cube size is not used before the water line is connected can regulate the size with the moving parts of door openings and other operating conditions. Pressing at highest position returns indicator to the level of cubes dropping into the bin and water running...

Owner's Manual
Page 29
... THE HOLE FOR THE VALVE Drill a 1/4" hole in accordance with local plumbing code requirements. To determine how much tubing you can cause damage to refrigerator parts and lead to the water supply pipe. The water pressure must be sure the device is doubleinsulated or grounded in a manner to avoid drawing off...
... THE HOLE FOR THE VALVE Drill a 1/4" hole in accordance with local plumbing code requirements. To determine how much tubing you can cause damage to refrigerator parts and lead to the water supply pipe. The water pressure must be sure the device is doubleinsulated or grounded in a manner to avoid drawing off...


