
Owner's Manual
Page 3
... and pickup, install, instruct, or replace house fuses or correct house wiring or plumbing, or correction of unauthorized repairs. 2. LG Refrigerator / Freezer Warranty Period Product Parts Labor Refrigerator / Freezer 1 year 1 year [In-Home Service (Except Model GR-051)] Sealed System 7 years 1 year [In-Home Service (... 7 days per week, 365 days per year) Press the appropriate menu option, and have your Sales Receipt must be provided to LG in the repair of the product, or the replacement of defective parts, shall be submitted at its option replace, without charge, your ...
... and pickup, install, instruct, or replace house fuses or correct house wiring or plumbing, or correction of unauthorized repairs. 2. LG Refrigerator / Freezer Warranty Period Product Parts Labor Refrigerator / Freezer 1 year 1 year [In-Home Service (Except Model GR-051)] Sealed System 7 years 1 year [In-Home Service (... 7 days per week, 365 days per year) Press the appropriate menu option, and have your Sales Receipt must be provided to LG in the repair of the product, or the replacement of defective parts, shall be submitted at its option replace, without charge, your ...

Owner's Manual
Page 5
... to the product. For personal safety, this appliance only for its length or at the circuit breaker or fuse box in the freezer compartment when hands are in the freezer compartment - "...Thawed ground meats, poultry, or fish that have become frayed or otherwise damaged. If the odor or color of it straight...
... to the product. For personal safety, this appliance only for its length or at the circuit breaker or fuse box in the freezer compartment when hands are in the freezer compartment - "...Thawed ground meats, poultry, or fish that have become frayed or otherwise damaged. If the odor or color of it straight...

Owner's Manual
Page 6
...prevents overloading house wiring circuits which cannot be plugged into its own individual properly grounded electrical outlet rated for proper disposal by LG Electronics, to avoid some risk. 6 NOTE: Before performing any circumstances, cut or remove the third (ground) prong from ... or abandoned refrigerators are finished, reconnect the refrigerator to the electrical source and reset the control (Thermostat, Refrigerator Control or Freezer Control, depending on the model) to OFF and then disconnect the refrigerator from overheated wires. If you intentionally release this appliance...
...prevents overloading house wiring circuits which cannot be plugged into its own individual properly grounded electrical outlet rated for proper disposal by LG Electronics, to avoid some risk. 6 NOTE: Before performing any circumstances, cut or remove the third (ground) prong from ... or abandoned refrigerators are finished, reconnect the refrigerator to the electrical source and reset the control (Thermostat, Refrigerator Control or Freezer Control, depending on the model) to OFF and then disconnect the refrigerator from overheated wires. If you intentionally release this appliance...

Owner's Manual
Page 7
... you have purchased may have some models 7 PARTS AND FEATURES A B C L D M E N F O G H P I Ice Tray (Inside of H)* J Durabase K Divider L Dairy Bin M Design-A-Door N Egg Box O Refrigerator Door Rack P Freezer Light Q Pull out Drawer R Customcube Icemaker* *on some or all of the features shown below . A Digital Sensor Control B Refrigerator Light C Shelves D Temperature Control E Chef Fresh...
... you have purchased may have some models 7 PARTS AND FEATURES A B C L D M E N F O G H P I Ice Tray (Inside of H)* J Durabase K Divider L Dairy Bin M Design-A-Door N Egg Box O Refrigerator Door Rack P Freezer Light Q Pull out Drawer R Customcube Icemaker* *on some or all of the features shown below . A Digital Sensor Control B Refrigerator Light C Shelves D Temperature Control E Chef Fresh...

Owner's Manual
Page 8
... of the features shown below . The refrigerator you have some models 8 PARTS AND FEATURES A B J C K D L E M F N G H I Divider J Dairy Bin K Design-A-Door L Pull out Drawer M Refrigerator Door Rack N Freezer Light O Customcube Icemaker* *on some or all of the items listed below may have purchased may not match your model. NOTE: This guide covers several...
... of the features shown below . The refrigerator you have some models 8 PARTS AND FEATURES A B J C K D L E M F N G H I Divider J Dairy Bin K Design-A-Door L Pull out Drawer M Refrigerator Door Rack N Freezer Light O Customcube Icemaker* *on some or all of the items listed below may have purchased may not match your model. NOTE: This guide covers several...

Owner's Manual
Page 9
PARTS AND FEATURES A B I Dairy Bin J Design-A-Door K Wire Freezer Shelf L Refrigerator Door Rack M Freezer Light N Freezer Door Rack *on some or all of the features shown below may have some models 9 The locations of the items listed below. The refrigerator you ...
PARTS AND FEATURES A B I Dairy Bin J Design-A-Door K Wire Freezer Shelf L Refrigerator Door Rack M Freezer Light N Freezer Door Rack *on some or all of the features shown below may have some models 9 The locations of the items listed below. The refrigerator you ...

Owner's Manual
Page 10
... or moisture. INSTALLATION 1. Your refrigerator is heavy. If required, adjust the leveling screws to lower it , as ice cube bin, drawers, shelves, etc., in the freezer compartment to back wall of the floor. Too small a distance from refrigerator. REFRIGERATOR INSTALLATION WARNING Excessive Weight Hazard Use two or more information, see the...
... or moisture. INSTALLATION 1. Your refrigerator is heavy. If required, adjust the leveling screws to lower it , as ice cube bin, drawers, shelves, etc., in the freezer compartment to back wall of the floor. Too small a distance from refrigerator. REFRIGERATOR INSTALLATION WARNING Excessive Weight Hazard Use two or more information, see the...

Owner's Manual
Page 12
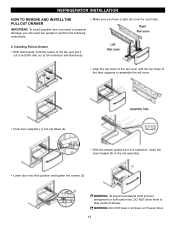
... property damage, you remove the drawer, do not hold the center of the bar and push it could cause personal injury. REFRIGERATOR INSTALLATION To remove Freezer Door Handle • Remove the screws(2) of the rail on handle with the screws mounted in front of the door.
... property damage, you remove the drawer, do not hold the center of the bar and push it could cause personal injury. REFRIGERATOR INSTALLATION To remove Freezer Door Handle • Remove the screws(2) of the rail on handle with the screws mounted in front of the door.
Owner's Manual
Page 13
...: To avoid possible injur or product or property damage, you have a right rail cover for each side. 2. WARNING: DO NOT step or sit down on Freezer Door. 13 Installing Pullout Drawer • With both hands, hold the center of the bar and pull it out to let both rails out to...
...: To avoid possible injur or product or property damage, you have a right rail cover for each side. 2. WARNING: DO NOT step or sit down on Freezer Door. 13 Installing Pullout Drawer • With both hands, hold the center of the bar and pull it out to let both rails out to...

Owner's Manual
Page 14
... a slotted screwdriver and attach it on the opposite side). Loosen the 2 screws (18) and attach the stopper (19) on the left (on the right. Removing Freezer Door Lift the door (10) slightly and remove it . Loosen the screw (5), remove the stoppers (6) and attach them on the left . Pry off the middle...
... a slotted screwdriver and attach it on the opposite side). Loosen the 2 screws (18) and attach the stopper (19) on the left (on the right. Removing Freezer Door Lift the door (10) slightly and remove it . Loosen the screw (5), remove the stoppers (6) and attach them on the left . Pry off the middle...
Owner's Manual
Page 16
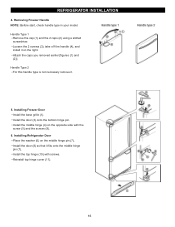
.... Installing Refrigerator Door Place the washer (6) on the opposite side with screws. Install the middle hinge (4) on the middle hinge pin (7). Installing Freezer Door Install the base grille (1). Removing Freezer Handle NOTE: Before start, check handle type in your model. Install the door (8) so that it fits onto the middle hinge pin (7).
.... Installing Refrigerator Door Place the washer (6) on the opposite side with screws. Install the middle hinge (4) on the middle hinge pin (7). Installing Freezer Door Install the base grille (1). Removing Freezer Handle NOTE: Before start, check handle type in your model. Install the door (8) so that it fits onto the middle hinge pin (7).

Owner's Manual
Page 18
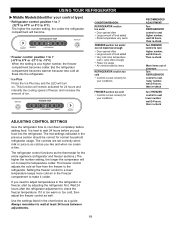
...of these vents with food packages. MULTI FLOW Your refrigerator has two controls that let you ´ll listen a alarm when the freezer or refrigerator door is not closed correctly. 18 But the refrigerator compartment becomes warmer because less cold air flows into the refrigerator. The ...alarm is cancelled when the freezer or the refrigerator is at this feature you regulate the temperature in one day) to - 13°C) When the setting is closed ...
...of these vents with food packages. MULTI FLOW Your refrigerator has two controls that let you ´ll listen a alarm when the freezer or refrigerator door is not closed correctly. 18 But the refrigerator compartment becomes warmer because less cold air flows into the refrigerator. The ...alarm is cancelled when the freezer or the refrigerator is at this feature you regulate the temperature in one day) to - 13°C) When the setting is closed ...
Owner's Manual
Page 19
...items out of ice. Wait 24 hours after the refrigerator adjustment to the refrigerator. If it colder. Use the settings listed in the Freezer compartment to -13°C) When the setting is firm. This function will run to keep the temperature colder. The refrigerator control functions.... REFRIGERATOR TEMP CONDITION/REASON: REFRIGERATOR section too warm Door opened often Large amount of food added Room temperature very warm ADJUST WARMER 4 IS RECOMMENDED Freezer control: position 1 to 7 (-6°F to 8°F or -21°C to make it is best to next lower number, wait 24 hours...
...items out of ice. Wait 24 hours after the refrigerator adjustment to the refrigerator. If it colder. Use the settings listed in the Freezer compartment to -13°C) When the setting is firm. This function will run to keep the temperature colder. The refrigerator control functions.... REFRIGERATOR TEMP CONDITION/REASON: REFRIGERATOR section too warm Door opened often Large amount of food added Room temperature very warm ADJUST WARMER 4 IS RECOMMENDED Freezer control: position 1 to 7 (-6°F to 8°F or -21°C to make it is best to next lower number, wait 24 hours...
Owner's Manual
Page 20
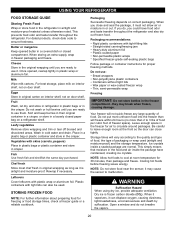
... original wrapping until you are ready to use : Bread wrappers Non-polyethylene plastic containers Containers without tight lids Wax paper or wax-coated freezer wrap Thin, semi-permeable wrap Freezing IMPORTANT: Do not store bottles in the food and air inside a sealed package are normal. Place... wrap or aluminum foil. Leftovers Cover leftovers with skins (carrots, peppers) Place in plastic bags or plastic container and store in the freezer for 30 minutes, then package and freeze. When you could have condensed, creating ice crystals. Ice crystals inside the package have food ...
... original wrapping until you are ready to use : Bread wrappers Non-polyethylene plastic containers Containers without tight lids Wax paper or wax-coated freezer wrap Thin, semi-permeable wrap Freezing IMPORTANT: Do not store bottles in the food and air inside a sealed package are normal. Place... wrap or aluminum foil. Leftovers Cover leftovers with skins (carrots, peppers) Place in plastic bags or plastic container and store in the freezer for 30 minutes, then package and freeze. When you could have condensed, creating ice crystals. Ice crystals inside the package have food ...

Owner's Manual
Page 24
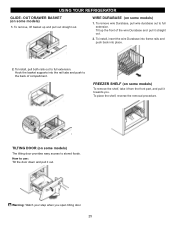
... bin in above the desired location and push down until it and pull straight out. 2. To replace the dairy bin, slide it in the freezer compartment. Tilt up . 2. FREEZER SECTION ICE BIN (on some models) 1. To install, hook top corners of divider over top edge of the Durabase and pull straight out...
... bin in above the desired location and push down until it and pull straight out. 2. To replace the dairy bin, slide it in the freezer compartment. Tilt up . 2. FREEZER SECTION ICE BIN (on some models) 1. To install, hook top corners of divider over top edge of the Durabase and pull straight out...
Owner's Manual
Page 25
... pull it towards you open tilting door.To adjust 25 Hook the basket supports into place. 2. To Install, pull both rails out to full extension. FREEZER SHELF (on some models) 1. USING YOUR REFRIGERATOR GLIDE - To install, insert the wire Durabase into frame rails and push back into the rail tabs and...
... pull it towards you open tilting door.To adjust 25 Hook the basket supports into place. 2. To Install, pull both rails out to full extension. FREEZER SHELF (on some models) 1. USING YOUR REFRIGERATOR GLIDE - To install, insert the wire Durabase into frame rails and push back into the rail tabs and...
Owner's Manual
Page 26
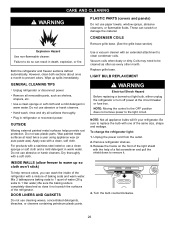
Both the refrigerator and freezer sections defrost automatically. Wipe up so cloth won't stick) To help of a flat screwdriver and pull the shield down to warm up spills immediately. Plug ... protection. Do not wax plastic parts. For products with a mixture of the refrigerator with a stainless steel exterior, use abrasive or harsh cleaners. INSIDE WALLS (allow freezer to remove it not scratch the surfaces of the refrigerator. Vacuum coils when dusty or dirty. NOTE: Moving the control to the OFF position does...
Both the refrigerator and freezer sections defrost automatically. Wipe up so cloth won't stick) To help of a flat screwdriver and pull the shield down to warm up spills immediately. Plug ... protection. Do not wax plastic parts. For products with a mixture of the refrigerator with a stainless steel exterior, use abrasive or harsh cleaners. INSIDE WALLS (allow freezer to remove it not scratch the surfaces of the refrigerator. Vacuum coils when dusty or dirty. NOTE: Moving the control to the OFF position does...

Owner's Manual
Page 27
...tape them open far enough for every cubic foot of the refrigerator so it for the move . 7. Depending on the model, raise the front of freezer space. Depending on while you are moving your hands from building up. See the Setting the Controls section. 3. Unplug the refrigerator. 4. Clean, wipe...in the leveling legs all food from the refrigerator. 2. To assemble, first insert the hooks at once. Empty the ice bin. To change the freezer light: 1. WHEN YOU GO ON VACATION If you choose to leave the refrigerator on your model, set the thermostat control (refrigerator control) to ...
...tape them open far enough for every cubic foot of the refrigerator so it for the move . 7. Depending on the model, raise the front of freezer space. Depending on while you are moving your hands from building up. See the Setting the Controls section. 3. Unplug the refrigerator. 4. Clean, wipe...in the leveling legs all food from the refrigerator. 2. To assemble, first insert the hooks at once. Empty the ice bin. To change the freezer light: 1. WHEN YOU GO ON VACATION If you choose to leave the refrigerator on your model, set the thermostat control (refrigerator control) to ...

Owner's Manual
Page 28
.... A newly-installed refrigerator may take 12 to 24 hours to flooding from ruptured water lines or connections. 28 approximately 100-130 cubes in the I (on freezer compartment temperature, room temperature, number of the feeler arm, the icemaker will buzz even if it cools to O (off the water supply to lowest position...
.... A newly-installed refrigerator may take 12 to 24 hours to flooding from ruptured water lines or connections. 28 approximately 100-130 cubes in the I (on freezer compartment temperature, room temperature, number of the feeler arm, the icemaker will buzz even if it cools to O (off the water supply to lowest position...

Owner's Manual
Page 32
... may cause your new refrigerator to run more efficiently to you, you may hear the evaporator fan motor circulating the air through the refrigerator and freezer compartments. You may hear a pulsating or high-pitched sound. Gently remove the bulb and reinsert.
... may cause your new refrigerator to run more efficiently to you, you may hear the evaporator fan motor circulating the air through the refrigerator and freezer compartments. You may hear a pulsating or high-pitched sound. Gently remove the bulb and reinsert.

