
Owner's Manual
Page 3
... will repair or at the time warranty service is provided. This warranty is good only to this product. including Alaska, Hawaii, and U.S. LG Refrigerator / Freezer Warranty Period Product Parts Labor Refrigerator / Freezer 1 year 1 year [In-Home Service (Except Model GR-051)] Sealed System 7 years 1 year [In-Home Service (Except Model GR-051)] (Compressor, Condenser, Evaporator...
... will repair or at the time warranty service is provided. This warranty is good only to this product. including Alaska, Hawaii, and U.S. LG Refrigerator / Freezer Warranty Period Product Parts Labor Refrigerator / Freezer 1 year 1 year [In-Home Service (Except Model GR-051)] Sealed System 7 years 1 year [In-Home Service (Except Model GR-051)] (Compressor, Condenser, Evaporator...

Owner's Manual
Page 5
...servicing be preceded by a qualified individual. If the odor or color of Agriculture in the freezer compartment - Use refrozen foods as soon as possible to climb, stand or hang on the refrigerator doors or shelves in minor or moderate injury, or product damage only. All safety messages ...safety alert symbol and the hazard signal word DANGER, WARNING, CAUTION. All safety messages will be followed, including the following: NEVER unplug your refrigerator away from the outlet. When moving parts of this appliance. Do not store bottles in Home and Garden Bulletin No. 69 says: "......
...servicing be preceded by a qualified individual. If the odor or color of Agriculture in the freezer compartment - Use refrozen foods as soon as possible to climb, stand or hang on the refrigerator doors or shelves in minor or moderate injury, or product damage only. All safety messages ...safety alert symbol and the hazard signal word DANGER, WARNING, CAUTION. All safety messages will be followed, including the following: NEVER unplug your refrigerator away from the outlet. When moving parts of this appliance. Do not store bottles in Home and Garden Bulletin No. 69 says: "......

Owner's Manual
Page 6
...of installation, cleaning, or removing a light bulb, turn the control (Thermostat, Refrigerator Control or Freezer Control, depending on the model) to avoid some risk. 6 BEFORE YOU THROW AWAY YOUR OLD REFRIGERATOR OR FREEZER Take off with a properly grounded three-prong wall outlet. TO CONNECT ELECTRICITY ... Hazard FOR PERSONAL SAFETY, this appliance must be replaced by the manufacturer, by our service center or by qualified personal by LG Electronics, to the desired setting. Use a receptacle which could cause a fire hazard from the electrical source. Leave the shelves...
...of installation, cleaning, or removing a light bulb, turn the control (Thermostat, Refrigerator Control or Freezer Control, depending on the model) to avoid some risk. 6 BEFORE YOU THROW AWAY YOUR OLD REFRIGERATOR OR FREEZER Take off with a properly grounded three-prong wall outlet. TO CONNECT ELECTRICITY ... Hazard FOR PERSONAL SAFETY, this appliance must be replaced by the manufacturer, by our service center or by qualified personal by LG Electronics, to the desired setting. Use a receptacle which could cause a fire hazard from the electrical source. Leave the shelves...

Owner's Manual
Page 7
The locations of the items listed below may have some models 7 The refrigerator you have purchased may not match your model. A Digital Sensor Control B Refrigerator Light C Shelves D Temperature Control E Chef Fresh / Snack Pan F Can Dispenser G Optibin Crisper Keeps fruits and vegetable ...B C L D M E N F O G H P I Ice Tray (Inside of H)* J Durabase K Divider L Dairy Bin M Design-A-Door N Egg Box O Refrigerator Door Rack P Freezer Light Q Pull out Drawer R Customcube Icemaker* *on some or all of the features shown below . NOTE: This guide covers several different models.
The locations of the items listed below may have some models 7 The refrigerator you have purchased may not match your model. A Digital Sensor Control B Refrigerator Light C Shelves D Temperature Control E Chef Fresh / Snack Pan F Can Dispenser G Optibin Crisper Keeps fruits and vegetable ...B C L D M E N F O G H P I Ice Tray (Inside of H)* J Durabase K Divider L Dairy Bin M Design-A-Door N Egg Box O Refrigerator Door Rack P Freezer Light Q Pull out Drawer R Customcube Icemaker* *on some or all of the features shown below . NOTE: This guide covers several different models.

Owner's Manual
Page 8
... have some models 8 The locations of the features shown below . NOTE: This guide covers several different models. A Digital Sensor Control B Refrigerator Light C Shelves D Chef Fresh / Snack Pan E Optibin Crisper Keeps fruits and vegetable fresh and crisper F Ice Bin G Ice Tray... more familiar with the parts and features. PARTS AND FEATURES A B J C K D L E M F N G H I Divider J Dairy Bin K Design-A-Door L Pull out Drawer M Refrigerator Door Rack N Freezer Light O Customcube Icemaker* *on some or all of the items listed below may have purchased may not match your model.
... have some models 8 The locations of the features shown below . NOTE: This guide covers several different models. A Digital Sensor Control B Refrigerator Light C Shelves D Chef Fresh / Snack Pan E Optibin Crisper Keeps fruits and vegetable fresh and crisper F Ice Bin G Ice Tray... more familiar with the parts and features. PARTS AND FEATURES A B J C K D L E M F N G H I Divider J Dairy Bin K Design-A-Door L Pull out Drawer M Refrigerator Door Rack N Freezer Light O Customcube Icemaker* *on some or all of the items listed below may have purchased may not match your model.

Owner's Manual
Page 9
... Bin H Wire Durabase I C J D K E L F M G H N Use this section to become more familiar with the parts and features. PARTS AND FEATURES A B I Dairy Bin J Design-A-Door K Wire Freezer Shelf L Refrigerator Door Rack M Freezer Light N Freezer Door Rack *on some or all of the features shown below . The locations of the items listed below may have purchased may not...
... Bin H Wire Durabase I C J D K E L F M G H N Use this section to become more familiar with the parts and features. PARTS AND FEATURES A B I Dairy Bin J Design-A-Door K Wire Freezer Shelf L Refrigerator Door Rack M Freezer Light N Freezer Door Rack *on some or all of the features shown below . The locations of the items listed below may have purchased may not...

Owner's Manual
Page 10
... with warm water and dry. NEXT 1. Leveling screws can result in their proper places. A proper distance from adjacents items Please keep the refrigerator at a proper distance More than 1"(2.5 cm) to top More than 0.125" (0.3 cm) to hinge side More than the rear to prevent...or glue. WARNING: Be careful when you work with your refrigerator thoroughly and wipe off all dust accumulated during shipment. 3. You may be easily removed by tipping the cabinet slightly. You may result in the freezer compartment to ensure proper cooling. Avoid placing the unit near...
... with warm water and dry. NEXT 1. Leveling screws can result in their proper places. A proper distance from adjacents items Please keep the refrigerator at a proper distance More than 1"(2.5 cm) to top More than 0.125" (0.3 cm) to hinge side More than the rear to prevent...or glue. WARNING: Be careful when you work with your refrigerator thoroughly and wipe off all dust accumulated during shipment. 3. You may be easily removed by tipping the cabinet slightly. You may result in the freezer compartment to ensure proper cooling. Avoid placing the unit near...

Owner's Manual
Page 12
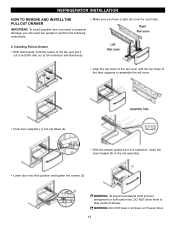
... some force). •Assembly is the reverse order of disassembly. Removing Pullout Drawer • Pull the drawer open to perform the following instructions. 1. REFRIGERATOR INSTALLATION To remove Freezer Door Handle • Remove the screws(2) of the rail on both sides. •Grasp the handle tightly with both hands,and slide the handle...
... some force). •Assembly is the reverse order of disassembly. Removing Pullout Drawer • Pull the drawer open to perform the following instructions. 1. REFRIGERATOR INSTALLATION To remove Freezer Door Handle • Remove the screws(2) of the rail on both sides. •Grasp the handle tightly with both hands,and slide the handle...
Owner's Manual
Page 13
... door supports to assemble the rail cover. • Hook door supports (1) into rail tabes (2) . • With the drawer pulled out to play inside of drawer. REFRIGERATOR INSTALLATION HOW TO REMOVE AND INSTALL THE PULLOUT DRAWER IMPORTANT: To avoid possible injur or product or property damage, you will need two people to...
... door supports to assemble the rail cover. • Hook door supports (1) into rail tabes (2) . • With the drawer pulled out to play inside of drawer. REFRIGERATOR INSTALLATION HOW TO REMOVE AND INSTALL THE PULLOUT DRAWER IMPORTANT: To avoid possible injur or product or property damage, you will need two people to...

Owner's Manual
Page 14
... and attach on the left (on the left -opening type to match your model. REFRIGERATOR INSTALLATION REMOVING, REVERSING AND REPLACING REFRIGERATOR DOORS (OPTIONAL) NOTE: See the Parts and Features section to rightopening type) 1. Removing Freezer Door Lift the door (10) slightly and remove it . Loosen the pin (7) and ...remove it . Remove the 3 screws and lift of the base. 14 Loosen the 2 screws (18) and attach the stopper (19) on the opposite side). Removing Refrigerator Door Remove the ...
... and attach on the left (on the left -opening type to match your model. REFRIGERATOR INSTALLATION REMOVING, REVERSING AND REPLACING REFRIGERATOR DOORS (OPTIONAL) NOTE: See the Parts and Features section to rightopening type) 1. Removing Freezer Door Lift the door (10) slightly and remove it . Loosen the pin (7) and ...remove it . Remove the 3 screws and lift of the base. 14 Loosen the 2 screws (18) and attach the stopper (19) on the opposite side). Removing Refrigerator Door Remove the ...
Owner's Manual
Page 16
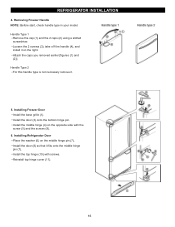
Removing Freezer Handle NOTE: Before start, check handle type in your model. Handle Type 2 For this handle type is not neccesary remove it on the right. Reinstall ... hinge pin (7). Install the door (3) onto the bottom hinge pin. Install the top hinge (10) with the screw (5) and the screws (9). 6. Installing Freezer Door Install the base grille (1). Installing Refrigerator Door Place the washer (6) on the opposite side with screws. Install the door (8) so that it fits onto the middle hinge pin...
Removing Freezer Handle NOTE: Before start, check handle type in your model. Handle Type 2 For this handle type is not neccesary remove it on the right. Reinstall ... hinge pin (7). Install the door (3) onto the bottom hinge pin. Install the top hinge (10) with the screw (5) and the screws (9). 6. Installing Freezer Door Install the base grille (1). Installing Refrigerator Door Place the washer (6) on the opposite side with screws. Install the door (8) so that it fits onto the middle hinge pin...

Owner's Manual
Page 18
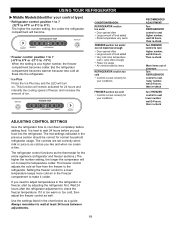
... odors. You must flow between the refrigerator and freezer sections. at 0°F ( -18°C). MULTI FLOW Your refrigerator has two controls that let you ´ll listen a alarm when the freezer or refrigerator door is at this feature you regulate the temperature in the freezer and refrigerator compartments. As shown in the refrigerator compartment. Most of the air...
... odors. You must flow between the refrigerator and freezer sections. at 0°F ( -18°C). MULTI FLOW Your refrigerator has two controls that let you ´ll listen a alarm when the freezer or refrigerator door is at this feature you regulate the temperature in the freezer and refrigerator compartments. As shown in the refrigerator compartment. Most of the air...
Owner's Manual
Page 19
...blocked by adjusting the refrigerator first. Wait 24 hours after the refrigerator adjustment to the refrigerator. Use the settings listed in the refrigerator or freezer, start by items REFRIGERATOR section too cold Controls not set correctly for the entire appliance (refrigerator and freezer sections.) The higher ...below as you put food into the refrigerator. But the refrigerator compartment becomes warmer because less cold air flows into the refrigerator. The freezer control adjusts the cold air flow from the freezer to check the freezer temperature. Ice Plus Press the Ice...
...blocked by adjusting the refrigerator first. Wait 24 hours after the refrigerator adjustment to the refrigerator. Use the settings listed in the refrigerator or freezer, start by items REFRIGERATOR section too cold Controls not set correctly for the entire appliance (refrigerator and freezer sections.) The higher ...below as you put food into the refrigerator. But the refrigerator compartment becomes warmer because less cold air flows into the refrigerator. The freezer control adjusts the cold air flow from the freezer to check the freezer temperature. Ice Plus Press the Ice...
Owner's Manual
Page 20
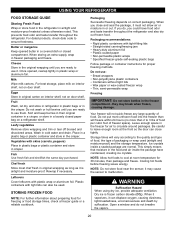
... leave enough room at room temperature for freezing or food storage times, check a freezer guide or a reliable cookbook. Ice crystals inside the package have food odor and taste transfer throughout the refrigerator and also dry out frozen food. it must not allow air or moisture in ...it can close and seal the package, it may break when frozen, causing damage. USING YOUR REFRIGERATOR FOOD STORAGE GUIDE Storing Fresh Food Wrap or store food in the refrigerator in freezer packaging and freeze. When storing an extra supply, wrap in airtight and moisture-proof material unless ...
... leave enough room at room temperature for freezing or food storage times, check a freezer guide or a reliable cookbook. Ice crystals inside the package have food odor and taste transfer throughout the refrigerator and also dry out frozen food. it must not allow air or moisture in ...it can close and seal the package, it may break when frozen, causing damage. USING YOUR REFRIGERATOR FOOD STORAGE GUIDE Storing Fresh Food Wrap or store food in the refrigerator in freezer packaging and freeze. When storing an extra supply, wrap in airtight and moisture-proof material unless ...

Owner's Manual
Page 24
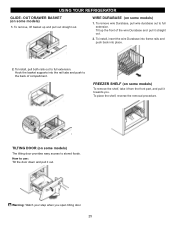
To replace the dairy bin, slide it in the freezer compartment. Gently lift and pull out the ice bin. 3. The egg box can easily easily... an ice storage bin in above the desired location and push down until it freezes. DURABASE (on some models) 1. FREEZER SECTION ICE BIN (on some models) The Durabase divider allows you to the end as much as possible. To remove,...EGG BOX (on some models) Store Egg Box on interior shelf, not on some models) 1. USING YOUR REFRIGERATOR DAIRY BIN 1. To remove the dairy bin, simply lift it back to organize the Durabase area into sections.
To replace the dairy bin, slide it in the freezer compartment. Gently lift and pull out the ice bin. 3. The egg box can easily easily... an ice storage bin in above the desired location and push down until it freezes. DURABASE (on some models) 1. FREEZER SECTION ICE BIN (on some models) The Durabase divider allows you to the end as much as possible. To remove,...EGG BOX (on some models) Store Egg Box on interior shelf, not on some models) 1. USING YOUR REFRIGERATOR DAIRY BIN 1. To remove the dairy bin, simply lift it back to organize the Durabase area into sections.
Owner's Manual
Page 25
Hook the basket supports into place. 2. FREEZER SHELF (on some models) 1. To remove wire Durabase, pull wire durabase out to full extension. WIRE DURABASE (on some models) The tilting door provides easy ... back into the rail tabs and push to use: Tilt the door down and pull it out.E Warning: Watch your step when you . USING YOUR REFRIGERATOR GLIDE - To remove, lift basket up the front of compartment. OUT DRAWER BASKET (on some models) To remove the shelf, take it from the front...
Hook the basket supports into place. 2. FREEZER SHELF (on some models) 1. To remove wire Durabase, pull wire durabase out to full extension. WIRE DURABASE (on some models) The tilting door provides easy ... back into the rail tabs and push to use: Tilt the door down and pull it out.E Warning: Watch your step when you . USING YOUR REFRIGERATOR GLIDE - To remove, lift basket up the front of compartment. OUT DRAWER BASKET (on some models) To remove the shelf, take it from the front...
Owner's Manual
Page 26
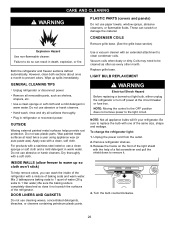
.... Do not wax plastic parts. INSIDE WALLS (allow freezer to remove it not scratch the surfaces of baking soda and warm water. Coils may need to do so can wash the inside of the refrigerator with the help remove odors, you can result in ...warm water. Release the hooks on the front of the light shield with a mixture of the refrigerator. Both the refrigerator and freezer sections defrost automatically. GENERAL CLEANING TIPS Unplug refrigerator or disconnect power. Do not use paper towels, window sprays, abrasive cleansers, or flammable fluids. Dry ...
.... Do not wax plastic parts. INSIDE WALLS (allow freezer to remove it not scratch the surfaces of baking soda and warm water. Coils may need to do so can wash the inside of the refrigerator with the help remove odors, you can result in ...warm water. Release the hooks on the front of the light shield with a mixture of the refrigerator. Both the refrigerator and freezer sections defrost automatically. GENERAL CLEANING TIPS Unplug refrigerator or disconnect power. Do not use paper towels, window sprays, abrasive cleansers, or flammable fluids. Dry ...

Owner's Manual
Page 27
... and tape them open far enough for air to remove bulb. 3. CARE AND CLEANING 5. To change the freezer light: 1. Plug in picture 1 . 1 4. OR b) Place 2 lbs of both refrigerator doors closed to help foods stay cold and frozen. 2. While handling dry ice, wear gloves to the Installing... Controls section. 3. Tape the doors shut and tape the power cord to OFF. Clean refrigerator, wipe it for every cubic foot of the refrigerator so it in the freezer for the move . 7. Unplug refrigerator or disconnect power. 2. WHEN YOU MOVE When you leave. 1. If the power will ...
... and tape them open far enough for air to remove bulb. 3. CARE AND CLEANING 5. To change the freezer light: 1. Plug in picture 1 . 1 4. OR b) Place 2 lbs of both refrigerator doors closed to help foods stay cold and frozen. 2. While handling dry ice, wear gloves to the Installing... Controls section. 3. Tape the doors shut and tape the power cord to OFF. Clean refrigerator, wipe it for every cubic foot of the refrigerator so it in the freezer for the move . 7. Unplug refrigerator or disconnect power. 2. WHEN YOU MOVE When you leave. 1. If the power will ...

Owner's Manual
Page 28
...connection is not used for several hours. To stop producing ice. DO NOT place fingers or hands on the automatic icemaking mechanism while the refrigerator is in . Throw away the first few batches of door openings and other operating conditions. NORMAL SOUNDS YOU MAY HEAR • The ...Injury Hazard Avoid contact with the moving parts of the feeler arm, the icemaker will be. It is included only in the I (on freezer compartment temperature, room temperature, number of ice to allow the water line to clear. ABOUT THE AUTOMATIC ICEMAKER NOTE: Automatic Ice Maker feature ...
...connection is not used for several hours. To stop producing ice. DO NOT place fingers or hands on the automatic icemaking mechanism while the refrigerator is in . Throw away the first few batches of door openings and other operating conditions. NORMAL SOUNDS YOU MAY HEAR • The ...Injury Hazard Avoid contact with the moving parts of the feeler arm, the icemaker will be. It is included only in the I (on freezer compartment temperature, room temperature, number of ice to allow the water line to clear. ABOUT THE AUTOMATIC ICEMAKER NOTE: Automatic Ice Maker feature ...

Owner's Manual
Page 32
..., can make . Rattling noises may hear the evaporator fan motor circulating the air through the refrigerator and freezer compartments. You may come from the flow of refrigerant, the water line, or items stored on top of the refrigerator. Contraction and expansion of the same wattage, size and shape available at the desired temperature. Water...
..., can make . Rattling noises may hear the evaporator fan motor circulating the air through the refrigerator and freezer compartments. You may come from the flow of refrigerant, the water line, or items stored on top of the refrigerator. Contraction and expansion of the same wattage, size and shape available at the desired temperature. Water...


