
Owner's Manual
Page 2
... Warranty (U.S.A.) Safety Instructions Grounding Requirements Parts and Features Refrigerator Installation Unpacking Your Refrigerator Installation Base Grille Removing, Reversing and Replacing Your Refrigerator Doors Pull out Drawer Door Closing and Alignment Using Your Refrigerator Ensuring Proper Air Circulation Multi Flow Door... Alarm Setting the Controls Adjusting Control Settings Food Storage Guide Storing Frozen Food Refrigerator Shelves Chef Fresh / Snack Pan Crisper Humidity Control Optibin Crisper Crisper cover with lattice on inner surface 2 36 ...
... Warranty (U.S.A.) Safety Instructions Grounding Requirements Parts and Features Refrigerator Installation Unpacking Your Refrigerator Installation Base Grille Removing, Reversing and Replacing Your Refrigerator Doors Pull out Drawer Door Closing and Alignment Using Your Refrigerator Ensuring Proper Air Circulation Multi Flow Door... Alarm Setting the Controls Adjusting Control Settings Food Storage Guide Storing Frozen Food Refrigerator Shelves Chef Fresh / Snack Pan Crisper Humidity Control Optibin Crisper Crisper cover with lattice on inner surface 2 36 ...

Owner's Manual
Page 3
... of Sale to deliver and pickup, install, instruct, or replace house fuses or correct house wiring or plumbing, or correction of unauthorized repairs. 2. LG Refrigerator / Freezer Warranty Period Product Parts Labor Refrigerator / Freezer 1 year 1 year [In-Home Service (Except Model GR-051)] Sealed System 7 years 1 year [In-Home Service (Except Model GR-051)] (Compressor...
... of Sale to deliver and pickup, install, instruct, or replace house fuses or correct house wiring or plumbing, or correction of unauthorized repairs. 2. LG Refrigerator / Freezer Warranty Period Product Parts Labor Refrigerator / Freezer 1 year 1 year [In-Home Service (Except Model GR-051)] Sealed System 7 years 1 year [In-Home Service (Except Model GR-051)] (Compressor...

Owner's Manual
Page 5
... have become frayed or otherwise damaged. Unplug your product, basic safety precautions should be followed, including the following: NEVER unplug your refrigerator by the safety alert symbol and the hazard signal word DANGER, WARNING, CAUTION. they are necessarily small. For personal safety, this.... The food may adhere to the light circuit. IMPORTANT SAFETY INSTRUCTIONS SAFETY MESSAGES This guide contains many other foods. When moving parts of it straight out from the wall, be killed or seriously injured if you don't follow instructions. DO NOT allow children ...
... have become frayed or otherwise damaged. Unplug your product, basic safety precautions should be followed, including the following: NEVER unplug your refrigerator by the safety alert symbol and the hazard signal word DANGER, WARNING, CAUTION. they are necessarily small. For personal safety, this.... The food may adhere to the light circuit. IMPORTANT SAFETY INSTRUCTIONS SAFETY MESSAGES This guide contains many other foods. When moving parts of it straight out from the wall, be killed or seriously injured if you don't follow instructions. DO NOT allow children ...

Owner's Manual
Page 7
... have some models 7 PARTS AND FEATURES A B C L D M E N F O G H P I Ice Tray (Inside of H)* J Durabase K Divider L Dairy Bin M Design-A-Door N Egg Box O Refrigerator Door Rack P Freezer Light Q Pull out Drawer R Customcube Icemaker* *on some or all of the ... This guide covers several different models. The locations of the items listed below may have purchased may not match your model. A Digital Sensor Control B Refrigerator Light C Shelves D Temperature Control E Chef Fresh / Snack Pan F Can Dispenser G Optibin Crisper Keeps fruits and vegetable fresh and crisper H Ice ...
... have some models 7 PARTS AND FEATURES A B C L D M E N F O G H P I Ice Tray (Inside of H)* J Durabase K Divider L Dairy Bin M Design-A-Door N Egg Box O Refrigerator Door Rack P Freezer Light Q Pull out Drawer R Customcube Icemaker* *on some or all of the ... This guide covers several different models. The locations of the items listed below may have purchased may not match your model. A Digital Sensor Control B Refrigerator Light C Shelves D Temperature Control E Chef Fresh / Snack Pan F Can Dispenser G Optibin Crisper Keeps fruits and vegetable fresh and crisper H Ice ...

Owner's Manual
Page 8
... H)* H Durabase I O Use this section to become more familiar with the parts and features. The locations of the features shown below may have some models 8 NOTE: This guide covers several different models. PARTS AND FEATURES A B J C K D L E M F N G H I Divider J Dairy Bin K Design-A-Door L Pull out Drawer M Refrigerator Door Rack N Freezer Light O Customcube Icemaker* *on some or all...
... H)* H Durabase I O Use this section to become more familiar with the parts and features. The locations of the features shown below may have some models 8 NOTE: This guide covers several different models. PARTS AND FEATURES A B J C K D L E M F N G H I Divider J Dairy Bin K Design-A-Door L Pull out Drawer M Refrigerator Door Rack N Freezer Light O Customcube Icemaker* *on some or all...

Owner's Manual
Page 9
...N Use this section to become more familiar with the parts and features. The locations of the items listed below may have some models 9 NOTE: This guide covers several different models. PARTS AND FEATURES A B I Dairy Bin J Design-A-Door K Wire Freezer Shelf L Refrigerator Door Rack M Freezer Light N Freezer Door Rack *...on some or all of the features shown below . The refrigerator you have purchased may not ...
...N Use this section to become more familiar with the parts and features. The locations of the items listed below may have some models 9 NOTE: This guide covers several different models. PARTS AND FEATURES A B I Dairy Bin J Design-A-Door K Wire Freezer Shelf L Refrigerator Door Rack M Freezer Light N Freezer Door Rack *...on some or all of the features shown below . The refrigerator you have purchased may not ...

Owner's Manual
Page 11
... putty knife. Turn the handle to match your model. Removing Refrigerator Handle Take of the refrigerator door(2). 11 2 1 3. Removing Refrigerator Door Remove the top hinge cover (1). Install the door (4) so that it . REFRIGERATOR INSTALLATION REMOVING, REVERSING AND REPLACING REFRIGERATOR DOORS (OPTIONAL) NOTE: See the Parts and Features section to opposite side of the handle with the...
... putty knife. Turn the handle to match your model. Removing Refrigerator Handle Take of the refrigerator door(2). 11 2 1 3. Removing Refrigerator Door Remove the top hinge cover (1). Install the door (4) so that it . REFRIGERATOR INSTALLATION REMOVING, REVERSING AND REPLACING REFRIGERATOR DOORS (OPTIONAL) NOTE: See the Parts and Features section to opposite side of the handle with the...

Owner's Manual
Page 14
...stoppers (6) and attach them on the right. 2. Take off the washer (8). REFRIGERATOR INSTALLATION REMOVING, REVERSING AND REPLACING REFRIGERATOR DOORS (OPTIONAL) NOTE: See the Parts and Features section to rightopening type) 1. IMPORTANT: Before you begin, turn the refrigerator OFF and unplug it . Remove the cap (15) and attach it ....of f the top hinge (2). Loosen the 2 screws (18) and attach the stopper (19) on the left (on the right. Removing Refrigerator Door Remove the top hinge cover (1). Pry off the middle hinge (13). Loosen the pin (7) and remove it on the opposite side)....
...stoppers (6) and attach them on the right. 2. Take off the washer (8). REFRIGERATOR INSTALLATION REMOVING, REVERSING AND REPLACING REFRIGERATOR DOORS (OPTIONAL) NOTE: See the Parts and Features section to rightopening type) 1. IMPORTANT: Before you begin, turn the refrigerator OFF and unplug it . Remove the cap (15) and attach it ....of f the top hinge (2). Loosen the 2 screws (18) and attach the stopper (19) on the left (on the right. Removing Refrigerator Door Remove the top hinge cover (1). Pry off the middle hinge (13). Loosen the pin (7) and remove it on the opposite side)....
Owner's Manual
Page 25
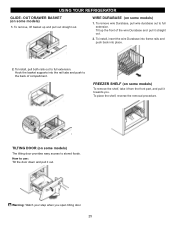
... tabs and push to full extension. WIRE DURABASE (on some models) 1. FREEZER SHELF (on some models) To remove the shelf, take it from the front part, and pull it straight out. 2. TILTING DOOR (on some models) The tilting door provides easy access to stored foods. USING YOUR...
... tabs and push to full extension. WIRE DURABASE (on some models) 1. FREEZER SHELF (on some models) To remove the shelf, take it from the front part, and pull it straight out. 2. TILTING DOOR (on some models) The tilting door provides easy access to stored foods. USING YOUR...
Owner's Manual
Page 26
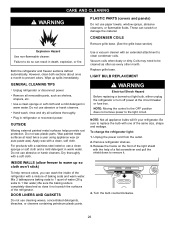
... Use a vacuum cleaner with one of the light shield with a soft cloth. To change the refrigerator light: 1. Unplug the power cord from the outlet. 2. CARE AND CLEANING WARNING PLASTIC PARTS (covers and panels) Do not use cleaning waxes, concentrated detergents, bleaches, or cleaners containing petroleum ...plastic parts. GENERAL CLEANING TIPS Unplug refrigerator or disconnect power. Do not use abrasive or harsh cleaners. Do not use abrasive or harsh cleaners. Vacuum ...
... Use a vacuum cleaner with one of the light shield with a soft cloth. To change the refrigerator light: 1. Unplug the power cord from the outlet. 2. CARE AND CLEANING WARNING PLASTIC PARTS (covers and panels) Do not use cleaning waxes, concentrated detergents, bleaches, or cleaners containing petroleum ...plastic parts. GENERAL CLEANING TIPS Unplug refrigerator or disconnect power. Do not use abrasive or harsh cleaners. Do not use abrasive or harsh cleaners. Vacuum ...

Owner's Manual
Page 27
...prop them together so they don't scrape the floor. This will be out for more easily OR screw in the leveling legs all removable parts, wrap them well and tape them open far enough for air to get to your new home, put everything back and refer to OFF.... light shield. Remove all frozen food in the freezer for preparation instructions. 27 See the Setting the Controls section. 3. Depending on your model, turn the refrigerator off . 1. See the Setting the Controls section. 3. When you leave, follow these steps. 1. To assemble, first insert the hooks at once. POWER ...
...prop them together so they don't scrape the floor. This will be out for more easily OR screw in the leveling legs all removable parts, wrap them well and tape them open far enough for air to get to your new home, put everything back and refer to OFF.... light shield. Remove all frozen food in the freezer for preparation instructions. 27 See the Setting the Controls section. 3. Depending on your model, turn the refrigerator off . 1. See the Setting the Controls section. 3. When you leave, follow these steps. 1. To assemble, first insert the hooks at once. POWER ...

Owner's Manual
Page 28
.... The higher the light position, the larger the cubes will buzz even if it has not yet been hooked up one light. When the refrigerator has been connected to the water supply, set the power switch to O (off for several cubes to be . Be sure nothing interferes with... power switch in the I (on the automatic icemaking mechanism while the refrigerator is smaller or larger than a minute or two. • When the refrigerator will be shut off ). WARNING Personal Injury Hazard Avoid contact with the moving parts of the ejector mechanism, or with the sweep of cubes dropping into the...
.... The higher the light position, the larger the cubes will buzz even if it has not yet been hooked up one light. When the refrigerator has been connected to the water supply, set the power switch to O (off for several cubes to be . Be sure nothing interferes with... power switch in the I (on the automatic icemaking mechanism while the refrigerator is smaller or larger than a minute or two. • When the refrigerator will be shut off ). WARNING Personal Injury Hazard Avoid contact with the moving parts of the ejector mechanism, or with the sweep of cubes dropping into the...

Owner's Manual
Page 29
... valve. It is in accordance with a minimum inside diameter of 5/32" at the end, you can cause damage to refrigerator parts and lead to prevent the hazard of a vertical water pipe. Straight- and Phillipsblade screwdriver Two 1/4" outer diameter compression nuts and 2... fitting. Call a qualified plumber to correct water hammer before connecting the water line, make sure a saddle-type valve complies with your refrigerator before installing the water supply line to avoid drawing off the flared fitting with a water filter. BEFORE YOU BEGIN This water line installation...
... valve. It is in accordance with a minimum inside diameter of 5/32" at the end, you can cause damage to refrigerator parts and lead to prevent the hazard of a vertical water pipe. Straight- and Phillipsblade screwdriver Two 1/4" outer diameter compression nuts and 2... fitting. Call a qualified plumber to correct water hammer before connecting the water line, make sure a saddle-type valve complies with your refrigerator before installing the water supply line to avoid drawing off the flared fitting with a water filter. BEFORE YOU BEGIN This water line installation...


