
Owner's Manual
Page 2
TABLE OF CONTENTS English Version Spanish Version Warranty (U.S.A.) Safety Instructions Grounding Requirements Parts and Features Refrigerator Installation Unpacking Your Refrigerator Installation Base Grille Removing, Reversing and Replacing Your Refrigerator Doors Pull out Drawer ...Out Drawer Basket Tilting Door Wire Durabase Frezzer Shelf Care and Cleaning General Cleaning Tips Outside Inside Walls Door Liner and Gaskets Plastic Parts Condenser Coils Light Bulb Replacement Power Interruptions When you go on vacation About the Custom Cube Icemaker Connecting the Water Line Troubleshooting ...
TABLE OF CONTENTS English Version Spanish Version Warranty (U.S.A.) Safety Instructions Grounding Requirements Parts and Features Refrigerator Installation Unpacking Your Refrigerator Installation Base Grille Removing, Reversing and Replacing Your Refrigerator Doors Pull out Drawer ...Out Drawer Basket Tilting Door Wire Durabase Frezzer Shelf Care and Cleaning General Cleaning Tips Outside Inside Walls Door Liner and Gaskets Plastic Parts Condenser Coils Light Bulb Replacement Power Interruptions When you go on vacation About the Custom Cube Icemaker Connecting the Water Line Troubleshooting ...

Owner's Manual
Page 3
... deliver and pickup, install, instruct, or replace house fuses or correct house wiring or plumbing, or correction of unauthorized repairs. 2. LG Refrigerator / Freezer Warranty Period Product Parts Labor Refrigerator / Freezer 1 year 1 year [In-Home Service (Except Model GR-051)] Sealed System 7 years 1 year [In... LG Electronics will repair or at the time warranty service is installed outside the normal service area, any cost of transportation involved in the repair of the product, or the replacement of defective parts, shall be borne by accident, pests, fire, floods, or acts ...
... deliver and pickup, install, instruct, or replace house fuses or correct house wiring or plumbing, or correction of unauthorized repairs. 2. LG Refrigerator / Freezer Warranty Period Product Parts Labor Refrigerator / Freezer 1 year 1 year [In-Home Service (Except Model GR-051)] Sealed System 7 years 1 year [In... LG Electronics will repair or at the time warranty service is installed outside the normal service area, any cost of transportation involved in the repair of the product, or the replacement of defective parts, shall be borne by accident, pests, fire, floods, or acts ...

Owner's Manual
Page 5
Always grip the plug firmly and pull it . When moving parts of this or any other foods. DO NOT allow children to roll over or damage the power cord. Unplug your refrigerator by a qualified individual. Read ...
Always grip the plug firmly and pull it . When moving parts of this or any other foods. DO NOT allow children to roll over or damage the power cord. Unplug your refrigerator by a qualified individual. Read ...

Owner's Manual
Page 7
... G Optibin Crisper Keeps fruits and vegetable fresh and crisper H Ice Bin I Q J R K Use this section to become more familiar with the parts and features. The refrigerator you have purchased may have some models 7 PARTS AND FEATURES A B C L D M E N F O G H P I Ice Tray (Inside of H)* J Durabase K Divider L Dairy Bin M Design-A-Door N Egg Box O Refrigerator Door Rack P Freezer Light...
... G Optibin Crisper Keeps fruits and vegetable fresh and crisper H Ice Bin I Q J R K Use this section to become more familiar with the parts and features. The refrigerator you have purchased may have some models 7 PARTS AND FEATURES A B C L D M E N F O G H P I Ice Tray (Inside of H)* J Durabase K Divider L Dairy Bin M Design-A-Door N Egg Box O Refrigerator Door Rack P Freezer Light...

Owner's Manual
Page 8
... and crisper F Ice Bin G Ice Tray (Inside of H)* H Durabase I O Use this section to become more familiar with the parts and features. The locations of the items listed below may not match your model. PARTS AND FEATURES A B J C K D L E M F N G H I Divider J Dairy Bin K Design-A-Door L Pull out Drawer M Refrigerator Door Rack N Freezer Light O Customcube Icemaker* *on...
... and crisper F Ice Bin G Ice Tray (Inside of H)* H Durabase I O Use this section to become more familiar with the parts and features. The locations of the items listed below may not match your model. PARTS AND FEATURES A B J C K D L E M F N G H I Divider J Dairy Bin K Design-A-Door L Pull out Drawer M Refrigerator Door Rack N Freezer Light O Customcube Icemaker* *on...

Owner's Manual
Page 9
... E Optibin Crisper Keeps fruits and vegetable fresh and crisp F Ice Trays* G Ice Bin H Wire Durabase I C J D K E L F M G H N Use this section to become more familiar with the parts and features. PARTS AND FEATURES A B I Dairy Bin J Design-A-Door K Wire Freezer Shelf L Refrigerator Door Rack M Freezer Light N Freezer Door Rack *on some or all of the features...
... E Optibin Crisper Keeps fruits and vegetable fresh and crisp F Ice Trays* G Ice Bin H Wire Durabase I C J D K E L F M G H N Use this section to become more familiar with the parts and features. PARTS AND FEATURES A B I Dairy Bin J Design-A-Door K Wire Freezer Shelf L Refrigerator Door Rack M Freezer Light N Freezer Door Rack *on some or all of the features...

Owner's Manual
Page 11
... (when converting from doors. Removing Refrigerator Handle Take of the refrigerator door(2). 11 2 1 3. REFRIGERATOR INSTALLATION REMOVING, REVERSING AND REPLACING REFRIGERATOR DOORS (OPTIONAL) NOTE: See the Parts and Features section to opposite side of the handle with both hands and pull up (1). Lift the Refrigerator door (3) slightly and remove it fits onto...
... (when converting from doors. Removing Refrigerator Handle Take of the refrigerator door(2). 11 2 1 3. REFRIGERATOR INSTALLATION REMOVING, REVERSING AND REPLACING REFRIGERATOR DOORS (OPTIONAL) NOTE: See the Parts and Features section to opposite side of the handle with both hands and pull up (1). Lift the Refrigerator door (3) slightly and remove it fits onto...

Owner's Manual
Page 14
... adjustable door or utility bins from the left side of f the top hinge (2). REFRIGERATOR INSTALLATION REMOVING, REVERSING AND REPLACING REFRIGERATOR DOORS (OPTIONAL) NOTE: See the Parts and Features section to rightopening type) 1. Loosen the screw (5), remove the stoppers (6) and attach them on the left (on the left -opening type to match...
... adjustable door or utility bins from the left side of f the top hinge (2). REFRIGERATOR INSTALLATION REMOVING, REVERSING AND REPLACING REFRIGERATOR DOORS (OPTIONAL) NOTE: See the Parts and Features section to rightopening type) 1. Loosen the screw (5), remove the stoppers (6) and attach them on the left (on the left -opening type to match...
Owner's Manual
Page 25
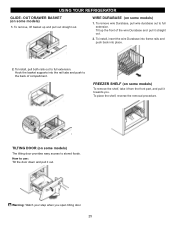
... place the shelf, reverse the removal procedure. How to stored foods. FREEZER SHELF (on some models) To remove the shelf, take it from the front part, and pull it towards you open tilting door.To adjust 25 WIRE DURABASE (on some models) 1. To remove wire Durabase, pull wire durabase out to...
... place the shelf, reverse the removal procedure. How to stored foods. FREEZER SHELF (on some models) To remove the shelf, take it from the front part, and pull it towards you open tilting door.To adjust 25 WIRE DURABASE (on some models) 1. To remove wire Durabase, pull wire durabase out to...
Owner's Manual
Page 26
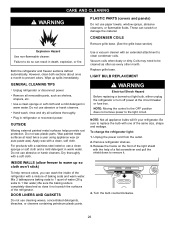
...or harsh cleaners. Remove refrigerator shelves. 3. Hand wash, rinse and dry all appliance bulbs will fit your refrigerator. Do not wax plastic parts. Wax painted metal surfaces at the circuit breaker or fuse box. Apply wax with a soft cloth. Dry thoroughly with a clean, soft ... of the refrigerator. These can result in warm water. Do not use cleaning waxes, concentrated detergents, bleaches, or cleaners containing petroleum plastic parts. Plug in warm water. Do not use paper towels, window sprays, abrasive cleansers, or flammable fluids. Unplug the power cord from the...
...or harsh cleaners. Remove refrigerator shelves. 3. Hand wash, rinse and dry all appliance bulbs will fit your refrigerator. Do not wax plastic parts. Wax painted metal surfaces at the circuit breaker or fuse box. Apply wax with a soft cloth. Dry thoroughly with a clean, soft ... of the refrigerator. These can result in warm water. Do not use cleaning waxes, concentrated detergents, bleaches, or cleaners containing petroleum plastic parts. Plug in warm water. Do not use paper towels, window sprays, abrasive cleansers, or flammable fluids. Unplug the power cord from the...

Owner's Manual
Page 27
... the light shield. If you leave, follow these steps. 1. OR b) Place 2 lbs of the refrigerator so it rolls more than 24 hours: a) Remove all removable parts, wrap them well and tape them open far enough for every cubic foot of both refrigerator doors closed to protect your model, turn the refrigerator...
... the light shield. If you leave, follow these steps. 1. OR b) Place 2 lbs of the refrigerator so it rolls more than 24 hours: a) Remove all removable parts, wrap them well and tape them open far enough for every cubic foot of both refrigerator doors closed to protect your model, turn the refrigerator...

Owner's Manual
Page 28
... on freezer compartment temperature, room temperature, number of the feeler arm. Throw away the first few batches of the ejector mechanism, or with the moving parts of ice to allow the water line to water. It is connected can regulate the size with water. To stop producing ice. Icemaker Cube Size...
... on freezer compartment temperature, room temperature, number of the feeler arm. Throw away the first few batches of the ejector mechanism, or with the moving parts of ice to allow the water line to water. It is connected can regulate the size with water. To stop producing ice. Icemaker Cube Size...

Owner's Manual
Page 29
... filter and between 20 and 120 p.s.i. Straight- CHOOSE THE VALVE LOCATION Choose a location for the valve that the kit you can cause damage to refrigerator parts and lead to prevent the hazard of 5/32" at plumbing supply stores) to connect the water line to connect into the drill. It is best...
... filter and between 20 and 120 p.s.i. Straight- CHOOSE THE VALVE LOCATION Choose a location for the valve that the kit you can cause damage to refrigerator parts and lead to prevent the hazard of 5/32" at plumbing supply stores) to connect the water line to connect into the drill. It is best...


