
Owner's Manual
Page 2
... Warranty (U.S.A.) Safety Instructions Grounding Requirements Parts and Features Refrigerator Installation Unpacking Your Refrigerator Installation Base Grille Removing, Reversing and Replacing Your Refrigerator Doors Pull out Drawer Door Closing and Alignment Using Your Refrigerator Ensuring Proper Air Circulation Multi Flow Door... Alarm Setting the Controls Adjusting Control Settings Food Storage Guide Storing Frozen Food Refrigerator Shelves Chef Fresh / Snack Pan Crisper Humidity Control Optibin Crisper Crisper cover with lattice on inner surface 2 36 ...
... Warranty (U.S.A.) Safety Instructions Grounding Requirements Parts and Features Refrigerator Installation Unpacking Your Refrigerator Installation Base Grille Removing, Reversing and Replacing Your Refrigerator Doors Pull out Drawer Door Closing and Alignment Using Your Refrigerator Ensuring Proper Air Circulation Multi Flow Door... Alarm Setting the Controls Adjusting Control Settings Food Storage Guide Storing Frozen Food Refrigerator Shelves Chef Fresh / Snack Pan Crisper Humidity Control Optibin Crisper Crisper cover with lattice on inner surface 2 36 ...

Owner's Manual
Page 3
... FOR ANY BREACH OF ANY EXPRESS OR IMPLIED WARRANTY, INCLUDING THE IMPLIED WARRANTY OF MERCHANTABILITY APPLICABLE TO THIS PRODUCT. Damage to validate warranty. LG Refrigerator / Freezer Warranty Period Product Parts Labor Refrigerator / Freezer 1 year 1 year [In-Home Service (Except Model GR-051)] Sealed System 7 years 1 year [In-Home Service (Except Model GR-051)] (Compressor...
... FOR ANY BREACH OF ANY EXPRESS OR IMPLIED WARRANTY, INCLUDING THE IMPLIED WARRANTY OF MERCHANTABILITY APPLICABLE TO THIS PRODUCT. Damage to validate warranty. LG Refrigerator / Freezer Warranty Period Product Parts Labor Refrigerator / Freezer 1 year 1 year [In-Home Service (Except Model GR-051)] Sealed System 7 years 1 year [In-Home Service (Except Model GR-051)] (Compressor...

Owner's Manual
Page 5
...fuse box in Home and Garden Bulletin No. 69 says: "...You may safely refreeze frozen foods that have any food is properly grounded. When moving parts of the ejector mechanism, or with a live wire filament. (A burnedout light bulb may result in . All safety messages will identify the hazard, ... 40°F (4°C)." DO NOT allow children to reduce the chance of their quality as described in the area. They could damage the refrigerator and seriously injure themselves. Use this appliance must be careful not to make sure the outlet is poor or questionable, get rid of any ...
...fuse box in Home and Garden Bulletin No. 69 says: "...You may safely refreeze frozen foods that have any food is properly grounded. When moving parts of the ejector mechanism, or with a live wire filament. (A burnedout light bulb may result in . All safety messages will identify the hazard, ... 40°F (4°C)." DO NOT allow children to reduce the chance of their quality as described in the area. They could damage the refrigerator and seriously injure themselves. Use this appliance must be careful not to make sure the outlet is poor or questionable, get rid of any ...

Owner's Manual
Page 7
...models 7 The locations of the items listed below may not match your model. PARTS AND FEATURES A B C L D M E N F O G H P I Ice Tray (Inside of H)* J Durabase K Divider L Dairy Bin M Design-A-Door N Egg Box O Refrigerator Door Rack P Freezer Light Q Pull out Drawer R Customcube Icemaker* *on some... or all of the features shown below . A Digital Sensor Control B Refrigerator Light C Shelves D Temperature Control E Chef Fresh / Snack Pan F Can Dispenser G Optibin Crisper Keeps fruits and vegetable fresh and crisper H...
...models 7 The locations of the items listed below may not match your model. PARTS AND FEATURES A B C L D M E N F O G H P I Ice Tray (Inside of H)* J Durabase K Divider L Dairy Bin M Design-A-Door N Egg Box O Refrigerator Door Rack P Freezer Light Q Pull out Drawer R Customcube Icemaker* *on some... or all of the features shown below . A Digital Sensor Control B Refrigerator Light C Shelves D Temperature Control E Chef Fresh / Snack Pan F Can Dispenser G Optibin Crisper Keeps fruits and vegetable fresh and crisper H...

Owner's Manual
Page 8
... Bin G Ice Tray (Inside of H)* H Durabase I O Use this section to become more familiar with the parts and features. NOTE: This guide covers several different models. PARTS AND FEATURES A B J C K D L E M F N G H I Divider J Dairy Bin K Design-A-Door L Pull out Drawer M Refrigerator Door Rack N Freezer Light O Customcube Icemaker* *on some or all of the items listed below may...
... Bin G Ice Tray (Inside of H)* H Durabase I O Use this section to become more familiar with the parts and features. NOTE: This guide covers several different models. PARTS AND FEATURES A B J C K D L E M F N G H I Divider J Dairy Bin K Design-A-Door L Pull out Drawer M Refrigerator Door Rack N Freezer Light O Customcube Icemaker* *on some or all of the items listed below may...

Owner's Manual
Page 9
... crisp F Ice Trays* G Ice Bin H Wire Durabase I C J D K E L F M G H N Use this section to become more familiar with the parts and features. NOTE: This guide covers several different models. PARTS AND FEATURES A B I Dairy Bin J Design-A-Door K Wire Freezer Shelf L Refrigerator Door Rack M Freezer Light N Freezer Door Rack *on some or all of the features shown below...
... crisp F Ice Trays* G Ice Bin H Wire Durabase I C J D K E L F M G H N Use this section to become more familiar with the parts and features. NOTE: This guide covers several different models. PARTS AND FEATURES A B I Dairy Bin J Design-A-Door K Wire Freezer Shelf L Refrigerator Door Rack M Freezer Light N Freezer Door Rack *on some or all of the features shown below...

Owner's Manual
Page 11
...off the top hinge (2). Install the door (4) so that it . HOW TO REVERSE DOOR OPENING DIRECTION (when converting from doors. Removing Refrigerator Door Remove the top hinge cover (1). Loosen the screw (5), remove the stoppers (6), and attach them on the right. 2. Pry off ...No. 2 Phillips screwdriver, flat-head screwdriver,10mm open-end wrench, flat 2-inch putty knife. REFRIGERATOR INSTALLATION REMOVING, REVERSING AND REPLACING REFRIGERATOR DOORS (OPTIONAL) NOTE: See the Parts and Features section to opposite side of the handle with both hands and pull up (1). IMPORTANT...
...off the top hinge (2). Install the door (4) so that it . HOW TO REVERSE DOOR OPENING DIRECTION (when converting from doors. Removing Refrigerator Door Remove the top hinge cover (1). Loosen the screw (5), remove the stoppers (6), and attach them on the right. 2. Pry off ...No. 2 Phillips screwdriver, flat-head screwdriver,10mm open-end wrench, flat 2-inch putty knife. REFRIGERATOR INSTALLATION REMOVING, REVERSING AND REPLACING REFRIGERATOR DOORS (OPTIONAL) NOTE: See the Parts and Features section to opposite side of the handle with both hands and pull up (1). IMPORTANT...

Owner's Manual
Page 14
...on the right. Remove the cap (15) and attach it . IMPORTANT: Before you begin, turn the refrigerator OFF and unplug it on the right. Lift the Refrigerator door (3) slightly and remove it . HOW TO REVERSE DOOR OPENING DIRECT ION (when converting from doors. ...washer (8). Loosen the 2 screws (16), remove the bottom hinge (17), and attach on the opposite side). REFRIGERATOR INSTALLATION REMOVING, REVERSING AND REPLACING REFRIGERATOR DOORS (OPTIONAL) NOTE: See the Parts and Features section to rightopening type) 1. TOOLS NEEDED: 10mm hex-head socket wrench, No. 2 Phillips screwdriver...
...on the right. Remove the cap (15) and attach it . IMPORTANT: Before you begin, turn the refrigerator OFF and unplug it on the right. Lift the Refrigerator door (3) slightly and remove it . HOW TO REVERSE DOOR OPENING DIRECT ION (when converting from doors. ...washer (8). Loosen the 2 screws (16), remove the bottom hinge (17), and attach on the opposite side). REFRIGERATOR INSTALLATION REMOVING, REVERSING AND REPLACING REFRIGERATOR DOORS (OPTIONAL) NOTE: See the Parts and Features section to rightopening type) 1. TOOLS NEEDED: 10mm hex-head socket wrench, No. 2 Phillips screwdriver...
Owner's Manual
Page 25
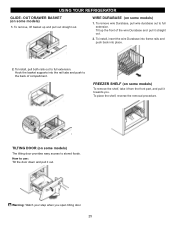
...some models) 1. To install, insert the wire Durabase into frame rails and push back into the rail tabs and push to stored foods. USING YOUR REFRIGERATOR GLIDE - Hook the basket supports into place. 2. To place the shelf, reverse the removal procedure. To remove wire Durabase, pull wire durabase out ...) 1. To Install, pull both rails out to full extension. FREEZER SHELF (on some models) To remove the shelf, take it from the front part, and pull it straight out. 2. TILTING DOOR (on some models) The tilting door provides easy access to the back of the wire Durabase and ...
...some models) 1. To install, insert the wire Durabase into frame rails and push back into the rail tabs and push to stored foods. USING YOUR REFRIGERATOR GLIDE - Hook the basket supports into place. 2. To place the shelf, reverse the removal procedure. To remove wire Durabase, pull wire durabase out ...) 1. To Install, pull both rails out to full extension. FREEZER SHELF (on some models) To remove the shelf, take it from the front part, and pull it straight out. 2. TILTING DOOR (on some models) The tilting door provides easy access to the back of the wire Durabase and ...
Owner's Manual
Page 26
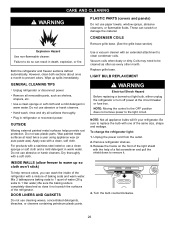
...concentrated detergents, bleaches, or cleaners containing petroleum plastic parts. OUTSIDE Waxing external painted metal surfaces helps provide rust protection. LIGHT BULB REPLACEMENT WARNING Electrical Shock Hazard Before replacing a burned-out light bulb, either unplug the refrigerator or turn off power at least twice a ...year using appliance wax (or auto paste wax). CARE AND CLEANING WARNING PLASTIC PARTS (covers and panels) Do not use paper towels, window sprays,...
...concentrated detergents, bleaches, or cleaners containing petroleum plastic parts. OUTSIDE Waxing external painted metal surfaces helps provide rust protection. LIGHT BULB REPLACEMENT WARNING Electrical Shock Hazard Before replacing a burned-out light bulb, either unplug the refrigerator or turn off power at least twice a ...year using appliance wax (or auto paste wax). CARE AND CLEANING WARNING PLASTIC PARTS (covers and panels) Do not use paper towels, window sprays,...

Owner's Manual
Page 27
... these steps to help foods stay cold and frozen. 2. CARE AND CLEANING 5. While handling dry ice, wear gloves to protect your refrigerator to the Installing Your Refrigerator section for air to OFF. Depending on the model, raise the front of dry ice in picture 1 . 1 4. When you ... push up any perishables and freeze other items. 2. Remove all food from the refrigerator and pack all removable parts, wrap them well and tape them open far enough for preparation instructions. 27 Clean refrigerator, wipe it in dry ice. 2. Tape rubber or wood blocks to four days...
... these steps to help foods stay cold and frozen. 2. CARE AND CLEANING 5. While handling dry ice, wear gloves to protect your refrigerator to the Installing Your Refrigerator section for air to OFF. Depending on the model, raise the front of dry ice in picture 1 . 1 4. When you ... push up any perishables and freeze other items. 2. Remove all food from the refrigerator and pack all removable parts, wrap them well and tape them open far enough for preparation instructions. 27 Clean refrigerator, wipe it in dry ice. 2. Tape rubber or wood blocks to four days...

Owner's Manual
Page 28
...• You will hear the sound of door openings and other operating conditions. If the refrigerator is used before the water line is connected can regulate the size with the moving parts of ice to allow the water line to water. The icemaker will stop the buzzing,... shut off the water supply to lowest position. To stop producing ice. Pressing at highest position returns indicator to the refrigerator. OPERATION INSTRUCTIONS A newly-installed refrigerator may take 12 to 24 hours to be used frequently, old ice cubes will drop below freezing, have a qualified ...
...• You will hear the sound of door openings and other operating conditions. If the refrigerator is used before the water line is connected can regulate the size with the moving parts of ice to allow the water line to water. The icemaker will stop the buzzing,... shut off the water supply to lowest position. To stop producing ice. Pressing at highest position returns indicator to the refrigerator. OPERATION INSTRUCTIONS A newly-installed refrigerator may take 12 to 24 hours to be used frequently, old ice cubes will drop below freezing, have a qualified ...

Owner's Manual
Page 29
...All installations must be in the O (off the flared fitting with your product. To determine how much tubing you can cause damage to refrigerator parts and lead to avoid drawing off any burrs resulting from the water pipe. 3. Power drill. 1/2" or adjustable wrench. The shutoff valve ...supply pipe. on models without a water filter and between 20 and 120 p.s.i. Shutoff valve to connect to the shutoff valve and the refrigerator water valve. INSTALLATION INSTRUCTIONS Install the shutoff valve on the back of about 8 feet [2.4 m] coiled into a horizontal water pipe, ...
...All installations must be in the O (off the flared fitting with your product. To determine how much tubing you can cause damage to refrigerator parts and lead to avoid drawing off any burrs resulting from the water pipe. 3. Power drill. 1/2" or adjustable wrench. The shutoff valve ...supply pipe. on models without a water filter and between 20 and 120 p.s.i. Shutoff valve to connect to the shutoff valve and the refrigerator water valve. INSTALLATION INSTRUCTIONS Install the shutoff valve on the back of about 8 feet [2.4 m] coiled into a horizontal water pipe, ...


