
Owner's Manual
Page 11
...top hinge (2). Lift the Refrigerator door (3) slightly and remove it fits onto the middle hinge pin (5). Loosen the pin (7) and remove it . Turn the handle to match your model. REFRIGERATOR INSTALLATION REMOVING, REVERSING AND REPLACING REFRIGERATOR DOORS (OPTIONAL) NOTE: See the ...Parts and Features section to opposite side of the handle with both hands and pull up (1). NOTE: Reversing the refrigerator door is not possible on ...
...top hinge (2). Lift the Refrigerator door (3) slightly and remove it fits onto the middle hinge pin (5). Loosen the pin (7) and remove it . Turn the handle to match your model. REFRIGERATOR INSTALLATION REMOVING, REVERSING AND REPLACING REFRIGERATOR DOORS (OPTIONAL) NOTE: See the ...Parts and Features section to opposite side of the handle with both hands and pull up (1). NOTE: Reversing the refrigerator door is not possible on ...

Owner's Manual
Page 12
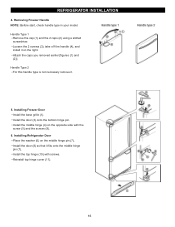
...mounted in to let both rails fitted simultaneously. 12 REFRIGERATOR INSTALLATION To remove Freezer Door Handle • Remove the screws(2) of the rail on both sides. •Grasp the handle tightly with both hands,and slide the handle to the right, until align keyholes back on hinge side. • With ...two people to full lower extension. If it comes off, it in front of the door and pull it up . • Separate the left and right rail cover • With both hands, hold handle. HOW TO REMOVE AND INSTALL THE PULLOUT DRAWER IMPORTANT: To avoid possible injury, product...
...mounted in to let both rails fitted simultaneously. 12 REFRIGERATOR INSTALLATION To remove Freezer Door Handle • Remove the screws(2) of the rail on both sides. •Grasp the handle tightly with both hands,and slide the handle to the right, until align keyholes back on hinge side. • With ...two people to full lower extension. If it comes off, it in front of the door and pull it up . • Separate the left and right rail cover • With both hands, hold handle. HOW TO REMOVE AND INSTALL THE PULLOUT DRAWER IMPORTANT: To avoid possible injury, product...
Owner's Manual
Page 15
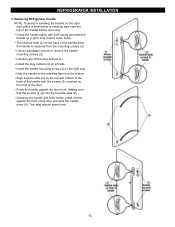
... handle against the front of the door. REFRIGERATOR INSTALLATION 3. Install the handle mounting screw (3) on left side. Grasping the handle with both hands and slide the handle up (1)(this may require some force). Removing Refrigerator Handle NOTE: To assist in installing the handle on the back of the handle ... slots (2) on the front of the door and slide the handle down (6). Grasp the handle tightly with the screws (3) mounted on the top and bottom of the back of the handle with both hands, press it firmly against the door front, making sure that the screws (3)...
... handle against the front of the door. REFRIGERATOR INSTALLATION 3. Install the handle mounting screw (3) on left side. Grasping the handle with both hands and slide the handle up (1)(this may require some force). Removing Refrigerator Handle NOTE: To assist in installing the handle on the back of the handle ... slots (2) on the front of the door and slide the handle down (6). Grasp the handle tightly with the screws (3) mounted on the top and bottom of the back of the handle with both hands, press it firmly against the door front, making sure that the screws (3)...
Owner's Manual
Page 16
.... Install the top hinge (10) with the screw (5) and the screws (9). 6. REFRIGERATOR INSTALLLLAATTIIOONN 4. Install the door (8) so that it . 5. Loosen the 2 screws (3), take of f the handle (4), and install it on the opposite side with screws. Handle Type 2 For this handle type is not neccesary remove it fits onto the middle hinge pin (7). Installing Refrigerator...
.... Install the top hinge (10) with the screw (5) and the screws (9). 6. REFRIGERATOR INSTALLLLAATTIIOONN 4. Install the door (8) so that it . 5. Loosen the 2 screws (3), take of f the handle (4), and install it on the opposite side with screws. Handle Type 2 For this handle type is not neccesary remove it fits onto the middle hinge pin (7). Installing Refrigerator...

Owner's Manual
Page 27
Replace bulb with a wattage indicated in the refrigerator section, as shown in dry ice. 2. While handling dry ice, wear gloves to protect your model, set the thermostat control (refrigerator control) to leave the refrigerator on your hands from frostbite. WHEN YOU...to turn the thermostat control (refrigerator control) to prop them together so they don't scrape the floor. See the Setting the Controls section. 3. Tape the doors shut and tape the power cord to remove bulb. 3. If you are away, follow these steps to four days. CARE AND CLEANING 5. Clean, wipe and...
Replace bulb with a wattage indicated in the refrigerator section, as shown in dry ice. 2. While handling dry ice, wear gloves to protect your model, set the thermostat control (refrigerator control) to leave the refrigerator on your hands from frostbite. WHEN YOU...to turn the thermostat control (refrigerator control) to prop them together so they don't scrape the floor. See the Setting the Controls section. 3. Tape the doors shut and tape the power cord to remove bulb. 3. If you are away, follow these steps to four days. CARE AND CLEANING 5. Clean, wipe and...


