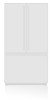

Owner's Manual
Page 2
TABLE OF CONTENTS English Version Spanish Version Warranty (U.S.A.) Safety Instructions Grounding Requirements Parts and Features Refrigerator Installation Unpacking Your Refrigerator Installation Base Grille Removing, Reversing and Replacing Your Refrigerator Doors Pull out Drawer ...Out Drawer Basket Tilting Door Wire Durabase Frezzer Shelf Care and Cleaning General Cleaning Tips Outside Inside Walls Door Liner and Gaskets Plastic Parts Condenser Coils Light Bulb Replacement Power Interruptions When you go on vacation About the Custom Cube Icemaker Connecting the Water Line Troubleshooting ...
TABLE OF CONTENTS English Version Spanish Version Warranty (U.S.A.) Safety Instructions Grounding Requirements Parts and Features Refrigerator Installation Unpacking Your Refrigerator Installation Base Grille Removing, Reversing and Replacing Your Refrigerator Doors Pull out Drawer ...Out Drawer Basket Tilting Door Wire Durabase Frezzer Shelf Care and Cleaning General Cleaning Tips Outside Inside Walls Door Liner and Gaskets Plastic Parts Condenser Coils Light Bulb Replacement Power Interruptions When you go on vacation About the Custom Cube Icemaker Connecting the Water Line Troubleshooting ...

Owner's Manual
Page 3
LG Refrigerator / Freezer Warranty Period Product Parts Labor Refrigerator / Freezer 1 year 1 year [In-Home Service (Except Model GR-051)] ... or limitation of the product during and/or after delivery. 6. Damage to LG in the repair of the product, or the replacement of defective parts, shall be submitted at its option replace, without charge, your product type ... the consumer. visit our web site/http://www.lgservice.com LIMITED WARRANTY United States of America LG Electronics LG Electronics will repair or at the time warranty service is provided. Service trips to your Bill ...
LG Refrigerator / Freezer Warranty Period Product Parts Labor Refrigerator / Freezer 1 year 1 year [In-Home Service (Except Model GR-051)] ... or limitation of the product during and/or after delivery. 6. Damage to LG in the repair of the product, or the replacement of defective parts, shall be submitted at its option replace, without charge, your product type ... the consumer. visit our web site/http://www.lgservice.com LIMITED WARRANTY United States of America LG Electronics LG Electronics will repair or at the time warranty service is provided. Service trips to your Bill ...

Owner's Manual
Page 5
... care guide. This is in operation, do not touch the cold surfaces in this appliance. Always grip the plug firmly and pull it . When moving parts of Agriculture in Home and Garden Bulletin No. 69 says: "...You may break when being replaced.) NOTE: Setting either the plug or connector end. Skin...
... care guide. This is in operation, do not touch the cold surfaces in this appliance. Always grip the plug firmly and pull it . When moving parts of Agriculture in Home and Garden Bulletin No. 69 says: "...You may break when being replaced.) NOTE: Setting either the plug or connector end. Skin...

Owner's Manual
Page 7
... Dispenser G Optibin Crisper Keeps fruits and vegetable fresh and crisper H Ice Bin I Q J R K Use this section to become more familiar with the parts and features. The locations of the features shown below . PARTS AND FEATURES A B C L D M E N F O G H P I Ice Tray (Inside of H)* J Durabase K Divider L Dairy Bin M Design-A-Door N Egg Box O Refrigerator Door Rack P Freezer Light Q Pull...
... Dispenser G Optibin Crisper Keeps fruits and vegetable fresh and crisper H Ice Bin I Q J R K Use this section to become more familiar with the parts and features. The locations of the features shown below . PARTS AND FEATURES A B C L D M E N F O G H P I Ice Tray (Inside of H)* J Durabase K Divider L Dairy Bin M Design-A-Door N Egg Box O Refrigerator Door Rack P Freezer Light Q Pull...

Owner's Manual
Page 8
... Crisper Keeps fruits and vegetable fresh and crisper F Ice Bin G Ice Tray (Inside of H)* H Durabase I O Use this section to become more familiar with the parts and features. PARTS AND FEATURES A B J C K D L E M F N G H I Divider J Dairy Bin K Design-A-Door L Pull out Drawer M Refrigerator Door Rack N Freezer Light O Customcube Icemaker* *on some or all of the items...
... Crisper Keeps fruits and vegetable fresh and crisper F Ice Bin G Ice Tray (Inside of H)* H Durabase I O Use this section to become more familiar with the parts and features. PARTS AND FEATURES A B J C K D L E M F N G H I Divider J Dairy Bin K Design-A-Door L Pull out Drawer M Refrigerator Door Rack N Freezer Light O Customcube Icemaker* *on some or all of the items...

Owner's Manual
Page 9
PARTS AND FEATURES A B I Dairy Bin J Design-A-Door K Wire Freezer Shelf L Refrigerator Door Rack M Freezer Light N Freezer Door Rack *on some or all of the features shown ... Pan E Optibin Crisper Keeps fruits and vegetable fresh and crisp F Ice Trays* G Ice Bin H Wire Durabase I C J D K E L F M G H N Use this section to become more familiar with the parts and features. The refrigerator you have some models 9 The locations of the items listed below may have purchased may not match your model. NOTE: This...
PARTS AND FEATURES A B I Dairy Bin J Design-A-Door K Wire Freezer Shelf L Refrigerator Door Rack M Freezer Light N Freezer Door Rack *on some or all of the features shown ... Pan E Optibin Crisper Keeps fruits and vegetable fresh and crisp F Ice Trays* G Ice Bin H Wire Durabase I C J D K E L F M G H N Use this section to become more familiar with the parts and features. The refrigerator you have some models 9 The locations of the items listed below may have purchased may not match your model. NOTE: This...

Owner's Manual
Page 11
... top hinge (2). NOTE: Reversing the refrigerator door is not possible on the right. 2. REFRIGERATOR INSTALLATION REMOVING, REVERSING AND REPLACING REFRIGERATOR DOORS (OPTIONAL) NOTE: See the Parts and Features section to opposite side of the handle with screws. HOW TO REVERSE DOOR OPENING DIRECTION (when converting from doors. Removing Refrigerator Door Remove...
... top hinge (2). NOTE: Reversing the refrigerator door is not possible on the right. 2. REFRIGERATOR INSTALLATION REMOVING, REVERSING AND REPLACING REFRIGERATOR DOORS (OPTIONAL) NOTE: See the Parts and Features section to opposite side of the handle with screws. HOW TO REVERSE DOOR OPENING DIRECTION (when converting from doors. Removing Refrigerator Door Remove...

Owner's Manual
Page 14
... base grille (14). Remove the cap (15) and attach it on the right. 2. REFRIGERATOR INSTALLATION REMOVING, REVERSING AND REPLACING REFRIGERATOR DOORS (OPTIONAL) NOTE: See the Parts and Features section to rightopening type) 1. IMPORTANT: Before you begin, turn the refrigerator OFF and unplug it . Removing Refrigerator Door Remove the top hinge cover...
... base grille (14). Remove the cap (15) and attach it on the right. 2. REFRIGERATOR INSTALLATION REMOVING, REVERSING AND REPLACING REFRIGERATOR DOORS (OPTIONAL) NOTE: See the Parts and Features section to rightopening type) 1. IMPORTANT: Before you begin, turn the refrigerator OFF and unplug it . Removing Refrigerator Door Remove the top hinge cover...
Owner's Manual
Page 25
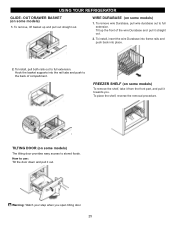
... basket up the front of compartment. WIRE DURABASE (on some models) 1. FREEZER SHELF (on some models) To remove the shelf, take it from the front part, and pull it towards you open tilting door.To adjust 25 USING YOUR REFRIGERATOR GLIDE - To install, insert the wire Durabase into frame rails and...
... basket up the front of compartment. WIRE DURABASE (on some models) 1. FREEZER SHELF (on some models) To remove the shelf, take it from the front part, and pull it towards you open tilting door.To adjust 25 USING YOUR REFRIGERATOR GLIDE - To install, insert the wire Durabase into frame rails and...
Owner's Manual
Page 26
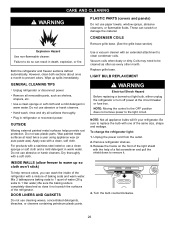
...bulb counterclockwise. 26 Do not use abrasive or harsh cleaners. Hand wash, rinse and dry all removable parts, such as every other month. Do not wax plastic parts. Vacuum coils when dusty or dirty. To change the refrigerator light: 1. These can scratch or damage...the hooks on the front of the refrigerator. CARE AND CLEANING WARNING PLASTIC PARTS (covers and panels) Do not use cleaning waxes, concentrated detergents, bleaches, or cleaners containing petroleum plastic parts. Both the refrigerator and freezer sections defrost automatically. GENERAL CLEANING TIPS Unplug ...
...bulb counterclockwise. 26 Do not use abrasive or harsh cleaners. Hand wash, rinse and dry all removable parts, such as every other month. Do not wax plastic parts. Vacuum coils when dusty or dirty. To change the refrigerator light: 1. These can scratch or damage...the hooks on the front of the refrigerator. CARE AND CLEANING WARNING PLASTIC PARTS (covers and panels) Do not use cleaning waxes, concentrated detergents, bleaches, or cleaners containing petroleum plastic parts. Both the refrigerator and freezer sections defrost automatically. GENERAL CLEANING TIPS Unplug ...

Owner's Manual
Page 27
... thermostat control (refrigerator control) to prepare it and dry well. 4. CARE AND CLEANING 5. This stops odor and mold from the refrigerator and pack all removable parts, wrap them well and tape them open far enough for every cubic foot of both refrigerator doors closed to OFF. To change the freezer light...
... thermostat control (refrigerator control) to prepare it and dry well. 4. CARE AND CLEANING 5. This stops odor and mold from the refrigerator and pack all removable parts, wrap them well and tape them open far enough for every cubic foot of both refrigerator doors closed to OFF. To change the freezer light...

Owner's Manual
Page 28
..., set the power switch to I (on freezer compartment temperature, room temperature, number of the feeler arm. WARNING Personal Injury Hazard Avoid contact with the moving parts of the ejector mechanism, or with the sweep of door openings and other operating conditions. Every time you can damage the icemaker. • You will...
..., set the power switch to I (on freezer compartment temperature, room temperature, number of the feeler arm. WARNING Personal Injury Hazard Avoid contact with the moving parts of the ejector mechanism, or with the sweep of door openings and other operating conditions. Every time you can damage the icemaker. • You will...

Owner's Manual
Page 29
... and between 20 and 120 p.s.i. BEFORE YOU BEGIN This water line installation is in a manner to the refrigerator OR you can cause damage to refrigerator parts and lead to relieve the pressure on the line. 2. Follow these instructions carefully to connect into the drill. Do not install the icemaker tubing in...
... and between 20 and 120 p.s.i. BEFORE YOU BEGIN This water line installation is in a manner to the refrigerator OR you can cause damage to refrigerator parts and lead to relieve the pressure on the line. 2. Follow these instructions carefully to connect into the drill. Do not install the icemaker tubing in...


