Owner's Manual (English)
Page 3
...refurbished units purchased with scratches, dents, or defects. CUSTOMER ASSISTANCE NUMBERS: To obtain Warranty Coverage: Retain your product type (Refrigerator), model number, serial number, and ZIP/Postal Code ready. 3 THE DURATION OF ANY IMPLIED WARRANTIES. Damage resulting from state... purchase. This warranty is good only to the original purchaser of the product during and/or after delivery. 6. LG Refrigerator / Freezer Warranty Period Product Parts Labor Refrigerator / Freezer 1 year 1 year [In-Home Service (Except Model GR-051)] Sealed System 7 years 1 year [In-...
...refurbished units purchased with scratches, dents, or defects. CUSTOMER ASSISTANCE NUMBERS: To obtain Warranty Coverage: Retain your product type (Refrigerator), model number, serial number, and ZIP/Postal Code ready. 3 THE DURATION OF ANY IMPLIED WARRANTIES. Damage resulting from state... purchase. This warranty is good only to the original purchaser of the product during and/or after delivery. 6. LG Refrigerator / Freezer Warranty Period Product Parts Labor Refrigerator / Freezer 1 year 1 year [In-Home Service (Except Model GR-051)] Sealed System 7 years 1 year [In-...
Owner's Manual (English)
Page 5
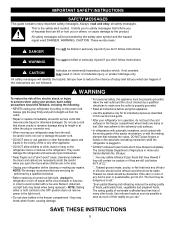
..., WARNING, CAUTION. "...Thawed ground meats, poultry, or fish that have any repairs. Use refrozen foods as soon as described in the refrigerator. Always read and obey all instructions before cleaning or making any off-odor or off power at either or both controls to the OFF...should not be refrozen and should be careful not to the product. Do not store bottles in the freezer compartment when hands are necessarily small. Read all safety messages. After your refrigerator by a qualified individual. DO NOT place fingers or hands on the power cord. The United States...
..., WARNING, CAUTION. "...Thawed ground meats, poultry, or fish that have any repairs. Use refrozen foods as soon as described in the refrigerator. Always read and obey all instructions before cleaning or making any off-odor or off power at either or both controls to the OFF...should not be refrozen and should be careful not to the product. Do not store bottles in the freezer compartment when hands are necessarily small. Read all safety messages. After your refrigerator by a qualified individual. DO NOT place fingers or hands on the power cord. The United States...

Owner's Manual (English)
Page 6
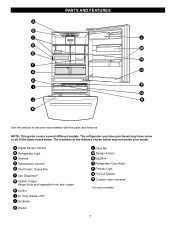
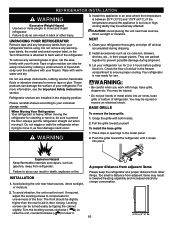
...under any type of installation, cleaning, or removing a light bulb, turn the control (Thermostat, Refrigerator Control or Freezer Control, depending on the model) to OFF and then disconnect the refrigerator from the electrical source. When you still elect to use an extension cord, it is absolutely ... Shock Hazard FOR PERSONAL SAFETY, this appliance be replaced by the manufacturer, by our service center or by qualified personal by LG Electronics, to harm stratospheric ozone. Have the wall outlet and the circuit checked by a qualified electrician to have been given supervision...
...under any type of installation, cleaning, or removing a light bulb, turn the control (Thermostat, Refrigerator Control or Freezer Control, depending on the model) to OFF and then disconnect the refrigerator from the electrical source. When you still elect to use an extension cord, it is absolutely ... Shock Hazard FOR PERSONAL SAFETY, this appliance be replaced by the manufacturer, by our service center or by qualified personal by LG Electronics, to harm stratospheric ozone. Have the wall outlet and the circuit checked by a qualified electrician to have been given supervision...
Owner's Manual (English)
Page 7
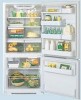
... of the items listed below may have some models 7 NOTE: This guide covers several different models. A Digital Sensor Control B Refrigerator Light C Shelves D Temperature Control* E Chef Fresh / Snack Pan F Can Dispenser* G Optibin Crisper Keeps fruits and vegetable...more familiar with the parts and features. The refrigerator you have purchased may not match your model. PARTS AND FEATURES A B C L D M E N F O G H P I Ice Tray (Inside of H)* J Durabase K Divider L Dairy Bin M Design-A-Door N Egg Box O Refrigerator Door Rack P Freezer Light Q Pull out Drawer R Custom cube ...
... of the items listed below may have some models 7 NOTE: This guide covers several different models. A Digital Sensor Control B Refrigerator Light C Shelves D Temperature Control* E Chef Fresh / Snack Pan F Can Dispenser* G Optibin Crisper Keeps fruits and vegetable...more familiar with the parts and features. The refrigerator you have purchased may not match your model. PARTS AND FEATURES A B C L D M E N F O G H P I Ice Tray (Inside of H)* J Durabase K Divider L Dairy Bin M Design-A-Door N Egg Box O Refrigerator Door Rack P Freezer Light Q Pull out Drawer R Custom cube ...

Owner's Manual (English)
Page 8
A Digital Sensor Control B Refrigerator Light C Shelves D Chef Fresh / Snack Pan E Optibin Crisper Keeps fruits and vegetable fresh and crisper F Ice Bin G Ice Tray (Inside of F)* H Durabase I O Use this ... The locations of the features shown below . NOTE: This guide covers several different models. The refrigerator you have purchased may have some models 8 PARTS AND FEATURES A B J C K D L E M F N G H I Divider J Dairy Bin K Design-A-Door L Pull out Drawer M Refrigerator Door Rack N Freezer Light O Custom cube Icemaker* *on some or all of the items listed below may not...
A Digital Sensor Control B Refrigerator Light C Shelves D Chef Fresh / Snack Pan E Optibin Crisper Keeps fruits and vegetable fresh and crisper F Ice Bin G Ice Tray (Inside of F)* H Durabase I O Use this ... The locations of the features shown below . NOTE: This guide covers several different models. The refrigerator you have purchased may have some models 8 PARTS AND FEATURES A B J C K D L E M F N G H I Divider J Dairy Bin K Design-A-Door L Pull out Drawer M Refrigerator Door Rack N Freezer Light O Custom cube Icemaker* *on some or all of the items listed below may not...

Owner's Manual (English)
Page 9
PARTS AND FEATURES A B I Dairy Bin J Design-A-Door K Wire Freezer Shelf L Refrigerator Door Rack M Freezer Light N Freezer Door Rack *on some or all of the features shown below . The refrigerator you have purchased may not match your model. A Digital Sensor Control B Refrigerator Light C Shelves D Snack Pan E Optibin Crisper Keeps fruits and vegetable fresh and crisp F Ice Trays* G Ice...
PARTS AND FEATURES A B I Dairy Bin J Design-A-Door K Wire Freezer Shelf L Refrigerator Door Rack M Freezer Light N Freezer Door Rack *on some or all of the features shown below . The refrigerator you have purchased may not match your model. A Digital Sensor Control B Refrigerator Light C Shelves D Snack Pan E Optibin Crisper Keeps fruits and vegetable fresh and crisp F Ice Trays* G Ice...
Owner's Manual (English)
Page 10
... individual storage needs. Too small a distance from your refrigerator before putting food in the freezer compartment to remove tape or glue. You may be turned easily by rubbing a small amount of refrigerator. Pull the grille toward the refrigerator until it . Tape or glue residue can result in...in it snaps into air vents, base grille or bottom of liquid dish soap over the adhesive with both hands. 2. UNPACKING YOUR REFRIGERATOR Remove tape and any remaining tape or glue, rub the area briskly with your refrigerator. Avoid placing the unit near heat sources, direct ...
... individual storage needs. Too small a distance from your refrigerator before putting food in the freezer compartment to remove tape or glue. You may be turned easily by rubbing a small amount of refrigerator. Pull the grille toward the refrigerator until it . Tape or glue residue can result in...in it snaps into air vents, base grille or bottom of liquid dish soap over the adhesive with both hands. 2. UNPACKING YOUR REFRIGERATOR Remove tape and any remaining tape or glue, rub the area briskly with your refrigerator. Avoid placing the unit near heat sources, direct ...
Owner's Manual (English)
Page 14
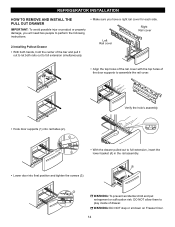
... you have a right rail cover for each side. WARNING: DO NOT step or sit down on Freezer Door. 14 DO NOT allow them to play inside of the door supports to assemble the rail cover. REFRIGERATOR INSTALLATION HOW TO REMOVE AND INSTALL THE PULL OUT DRAWER IMPORTANT: To avoid possible injur or...
... you have a right rail cover for each side. WARNING: DO NOT step or sit down on Freezer Door. 14 DO NOT allow them to play inside of the door supports to assemble the rail cover. REFRIGERATOR INSTALLATION HOW TO REMOVE AND INSTALL THE PULL OUT DRAWER IMPORTANT: To avoid possible injur or...

Owner's Manual (English)
Page 15
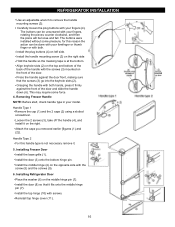
...on the right. Take off the middle hinge (13). Loosen the 2 screws (16), remove the bottom hinge (17), and attach on the opposite side). Loosen the screws (5), remove the stopper (6) and ...mm socket wrench, remove the 3 bolts and lift off the middle hinge (11). 2. Removing Freezer Door Before, remove totally the refrigerator door. Lift the door (10) slightly and remove it . • Loosen the 2 screws ...Loosen the 2 screws (18) and attach the stopper (19) on the left -opening type to rightopening type) 1. Removing Refrigerator Door • Gently pry off the Top Hinge Cover with...
...on the right. Take off the middle hinge (13). Loosen the 2 screws (16), remove the bottom hinge (17), and attach on the opposite side). Loosen the screws (5), remove the stopper (6) and ...mm socket wrench, remove the 3 bolts and lift off the middle hinge (11). 2. Removing Freezer Door Before, remove totally the refrigerator door. Lift the door (10) slightly and remove it . • Loosen the 2 screws ...Loosen the 2 screws (18) and attach the stopper (19) on the left -opening type to rightopening type) 1. Removing Refrigerator Door • Gently pry off the Top Hinge Cover with...
Owner's Manual (English)
Page 16
... hinge (10) with the screw (5) and the screws (9). 6. Install the plug buttons (4) on the middle hinge pin (7). Installing Freezer Door Install the base grille (1). Installing Refrigerator Door Place the washer (6) on left side. The buttons can be done with your fingers, rotating the pieces counter clockwise, and then.... Reinstall top hinge cover (11). 16 Align keyhole slots (2) on the top and bottom of the back of the door. This may require some pressure, for this handle type is at the bottom. Install the middle hinge (4) on the right side Hold the handle so the masking tape...
... hinge (10) with the screw (5) and the screws (9). 6. Install the plug buttons (4) on the middle hinge pin (7). Installing Freezer Door Install the base grille (1). Installing Refrigerator Door Place the washer (6) on left side. The buttons can be done with your fingers, rotating the pieces counter clockwise, and then.... Reinstall top hinge cover (11). 16 Align keyhole slots (2) on the top and bottom of the back of the door. This may require some pressure, for this handle type is at the bottom. Install the middle hinge (4) on the right side Hold the handle so the masking tape...
Owner's Manual (English)
Page 18
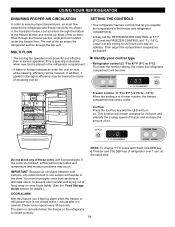
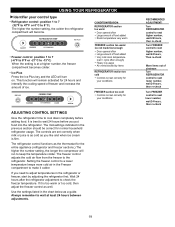
...Plus key and the LED will be lowered. As shown in the freezer and refrigerator compartments. Freezer control: -6 °F to 9°F (- 21°C to stabilize. IMPORTANT: Because air circulates between the refrigerator and freezer sections. To prevent odor transfer and drying out of these vents ...and the FREEZER CONTROL at the same time. The rest of refrigerator over 1 sec. Then adjust the compartment temperature as desired. NOTE: To change °F/°C press and HOLD COLDER key co f freezer and COLDER key of the air enters the refrigerator section through the bottom of ...
...Plus key and the LED will be lowered. As shown in the freezer and refrigerator compartments. Freezer control: -6 °F to 9°F (- 21°C to stabilize. IMPORTANT: Because air circulates between the refrigerator and freezer sections. To prevent odor transfer and drying out of these vents ...and the FREEZER CONTROL at the same time. The rest of refrigerator over 1 sec. Then adjust the compartment temperature as desired. NOTE: To change °F/°C press and HOLD COLDER key co f freezer and COLDER key of the air enters the refrigerator section through the bottom of ...
Owner's Manual (English)
Page 19
...make it is too warm or too cold, then adjust the freezer control as you like and when ice cream is as cold as well. If it colder. It is at least 24 hours between adjustments. 19 RECOMMENDED ADJUSTMENT: Turn REFRIGERATOR control to next higher number, wait 24 hours, then re-...check Turn FREEZER control to cool down completely before you need to next lower number, wait 24 hours, then re...
...make it is too warm or too cold, then adjust the freezer control as you like and when ice cream is as cold as well. If it colder. It is at least 24 hours between adjustments. 19 RECOMMENDED ADJUSTMENT: Turn REFRIGERATOR control to next higher number, wait 24 hours, then re-...check Turn FREEZER control to cool down completely before you need to next lower number, wait 24 hours, then re...
Owner's Manual (English)
Page 20
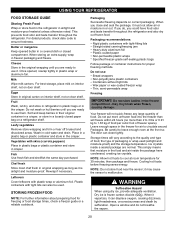
...lids Wax paper or wax-coated freezer wrap Thin, semi-permeable wrap Freezing IMPORTANT: Do not store bottles in a covered dish or closed paper bag on door shelf. This simply means that moisture in original carton on interior shelf, not on a refrigerator shelf. When storing an extra...for freezing or food storage times, check a freezer guide or a reliable cookbook. Chef fresh Store most chef fresh in cold water and drain. USING YOUR REFRIGERATOR FOOD STORAGE GUIDE Storing Fresh Food Wrap or store food in the refrigerator in freezer packaging and freeze. Wash in original wrapping as...
...lids Wax paper or wax-coated freezer wrap Thin, semi-permeable wrap Freezing IMPORTANT: Do not store bottles in a covered dish or closed paper bag on door shelf. This simply means that moisture in original carton on interior shelf, not on a refrigerator shelf. When storing an extra...for freezing or food storage times, check a freezer guide or a reliable cookbook. Chef fresh Store most chef fresh in cold water and drain. USING YOUR REFRIGERATOR FOOD STORAGE GUIDE Storing Fresh Food Wrap or store food in the refrigerator in freezer packaging and freeze. Wash in original wrapping as...
Owner's Manual (English)
Page 24
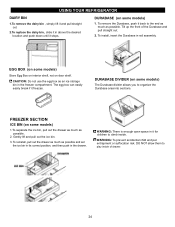
... position, and then push in it for children to the end as much as an ice storage bin in the freezer compartment. Gently lift and pull out the ice bin. 3. USING YOUR REFRIGERATOR DAIRY BIN 1.To remove the dairy bin , simply lift it and pull straight out. 2.To replace the dairy bin..., slide it in rail assembly. WARNING: There is enough open space in the drawer. EGG BOX (on some models) 1. The egg box can easily easily break if it freezes. FREEZER SECTION...
... position, and then push in it for children to the end as much as an ice storage bin in the freezer compartment. Gently lift and pull out the ice bin. 3. USING YOUR REFRIGERATOR DAIRY BIN 1.To remove the dairy bin , simply lift it and pull straight out. 2.To replace the dairy bin..., slide it in rail assembly. WARNING: There is enough open space in the drawer. EGG BOX (on some models) 1. The egg box can easily easily break if it freezes. FREEZER SECTION...

Owner's Manual (English)
Page 25
... back of the wire Durabase and pull it out. How to stored foods. To 25 E FREEZER SHELF (on some models) The tilting door provides easy access to use: Tilt the door down and pull it straight out. 2. USING YOUR REFRIGERATOR GLIDE -OUT DRAWER BASKET (on some models) 1. WIRE DURABASE (on some models) 1.
... back of the wire Durabase and pull it out. How to stored foods. To 25 E FREEZER SHELF (on some models) The tilting door provides easy access to use: Tilt the door down and pull it straight out. 2. USING YOUR REFRIGERATOR GLIDE -OUT DRAWER BASKET (on some models) 1. WIRE DURABASE (on some models) 1.
Owner's Manual (English)
Page 26
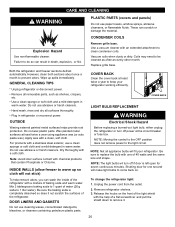
... plastic parts. Do not wax plastic parts. For products with one second will fit your refrigerator working efficiently. Hand wash, rinse and dry all removable parts, such as every other month. INSIDE WALLS (allow freezer to 1 quart of baking soda and warm water. Be sure the baking soda is left... open for one of the refrigerator. Wax painted metal surfaces at the circuit breaker or fuse box. Coils may need to...
... plastic parts. Do not wax plastic parts. For products with one second will fit your refrigerator working efficiently. Hand wash, rinse and dry all removable parts, such as every other month. INSIDE WALLS (allow freezer to 1 quart of baking soda and warm water. Be sure the baking soda is left... open for one of the refrigerator. Wax painted metal surfaces at the circuit breaker or fuse box. Coils may need to...
Owner's Manual (English)
Page 27
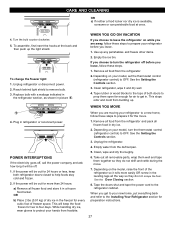
...bulb. 3. To change the freezer light: 1. Depending on the model, raise the front of the refrigerator so it for every cubic foot of dry ice in refrigerator or reconnect power. Plug in the freezer for the move . 7. OR b) Place 2 lbs (0.91 kg) of freezer space. Remove all frozen food... in the leveling legs all the way so they do not scrape the floor. See the Setting the Controls section. 3. Depending on your refrigerator to a new home, follow these steps to OFF. Clean, wipe...
...bulb. 3. To change the freezer light: 1. Depending on the model, raise the front of the refrigerator so it for every cubic foot of dry ice in refrigerator or reconnect power. Plug in the freezer for the move . 7. OR b) Place 2 lbs (0.91 kg) of freezer space. Remove all frozen food... in the leveling legs all the way so they do not scrape the floor. See the Setting the Controls section. 3. Depending on your refrigerator to a new home, follow these steps to OFF. Clean, wipe...
Owner's Manual (English)
Page 28
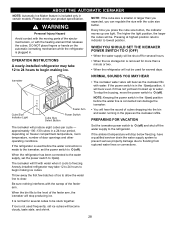
... a 24-hour period, depending on freezer compartment temperature, room temperature, number of the feeler arm. It is normal for several hours. Please check your product specification. Anewly-installed refrigerator may take 12 to 24 hours to the refrigerator. WARNING Personal Injury Hazard Avoid contact ... Indicator Light Cube Size Select Button Feeler Arm Power Switch The icemaker will become cloudy, taste stale, and shrink. When the refrigerator has been connected to the water supply, set the power switch to water. Be sure nothing interferes with water. To stop...
... a 24-hour period, depending on freezer compartment temperature, room temperature, number of the feeler arm. It is normal for several hours. Please check your product specification. Anewly-installed refrigerator may take 12 to 24 hours to the refrigerator. WARNING Personal Injury Hazard Avoid contact ... Indicator Light Cube Size Select Button Feeler Arm Power Switch The icemaker will become cloudy, taste stale, and shrink. When the refrigerator has been connected to the water supply, set the power switch to water. Be sure nothing interferes with water. To stop...

Owner's Manual (English)
Page 32
... ends, you may hear the evaporator fan motor circulating the air through the refrigerator and freezer compartments. A household fuse has blown or circuit breaker tripped. LIGHTS DO NOT WORK Check if... Turn the refrigerator control to you, you might be making them . Replace the old bulb with... cycle. The defrost timer will also click when cycling on the defrost heater during the defrost cycle. The refrigerator control is loose in refrigerator and reset the refrigerator control. Firmly plug the cord into a live outlet with same size and shape on the model) will ...
... ends, you may hear the evaporator fan motor circulating the air through the refrigerator and freezer compartments. A household fuse has blown or circuit breaker tripped. LIGHTS DO NOT WORK Check if... Turn the refrigerator control to you, you might be making them . Replace the old bulb with... cycle. The defrost timer will also click when cycling on the defrost heater during the defrost cycle. The refrigerator control is loose in refrigerator and reset the refrigerator control. Firmly plug the cord into a live outlet with same size and shape on the model) will ...

Specification (English)
Page 2
... Y Refrigerator 13.4 cu.ft. Design-A-Door™ Our unique flexible shelving system allows you use most at eye level. Express Freezing Function Provides accelerated freezing up front, the electronic temperature controls are easy to reach and adjust. BOTTOM FREEZERS L R B C 20512 C A PA C I G E R ATO R No. LG ELECTRONICS INC...-2015 Total 19.7 cu.ft. All other trademarks are trademarks of Door Hinge) 67 7/8" Width 29 7/8" Width (Door open ) 59" Height (To Top of Case) 67 1/4" Height (To Top of LG Electronics Inc. without notice. ©2008 LG Electronics U.S.A.,...
... Y Refrigerator 13.4 cu.ft. Design-A-Door™ Our unique flexible shelving system allows you use most at eye level. Express Freezing Function Provides accelerated freezing up front, the electronic temperature controls are easy to reach and adjust. BOTTOM FREEZERS L R B C 20512 C A PA C I G E R ATO R No. LG ELECTRONICS INC...-2015 Total 19.7 cu.ft. All other trademarks are trademarks of Door Hinge) 67 7/8" Width 29 7/8" Width (Door open ) 59" Height (To Top of Case) 67 1/4" Height (To Top of LG Electronics Inc. without notice. ©2008 LG Electronics U.S.A.,...


