
Owners Manual
Page 1
TYPE : PORTABLE AIR CONDITIONER MODEL : LP0817WSR LP1017WSR LP1217GSR LP1417SHR LP1417GSR LP1417WSRSM P/NO : COV34636802 Rev.2 www.lg.com Copyright © 2016 - 2018 LG Electronics Inc. COV34636802 2018. 2. 5. 오오 6:10 Page 1 ENGLISH ESPAÑOL Read this owner's manual thoroughly before operating the appliance and retain it for future reference. All Rights Reserved.
TYPE : PORTABLE AIR CONDITIONER MODEL : LP0817WSR LP1017WSR LP1217GSR LP1417SHR LP1417GSR LP1417WSRSM P/NO : COV34636802 Rev.2 www.lg.com Copyright © 2016 - 2018 LG Electronics Inc. COV34636802 2018. 2. 5. 오오 6:10 Page 1 ENGLISH ESPAÑOL Read this owner's manual thoroughly before operating the appliance and retain it for future reference. All Rights Reserved.

Owners Manual
Page 2
COV34636802 2018. 2. 5. 오오 6:10 Page 2 TABLE OF CONTENTS Important Safety Instructions 3 Electrical Safety 6 7 Before Using the Air Conditioner 8 Control Panel and Remote 10 Operation 12 SMART FUNCTIONS Using Smart ThinQ Application 13 15 16 16 17 Installation in Vertical-Sliding Windows 18 Installation in Horizontal-Sliding Windows 20 Heating Drainage 22 Emptying the Water Collection Tank 24 25 25 26 27 29 Arbitration Notice 30 2
COV34636802 2018. 2. 5. 오오 6:10 Page 2 TABLE OF CONTENTS Important Safety Instructions 3 Electrical Safety 6 7 Before Using the Air Conditioner 8 Control Panel and Remote 10 Operation 12 SMART FUNCTIONS Using Smart ThinQ Application 13 15 16 16 17 Installation in Vertical-Sliding Windows 18 Installation in Horizontal-Sliding Windows 20 Heating Drainage 22 Emptying the Water Collection Tank 24 25 25 26 27 29 Arbitration Notice 30 2

Owners Manual
Page 8
COV34636802 2018. 2. 5. 오오 6:10 Page 8 BEFORE USING THE AIR CONDITIONER Doing so are they do place the appliance near 8
COV34636802 2018. 2. 5. 오오 6:10 Page 8 BEFORE USING THE AIR CONDITIONER Doing so are they do place the appliance near 8

Owners Manual
Page 9
ENGLISH COV34636802 2018. 2. 5. 오오 6:10 Page 9 BEFORE USING THE AIR CONDITIONER the Press and slide to remove the battery cover on the back of the remote. • If the batteries leak onto your clothes or skin, remove contaminated clothing and rinse skin thoroughly with soap and water. Contact a physician immediately. 9 Do not use the remote if the battery has leaked. • If the battery or the liquid inside it are ingested, do not induce vomiting or give food or drink.
ENGLISH COV34636802 2018. 2. 5. 오오 6:10 Page 9 BEFORE USING THE AIR CONDITIONER the Press and slide to remove the battery cover on the back of the remote. • If the batteries leak onto your clothes or skin, remove contaminated clothing and rinse skin thoroughly with soap and water. Contact a physician immediately. 9 Do not use the remote if the battery has leaked. • If the battery or the liquid inside it are ingested, do not induce vomiting or give food or drink.

Owners Manual
Page 10
... using the remote, remember to toggle the fan speed between the remote and the sensor. The fan speed can only be set the air conditioner to switch the temperature display from anywhere at a desired time. The fan speed is located on or off at the sensor. Press .... The timer function can be supported, depending on the control panel. COV34636802 2018. 2. 5. 오오 6:10 Page 10 Operation of the air conditioner. See the Operation section for more information. 10 See the Operation section for more information. Use the timer function to set using the remote or...
... using the remote, remember to toggle the fan speed between the remote and the sensor. The fan speed can only be set the air conditioner to switch the temperature display from anywhere at a desired time. The fan speed is located on or off at the sensor. Press .... The timer function can be supported, depending on the control panel. COV34636802 2018. 2. 5. 오오 6:10 Page 10 Operation of the air conditioner. See the Operation section for more information. 10 See the Operation section for more information. Use the timer function to set using the remote or...
Owners Manual
Page 12
...in Dry mode, the target temperature is automatically set the desired fan speed to power it ON. 2. The delay time appears briefly in the air conditioner and use the ƞ.Ơ buttons to set the desired mode, temperature, fan speed, etc. 3. To cancel the Timer function, press ... and use the remote to 4°F (2°C) below the current room temperature. The delay time can be adjusted. Setting the Air Conditioner to turn the air conditioner ON/OFF automatically. Use the ƞ.Ơ and FAN buttons to set the desired temperature and fan speed. Press TIMER on the...
...in Dry mode, the target temperature is automatically set the desired fan speed to power it ON. 2. The delay time appears briefly in the air conditioner and use the ƞ.Ơ buttons to set the desired mode, temperature, fan speed, etc. 3. To cancel the Timer function, press ... and use the remote to 4°F (2°C) below the current room temperature. The delay time can be adjusted. Setting the Air Conditioner to turn the air conditioner ON/OFF automatically. Use the ƞ.Ơ and FAN buttons to set the desired temperature and fan speed. Press TIMER on the...

Owners Manual
Page 14
... Google Play Store or Apple App Store on a smart phone. Product Registration 1 Run the LG SmartThinQ application on a smart phone. 2 Create an account and sign in. 3 Select Register. 4 Select Air conditioner. 5 Follow the instruction on the smart phone. Settings Allows you on CD-ROM for the... LG SmartThinQ application from a smart phone using the convenient smart features. NOTE • If you change ...
... Google Play Store or Apple App Store on a smart phone. Product Registration 1 Run the LG SmartThinQ application on a smart phone. 2 Create an account and sign in. 3 Select Register. 4 Select Air conditioner. 5 Follow the instruction on the smart phone. Settings Allows you on CD-ROM for the... LG SmartThinQ application from a smart phone using the convenient smart features. NOTE • If you change ...

Owners Manual
Page 16
... into place. Insert the vent hose in the round end of the diffuser in step 5. 16 Attach the hose assembly onto the back of the air conditioner by inserting the edges of the mounting bracket behind the tabs at both ends of the diffuser. Set the grill and screws aside. 6.
... into place. Insert the vent hose in the round end of the diffuser in step 5. 16 Attach the hose assembly onto the back of the air conditioner by inserting the edges of the mounting bracket behind the tabs at both ends of the diffuser. Set the grill and screws aside. 6.

Owners Manual
Page 17
... Fig. d 17 COV34636802 2018. 2. 5. 오오 6:10 Page 17 INSTALLATION INSTRUCTIONS WINDOW VENT PANEL AND EXTENSIONS The window installation kit allows you to install the air conditioner in place with 1 type A screw. Fig. b For window openings from 27" to 34", use the window vent panel (Panel A) and an extension panel (Panel B). If...
... Fig. d 17 COV34636802 2018. 2. 5. 오오 6:10 Page 17 INSTALLATION INSTRUCTIONS WINDOW VENT PANEL AND EXTENSIONS The window installation kit allows you to install the air conditioner in place with 1 type A screw. Fig. b For window openings from 27" to 34", use the window vent panel (Panel A) and an extension panel (Panel B). If...

Owners Manual
Page 24
NOTE: After the air conditioner is full. Unplug the air conditioner, drain the tank, then plug the air conditioner back in and restart it defaults to the Cool mode with a temperature setting of the hose over a drain or bucket or out the window. Using ...
NOTE: After the air conditioner is full. Unplug the air conditioner, drain the tank, then plug the air conditioner back in and restart it defaults to the Cool mode with a temperature setting of the hose over a drain or bucket or out the window. Using ...

Owners Manual
Page 26
COV34636802 2018. 2. 5. 오오 6:10 Page 26 CARE AND CLEANING STORING THE AIR CONDITIONER extended period of time: Make sure the filters and drain cap are in place Remove and clean the filters, allow them to dry completely, then reinstall them. 26
COV34636802 2018. 2. 5. 오오 6:10 Page 26 CARE AND CLEANING STORING THE AIR CONDITIONER extended period of time: Make sure the filters and drain cap are in place Remove and clean the filters, allow them to dry completely, then reinstall them. 26

Specification
Page 1
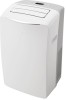
... LCD Remote Control • Timer 24 Hr. It circulates your LG appliances from anywhere. Non-metric weights and measurements are subject to change without notice. That's why we make portable air conditioners. Which means you can control the temperature even when you full feature... Multiple Fan Speeds with our oscillating air vent technology. Most of their respective companies. 02/17 "LG Life's Good" is a registered trademark of person? Don't worry. All rights reserved. This one App. Cooling Area (SQ. Portable Air Conditioner LP1417WSRSM EASY DOES IT Not really an ...
... LCD Remote Control • Timer 24 Hr. It circulates your LG appliances from anywhere. Non-metric weights and measurements are subject to change without notice. That's why we make portable air conditioners. Which means you can control the temperature even when you full feature... Multiple Fan Speeds with our oscillating air vent technology. Most of their respective companies. 02/17 "LG Life's Good" is a registered trademark of person? Don't worry. All rights reserved. This one App. Cooling Area (SQ. Portable Air Conditioner LP1417WSRSM EASY DOES IT Not really an ...


