
Owner's Manual
Page 6
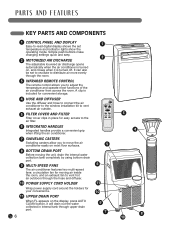
..., and closes when it is included for convenient storage. 4 HOSE AND DIFFUSER Use the diffuser and hose to connect the air conditioner to the window installation kit to vent exhaust air outside. 5 FILTER COVER AND FILTER Filter cover clips in place for easy access to vent hot air outdoors through the hose...
..., and closes when it is included for convenient storage. 4 HOSE AND DIFFUSER Use the diffuser and hose to connect the air conditioner to the window installation kit to vent exhaust air outside. 5 FILTER COVER AND FILTER Filter cover clips in place for easy access to vent hot air outdoors through the hose...
Owner's Manual
Page 8
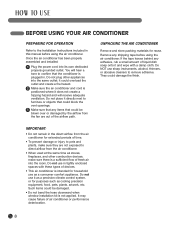
it could be damaged. • Do not bend the hose downward when window installation kit is positioned where it as a precision climate control system, or for household use sharp instruments, alcohol, thinners, or abrasive cleaners to confirm that could overload ...
it could be damaged. • Do not bend the hose downward when window installation kit is positioned where it as a precision climate control system, or for household use sharp instruments, alcohol, thinners, or abrasive cleaners to confirm that could overload ...
Owner's Manual
Page 13
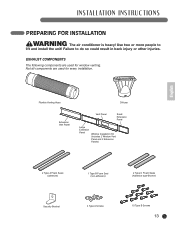
...injuryorotherinjuries. English Flexible Venting Hose Diffuser Extension Vent Panel Vent Panel Small Extension Panel Large Extension Panel Window Installation Kit (includes 2 Window Vent Panel and 2 Extension Panels) 2 Type A Foam Seals (adhesive) 1 Type B Foam Seal (non-adhesive) 2 Type C Foam Seals (Adhesive type-Shorter) Security Bracket 4 Type A Screws...
...injuryorotherinjuries. English Flexible Venting Hose Diffuser Extension Vent Panel Vent Panel Small Extension Panel Large Extension Panel Window Installation Kit (includes 2 Window Vent Panel and 2 Extension Panels) 2 Type A Foam Seals (adhesive) 1 Type B Foam Seal (non-adhesive) 2 Type C Foam Seals (Adhesive type-Shorter) Security Bracket 4 Type A Screws...
Owner's Manual
Page 15
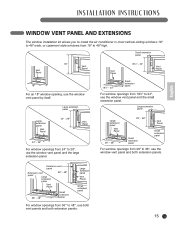
... from 36″ to 48" high. INSTALLATION INSTRUCTIONS English WINDOW VENT PANEL AND EXTENSIONS The window installation kit allows you to install the air conditioner in most vertical-sliding windows 18" to 48" wide, or casement-style windows from 18" to 48″, use the window vent panel by itself. Small extension panel Vent Panel...
... from 36″ to 48" high. INSTALLATION INSTRUCTIONS English WINDOW VENT PANEL AND EXTENSIONS The window installation kit allows you to install the air conditioner in most vertical-sliding windows 18" to 48" wide, or casement-style windows from 18" to 48″, use the window vent panel by itself. Small extension panel Vent Panel...

Owner's Manual
Page 16
... espuma A (Tipo adhesivo) Foam seal B (Non-adhesive type) Joints en Mousse C (Plus court de type adhésif) 3 Carefully lower the window. Extend the extension panels, if used with 4 type B screws, plus one screw for each extension: Vent panel only: 4 type B screws Vent panel...1 Cut the foam seal A(adhesive type) & C(adhesive type-shorterT) iptoo Cthdee spelrlaodpoecorn espuma length, and attach it to the window width. INSTALLATION INSTRUCTIONS INSTALLATION IN VERTICAL SLIDING WINDOWS NOTE: The window installation kit can be used . Stuff the foam seal B between 18" and 48" wide.
... espuma A (Tipo adhesivo) Foam seal B (Non-adhesive type) Joints en Mousse C (Plus court de type adhésif) 3 Carefully lower the window. Extend the extension panels, if used with 4 type B screws, plus one screw for each extension: Vent panel only: 4 type B screws Vent panel...1 Cut the foam seal A(adhesive type) & C(adhesive type-shorterT) iptoo Cthdee spelrlaodpoecorn espuma length, and attach it to the window width. INSTALLATION INSTRUCTIONS INSTALLATION IN VERTICAL SLIDING WINDOWS NOTE: The window installation kit can be used . Stuff the foam seal B between 18" and 48" wide.

Owner's Manual
Page 17
Type A screws 6 Insert the oval end of the diffuser into the window installation kit until the locking tabs engage. INSTALLATION INSTRUCTIONS INSTALLATION IN VERTICAL SLIDING WINDOWS Security Bracket Type B screw 5 Install the security bracket with four Type A screws. English 17 Secure in place with a type B screw, as shown.
Type A screws 6 Insert the oval end of the diffuser into the window installation kit until the locking tabs engage. INSTALLATION INSTRUCTIONS INSTALLATION IN VERTICAL SLIDING WINDOWS Security Bracket Type B screw 5 Install the security bracket with four Type A screws. English 17 Secure in place with a type B screw, as shown.

Owner's Manual
Page 18
...A (Adhesive type) 1 Cut the foam seal A(adhesive type) & C(adhesive type-shorter) to the proper length, and attach it to the window sash and frame. Stuff the foam sMeoausl sBe C between 18ʺ and 48ʺ tall. Extend the extension panels, if used with 4... adhésif) más corto) Foam seal B (Non-adhesive type) 3 Carefully close the window. Sellado con espuma C (tipo adhesivo- INSTALLATION INSTRUCTIONS INSTALLATION IN CASEMENT STYLE WINDOWS NOTE: The window installation kit can be used . Sellado con espuma A Type B sc(triepwo sadhesivo) Extension panel (if required)...
...A (Adhesive type) 1 Cut the foam seal A(adhesive type) & C(adhesive type-shorter) to the proper length, and attach it to the window sash and frame. Stuff the foam sMeoausl sBe C between 18ʺ and 48ʺ tall. Extend the extension panels, if used with 4... adhésif) más corto) Foam seal B (Non-adhesive type) 3 Carefully close the window. Sellado con espuma C (tipo adhesivo- INSTALLATION INSTRUCTIONS INSTALLATION IN CASEMENT STYLE WINDOWS NOTE: The window installation kit can be used . Sellado con espuma A Type B sc(triepwo sadhesivo) Extension panel (if required)...

Owner's Manual
Page 19
English 19 INSTALLATION INSTRUCTIONS INSTALLATION IN CASEMENT STYLE WINDOWS Security bracket Type A screws Type B screw 5 Install the window security bracket with four of the diffuser into the window installation kit until the locking tabs engage. Secure in place with a type B screw, as shown. 6 Insert the oval end of the included screws.
English 19 INSTALLATION INSTRUCTIONS INSTALLATION IN CASEMENT STYLE WINDOWS Security bracket Type A screws Type B screw 5 Install the window security bracket with four of the diffuser into the window installation kit until the locking tabs engage. Secure in place with a type B screw, as shown. 6 Insert the oval end of the included screws.


