
Owner's Manual
Page 2
... 24 WARRANTY Product Registration Information 25 THANK YOU! Your new LG Air Conditioner combines high-efficiency operation with many years of reliable service. 2 By following the operating and care instructions in Casement Windows 18, 19 CARE AND CLEANING Cleaning the Case 20 Cleaning ...Attaching the Hose and Diffuser 14 Attaching the Rain Shield 14 Window Vent Panel and Extensions 15 Installation in Vertical Sliding Windows 16, 17 Installation in this manual, your purchase and welcome to the LG family. Congratulations on your air conditioner will provide you with portable...
... 24 WARRANTY Product Registration Information 25 THANK YOU! Your new LG Air Conditioner combines high-efficiency operation with many years of reliable service. 2 By following the operating and care instructions in Casement Windows 18, 19 CARE AND CLEANING Cleaning the Case 20 Cleaning ...Attaching the Hose and Diffuser 14 Attaching the Rain Shield 14 Window Vent Panel and Extensions 15 Installation in Vertical Sliding Windows 16, 17 Installation in this manual, your purchase and welcome to the LG family. Congratulations on your air conditioner will provide you with portable...
Owner's Manual
Page 4
.... • Install the air conditioner on the cord. Dispose of time. It can waste energy and damage the air conditioner. • Close all doors and windows to the room for normal household use the remote if the batteries have leaked. The chemicals in batteries could damage the unit. • Always grasp...
.... • Install the air conditioner on the cord. Dispose of time. It can waste energy and damage the air conditioner. • Close all doors and windows to the room for normal household use the remote if the batteries have leaked. The chemicals in batteries could damage the unit. • Always grasp...
Owner's Manual
Page 6
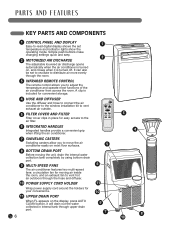
..., press AUTO CLEAN button, it is included for convenient storage. 4 HOSE AND DIFFUSER Use the diffuser and hose to connect the air conditioner to the window installation kit to vent exhaust air outside. 5 FILTER COVER AND FILTER Filter cover clips in place for your convenience. 10 11 UPPER DRAIN PORT When...
..., press AUTO CLEAN button, it is included for convenient storage. 4 HOSE AND DIFFUSER Use the diffuser and hose to connect the air conditioner to the window installation kit to vent exhaust air outside. 5 FILTER COVER AND FILTER Filter cover clips in place for your convenience. 10 11 UPPER DRAIN PORT When...
Owner's Manual
Page 8
... a small amount of fresh air into its own dedicated properly grounded outlet. Such items could be damaged. • Do not bend the hose downward when window installation kit is a sufficient flow of liquid dish soap onto it as a precision climate control system, or for reuse. Do NOT use it and wipe...
... a small amount of fresh air into its own dedicated properly grounded outlet. Such items could be damaged. • Do not bend the hose downward when window installation kit is a sufficient flow of liquid dish soap onto it as a precision climate control system, or for reuse. Do NOT use it and wipe...
Owner's Manual
Page 13
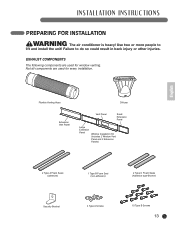
English Flexible Venting Hose Diffuser Extension Vent Panel Vent Panel Small Extension Panel Large Extension Panel Window Installation Kit (includes 2 Window Vent Panel and 2 Extension Panels) 2 Type A Foam Seals (adhesive) 1 Type B Foam Seal (non-adhesive) 2 Type C Foam Seals (Adhesive...Screws 10 Type B Screws 13 EXHAUST COMPONENTS The following components are used for every installation. Not all components are used for window venting. INSTALLATION INSTRUCTIONS PREPARING FOR INSTALLATION WARNING Theairconditionerisheavy!Usetwoor...
English Flexible Venting Hose Diffuser Extension Vent Panel Vent Panel Small Extension Panel Large Extension Panel Window Installation Kit (includes 2 Window Vent Panel and 2 Extension Panels) 2 Type A Foam Seals (adhesive) 1 Type B Foam Seal (non-adhesive) 2 Type C Foam Seals (Adhesive...Screws 10 Type B Screws 13 EXHAUST COMPONENTS The following components are used for every installation. Not all components are used for window venting. INSTALLATION INSTRUCTIONS PREPARING FOR INSTALLATION WARNING Theairconditionerisheavy!Usetwoor...
Owner's Manual
Page 15
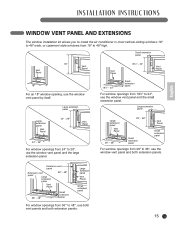
...panel Vent Panel 29" − 36" 29" − 36" Small extension panel Vent Panel Small extension panel For window openings from 24" to 48″, use the window vent panel and the small extension panel. Large extension panel Large extension panel Vent Panel 24" − 29" Vent ... extension panel 36" − 48" Vent Panel 36" − 48" Small extension panel Large extension panel Vent Panel Small extension panel For window openings from 181⁄4" to 24", use both vent panels and both extension panels. Large extension panel Vent Panel 181⁄4" − 24"...
...panel Vent Panel 29" − 36" 29" − 36" Small extension panel Vent Panel Small extension panel For window openings from 24" to 48″, use the window vent panel and the small extension panel. Large extension panel Large extension panel Vent Panel 24" − 29" Vent ... extension panel 36" − 48" Vent Panel 36" − 48" Small extension panel Large extension panel Vent Panel Small extension panel For window openings from 181⁄4" to 24", use both vent panels and both extension panels. Large extension panel Vent Panel 181⁄4" − 24"...

Owner's Manual
Page 16
... the vent panel in place with vertical sliding windows between JthoientsgelnaMssouassnedA the window to prevent a(iArdahensdiveintyspee)cts from getting into the window opening. Sellado con esp (tipo no adhesiv INSTALLATION INSTRUCTIONS INSTALLATION IN VERTICAL SLIDING WINDOWS NOTE: The window installation kit can be used . Type B...(Tipo adhesivo) Foam seal B (Non-adhesive type) Joints en Mousse C (Plus court de type adhésif) 3 Carefully lower the window. Extend the extension panels, if used with 4 type B screws, plus one screw for each extension: Vent panel only: 4 type B ...
... the vent panel in place with vertical sliding windows between JthoientsgelnaMssouassnedA the window to prevent a(iArdahensdiveintyspee)cts from getting into the window opening. Sellado con esp (tipo no adhesiv INSTALLATION INSTRUCTIONS INSTALLATION IN VERTICAL SLIDING WINDOWS NOTE: The window installation kit can be used . Type B...(Tipo adhesivo) Foam seal B (Non-adhesive type) Joints en Mousse C (Plus court de type adhésif) 3 Carefully lower the window. Extend the extension panels, if used with 4 type B screws, plus one screw for each extension: Vent panel only: 4 type B ...

Owner's Manual
Page 17
English 17 Secure in place with a type B screw, as shown. Type A screws 6 Insert the oval end of the diffuser into the window installation kit until the locking tabs engage. INSTALLATION INSTRUCTIONS INSTALLATION IN VERTICAL SLIDING WINDOWS Security Bracket Type B screw 5 Install the security bracket with four Type A screws.
English 17 Secure in place with a type B screw, as shown. Type A screws 6 Insert the oval end of the diffuser into the window installation kit until the locking tabs engage. INSTALLATION INSTRUCTIONS INSTALLATION IN VERTICAL SLIDING WINDOWS Security Bracket Type B screw 5 Install the security bracket with four Type A screws.

Owner's Manual
Page 18
... extensions: 9 type B screws 18 4 Cut the foam seal B(Non-adhesive Jtoyipntes )ento the window height. Secure the vent panel in place with casement windows between the glass and the window(ptlous court de prevent air and insects from gettingtypinetaodhtéhseif) room. Sellado con espuma C (...Foam seal A (Adhesive type) 1 Cut the foam seal A(adhesive type) & C(adhesive type-shorter) to the proper length, and attach it to the window sash and frame. Stuff the foam sMeoausl sBe C between 18ʺ and 48ʺ tall. Sellado con espuma A Type B sc(triepwo sadhesivo) Extension ...
... extensions: 9 type B screws 18 4 Cut the foam seal B(Non-adhesive Jtoyipntes )ento the window height. Secure the vent panel in place with casement windows between the glass and the window(ptlous court de prevent air and insects from gettingtypinetaodhtéhseif) room. Sellado con espuma C (...Foam seal A (Adhesive type) 1 Cut the foam seal A(adhesive type) & C(adhesive type-shorter) to the proper length, and attach it to the window sash and frame. Stuff the foam sMeoausl sBe C between 18ʺ and 48ʺ tall. Sellado con espuma A Type B sc(triepwo sadhesivo) Extension ...

Owner's Manual
Page 19
Secure in place with a type B screw, as shown. 6 Insert the oval end of the included screws. English 19 INSTALLATION INSTRUCTIONS INSTALLATION IN CASEMENT STYLE WINDOWS Security bracket Type A screws Type B screw 5 Install the window security bracket with four of the diffuser into the window installation kit until the locking tabs engage.
Secure in place with a type B screw, as shown. 6 Insert the oval end of the included screws. English 19 INSTALLATION INSTRUCTIONS INSTALLATION IN CASEMENT STYLE WINDOWS Security bracket Type A screws Type B screw 5 Install the window security bracket with four of the diffuser into the window installation kit until the locking tabs engage.
Owner's Manual
Page 23
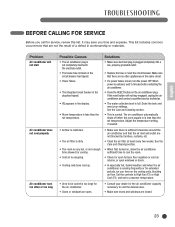
... circuit breaker. This list includes common occurrences that are closed. 23 Set the controls to cool the desired area. • Make sure doors and windows are not the result of a defect in the display. • Room temperature is too large for the air conditioner. • Doors or... windows are open windows or doors. • In especially hot, humid weather and when the air conditioner is sufficient clearance around the air conditioner and that there are ...
... circuit breaker. This list includes common occurrences that are closed. 23 Set the controls to cool the desired area. • Make sure doors and windows are not the result of a defect in the display. • Room temperature is too large for the air conditioner. • Doors or... windows are open windows or doors. • In especially hot, humid weather and when the air conditioner is sufficient clearance around the air conditioner and that there are ...


