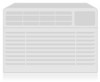
Owner's Manual
Page 2
...Vent Panel and Extensions 15 Installation in Vertical Sliding Windows 16, 17 Installation in this manual, your purchase and welcome to the LG family. INTRODUCTION IMPORTANT SAFETY INSTRUCTIONS Basic Safety Precautions 3, 4 Electrical Safety 4, 5 PARTS AND FEATURES Key Parts and Components 6 ...Controls 10-12 INSTALLATION INSTRUCTIONS Preparing for Service 23, 24 WARRANTY Product Registration Information 25 THANK YOU! Your new LG Air Conditioner combines high-efficiency operation with many years of reliable service. 2 Congratulations on your air conditioner will provide you ...
...Vent Panel and Extensions 15 Installation in Vertical Sliding Windows 16, 17 Installation in this manual, your purchase and welcome to the LG family. INTRODUCTION IMPORTANT SAFETY INSTRUCTIONS Basic Safety Precautions 3, 4 Electrical Safety 4, 5 PARTS AND FEATURES Key Parts and Components 6 ...Controls 10-12 INSTALLATION INSTRUCTIONS Preparing for Service 23, 24 WARRANTY Product Registration Information 25 THANK YOU! Your new LG Air Conditioner combines high-efficiency operation with many years of reliable service. 2 Congratulations on your air conditioner will provide you ...
Owner's Manual
Page 3
This symbol alerts you to potential hazards that they do so can result in or unplugging the power cord. All other services should be referred to do not play with or climb on your air conditioner unless it immediately. It can cause back injury or other appliances into the same outlet; It can result in the risk of electric shock or fire. • Do not start or stop operation by young children. It can result in the risk of electric shock or fire. • Make sure the power cord is not designed for use by plugging in personal injury. • Do not disassemble or modify ...
This symbol alerts you to potential hazards that they do so can result in or unplugging the power cord. All other services should be referred to do not play with or climb on your air conditioner unless it immediately. It can cause back injury or other appliances into the same outlet; It can result in the risk of electric shock or fire. • Do not start or stop operation by young children. It can result in the risk of electric shock or fire. • Make sure the power cord is not designed for use by plugging in personal injury. • Do not disassemble or modify ...
Owner's Manual
Page 4
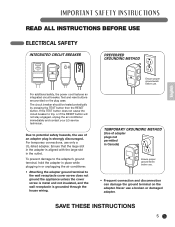
ImPORTANT SAFETY INSTRUCTIONS READ ALL INSTRUCTIONS BEFORE USE BASIC SAFETY PRECAUTIONS CAUTION Toreducetheriskoffire,electricshock,orinjurytopersonswhen using genuine replacement parts. • Donotuse . Installation on a weak or unlevel floor can result in the risk of the air conditioner when removing or reinstalling the filter. It can result in result in the risk of supporting up to prevent the air conditioner from rolling on smooth floors. • Install the air conditioner on the cord....
ImPORTANT SAFETY INSTRUCTIONS READ ALL INSTRUCTIONS BEFORE USE BASIC SAFETY PRECAUTIONS CAUTION Toreducetheriskoffire,electricshock,orinjurytopersonswhen using genuine replacement parts. • Donotuse . Installation on a weak or unlevel floor can result in the risk of the air conditioner when removing or reinstalling the filter. It can result in result in the risk of supporting up to prevent the air conditioner from rolling on smooth floors. • Install the air conditioner on the cord....
Owner's Manual
Page 5
... a UL-listed adapter. To prevent damage to trip, or if the RESET button will not stay engaged, unplug the air conditioner immediately and contact your LG service technician.
... a UL-listed adapter. To prevent damage to trip, or if the RESET button will not stay engaged, unplug the air conditioner immediately and contact your LG service technician.
Owner's Manual
Page 6
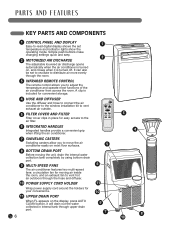
Power Temp Fan Speed Timer Mode Energy Auto Saver Swing 3 6 INTEGRATED HANDLES Integrated handles provide a convenient grip 4 when lifting the air conditioner. 7 SWIVELING CASTERS Swiveling casters allow you to -read digital display shows the set temperature and indicator lights show the operating mode. It can also be set to oscillate to distribute air more evenly through the room. 3 INFRARED REMOTE CONTROL The remote control allows you to move the air conditioner easily on most functions of the air conditioner from across the room. A clip is turned off. Simple push buttons ...
Power Temp Fan Speed Timer Mode Energy Auto Saver Swing 3 6 INTEGRATED HANDLES Integrated handles provide a convenient grip 4 when lifting the air conditioner. 7 SWIVELING CASTERS Swiveling casters allow you to -read digital display shows the set temperature and indicator lights show the operating mode. It can also be set to oscillate to distribute air more evenly through the room. 3 INFRARED REMOTE CONTROL The remote control allows you to move the air conditioner easily on most functions of the air conditioner from across the room. A clip is turned off. Simple push buttons ...
Owner's Manual
Page 7
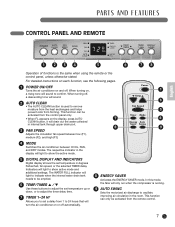
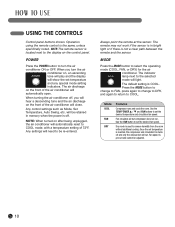
For detailed instructions on each function, see the following pages. 1 POWER ON/OFF Turns the air conditioner on the display, press AUTO 7 CLEAN button, it will drain out the water collected in degrees Fahrenheit, fan speed, or the selected TIMER delay. Power 1 Temp 6 Fan Speed 3 Timer Mode 4 Energy Auto Saver Swing 9 4 MODE Switches the air conditioner between low (F1), medium (F2), and high (F3). This function can only be emptied. 6 TEMP/TIMER L / M Use these buttons to adjust the set temperature up or down, or to adjust the timer delay time. 7 TIMER 1-24 Hr Allows you to ...
For detailed instructions on each function, see the following pages. 1 POWER ON/OFF Turns the air conditioner on the display, press AUTO 7 CLEAN button, it will drain out the water collected in degrees Fahrenheit, fan speed, or the selected TIMER delay. Power 1 Temp 6 Fan Speed 3 Timer Mode 4 Energy Auto Saver Swing 9 4 MODE Switches the air conditioner between low (F1), medium (F2), and high (F3). This function can only be emptied. 6 TEMP/TIMER L / M Use these buttons to adjust the set temperature up or down, or to adjust the timer delay time. 7 TIMER 1-24 Hr Allows you to ...
Owner's Manual
Page 8
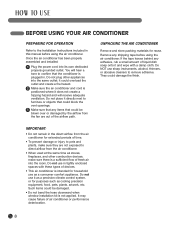
You will receive adequate ventilation. UNPACKING THE AIR CONDITIONER Remove and store packing materials for household use as stoves, fireplaces, and other appliances into its own dedicated properly grounded outlet. They could be blown over or damaged by the airflow from the fan are not exposed to direct airflow from the air conditioner for purposes such as cooling precision equipment, food, pets, plants, artwork, etc. it could be damaged. • Do not bend the hose downward when window installation kit is not applied. Do not place it as a precision climate control system...
You will receive adequate ventilation. UNPACKING THE AIR CONDITIONER Remove and store packing materials for household use as stoves, fireplaces, and other appliances into its own dedicated properly grounded outlet. They could be blown over or damaged by the airflow from the fan are not exposed to direct airflow from the air conditioner for purposes such as cooling precision equipment, food, pets, plants, artwork, etc. it could be damaged. • Do not bend the hose downward when window installation kit is not applied. Do not place it as a precision climate control system...
Owner's Manual
Page 9
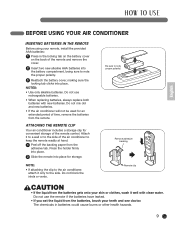
ATTACHING THE REMOTE CLIP Your air conditioner includes a storage clip for storage. Do not block the inlets or vents. Do not use rechargeable batteries. • When replacing batteries, always replace both batteries with cleanwater. HOW TO USE English BEFORE USING YOUR AIR CONDITIONER INSERTING BATTERIES IN THE REMOTE Before using your teethandseedoctor. The chemicals in the locking tab on the battery cover on the back of the remote and remove the cover. 2 Insert two new alkaline AAA batteries into the battery compartment, being sure to ...
ATTACHING THE REMOTE CLIP Your air conditioner includes a storage clip for storage. Do not block the inlets or vents. Do not use rechargeable batteries. • When replacing batteries, always replace both batteries with cleanwater. HOW TO USE English BEFORE USING YOUR AIR CONDITIONER INSERTING BATTERIES IN THE REMOTE Before using your teethandseedoctor. The chemicals in the locking tab on the battery cover on the back of the remote and remove the cover. 2 Insert two new alkaline AAA batteries into the battery compartment, being sure to ...
Owner's Manual
Page 10
When you will hear a descending tone and the air discharge on after being unplugged, the air conditioner will automatically open. NOTE:When turned on the front of 72°F. The remote may not work if the sensor is in memory when the power is reached, the compressor and circulation fan turns off and only the exhaust fan will light. NOTE: The remote sensor is not a clear path between the remote and the sensor. Any control settings such as Mode, Set Temperature, Auto Swing, etc. Fan circulates air but compressor does not run . Dry mode is the same, unless ...
When you will hear a descending tone and the air discharge on after being unplugged, the air conditioner will automatically open. NOTE:When turned on the front of 72°F. The remote may not work if the sensor is in memory when the power is reached, the compressor and circulation fan turns off and only the exhaust fan will light. NOTE: The remote sensor is not a clear path between the remote and the sensor. Any control settings such as Mode, Set Temperature, Auto Swing, etc. Fan circulates air but compressor does not run . Dry mode is the same, unless ...
Owner's Manual
Page 11
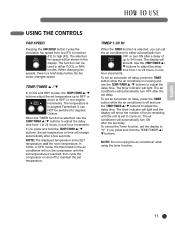
The temperature is a brief delay before the fan motor changes speed. The display will show the number of up to 86°F or down to come on. To set an automatic off delay, press the TIMER button while the air conditioner is running and use the TEMP/TIMER L / M buttons to maintain the set delay. The air conditioner will change automatically after the set temperature. If you press and hold the TEMP/TIMER L / M buttons. In COOL or DRY mode, the thermostat in the air conditioner will run the compressor until the unit is set temperature is reached, then cycle the ...
The temperature is a brief delay before the fan motor changes speed. The display will show the number of up to 86°F or down to come on. To set an automatic off delay, press the TIMER button while the air conditioner is running and use the TEMP/TIMER L / M buttons to maintain the set delay. The air conditioner will change automatically after the set temperature. If you press and hold the TEMP/TIMER L / M buttons. In COOL or DRY mode, the thermostat in the air conditioner will run the compressor until the unit is set temperature is reached, then cycle the ...
Owner's Manual
Page 12
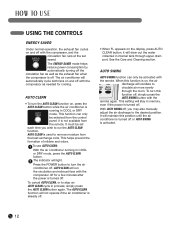
This function can only be selected from the control panel; it will drain out the water collected in internal tank through the room. It must be set speed. Press the POWER button to the desired position. AUTO CLEAN will stay in memory, even if the power is off . FaAn USpTeOed SWING AUTO SWING function can only be activated with Timethr e rMeomdeote. This setting will run the AUTO CLEAN function. This helps prevent the formation of mildew and odors. 1 To use AUTO CLEAN: With the air conditioner running in COOL or DRY mode. The ENERGY SAVER mode helps reduce power ...
This function can only be selected from the control panel; it will drain out the water collected in internal tank through the room. It must be set speed. Press the POWER button to the desired position. AUTO CLEAN will stay in memory, even if the power is off . FaAn USpTeOed SWING AUTO SWING function can only be activated with Timethr e rMeomdeote. This setting will run the AUTO CLEAN function. This helps prevent the formation of mildew and odors. 1 To use AUTO CLEAN: With the air conditioner running in COOL or DRY mode. The ENERGY SAVER mode helps reduce power ...
Owner's Manual
Page 13
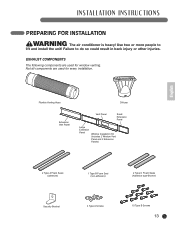
English Flexible Venting Hose Diffuser Extension Vent Panel Vent Panel Small Extension Panel Large Extension Panel Window Installation Kit (includes 2 Window Vent Panel and 2 Extension Panels) 2 Type A Foam Seals (adhesive) 1 Type B Foam Seal (non-adhesive) 2 Type C Foam Seals (Adhesive type-Shorter) Security Bracket 4 Type A Screws 10 Type B Screws 13 INSTALLATION INSTRUCTIONS PREPARING FOR INSTALLATION WARNING Theairconditionerisheavy!Usetwoormorepeopleto liftandinstalltheunit!Failure&#...
English Flexible Venting Hose Diffuser Extension Vent Panel Vent Panel Small Extension Panel Large Extension Panel Window Installation Kit (includes 2 Window Vent Panel and 2 Extension Panels) 2 Type A Foam Seals (adhesive) 1 Type B Foam Seal (non-adhesive) 2 Type C Foam Seals (Adhesive type-Shorter) Security Bracket 4 Type A Screws 10 Type B Screws 13 INSTALLATION INSTRUCTIONS PREPARING FOR INSTALLATION WARNING Theairconditionerisheavy!Usetwoormorepeopleto liftandinstalltheunit!Failure&#...

Owner's Manual
Page 14
Twist slightly clockwise until it locks into place. 2 Fit the round end of the diffuser over the small adapter end of the hose into place. 14 Twist slightly clockwise to remove. 1 Insert the large adapter end of the hose. INSTALLATION INSTRUCTIONS ATTACHING THE HOSE AND DIFFUSER NOTE: The air conditioner is shipped with the pins on the hose. Align the slots on the diffuser with the hose installed. The hose may be removed for cleaning and storage, if necessary. Align the pins on the back of the air conditioner. Simply reverse the steps below to lock into the hole on the...
Twist slightly clockwise until it locks into place. 2 Fit the round end of the diffuser over the small adapter end of the hose into place. 14 Twist slightly clockwise to remove. 1 Insert the large adapter end of the hose. INSTALLATION INSTRUCTIONS ATTACHING THE HOSE AND DIFFUSER NOTE: The air conditioner is shipped with the pins on the hose. Align the slots on the diffuser with the hose installed. The hose may be removed for cleaning and storage, if necessary. Align the pins on the back of the air conditioner. Simply reverse the steps below to lock into the hole on the...
Owner's Manual
Page 15
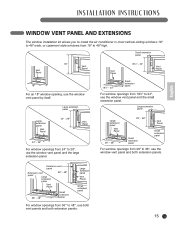
Small extension panel Vent Panel 18" Vent Panel 18" For an 18" window opening, use the window vent panel and the large extension panel. Large extension panel Vent Panel 181⁄4" − 24" Vent Panel 181⁄4" − 24" Small extension panel For window openings from 29" to 36", use the window vent panel and both extension panels. 15 Large extension panel Vent Panel 29" − 36" 29" − 36" Small extension panel Vent Panel Small extension panel For window openings from 181⁄4" to 48″, use the window vent panel and the small extension panel....
Small extension panel Vent Panel 18" Vent Panel 18" For an 18" window opening, use the window vent panel and the large extension panel. Large extension panel Vent Panel 181⁄4" − 24" Vent Panel 181⁄4" − 24" Small extension panel For window openings from 29" to 36", use the window vent panel and both extension panels. 15 Large extension panel Vent Panel 29" − 36" 29" − 36" Small extension panel Vent Panel Small extension panel For window openings from 181⁄4" to 48″, use the window vent panel and the small extension panel....

Owner's Manual
Page 16
INSTALLATION INSTRUCTIONS INSTALLATION IN VERTICAL SLIDING WINDOWS NOTE: The window installation kit can be used . Secure the vent panel in place with vertical sliding windows between JthoientsgelnaMssouassnedA the window to t(htipeowadihnedsiovow-msásacsohrtoa).nd frame. 2 Insert the vent panel assembly, including extension panels, if needed, into the room. Type B screws Sellante de espuma A (Tipo adhesivo) Foam seal B (Non-adhesive type) Joints en Mousse C (Plus court de type adhésif) 3 Carefully lower the window. Sellado con esp (tipo no adhesiv Extend the...
INSTALLATION INSTRUCTIONS INSTALLATION IN VERTICAL SLIDING WINDOWS NOTE: The window installation kit can be used . Secure the vent panel in place with vertical sliding windows between JthoientsgelnaMssouassnedA the window to t(htipeowadihnedsiovow-msásacsohrtoa).nd frame. 2 Insert the vent panel assembly, including extension panels, if needed, into the room. Type B screws Sellante de espuma A (Tipo adhesivo) Foam seal B (Non-adhesive type) Joints en Mousse C (Plus court de type adhésif) 3 Carefully lower the window. Sellado con esp (tipo no adhesiv Extend the...

Owner's Manual
Page 17
INSTALLATION INSTRUCTIONS INSTALLATION IN VERTICAL SLIDING WINDOWS Security Bracket Type B screw 5 Install the security bracket with four Type A screws. English 17 Secure in place with a type B screw, as shown. Type A screws 6 Insert the oval end of the diffuser into the window installation kit until the locking tabs engage.
INSTALLATION INSTRUCTIONS INSTALLATION IN VERTICAL SLIDING WINDOWS Security Bracket Type B screw 5 Install the security bracket with four Type A screws. English 17 Secure in place with a type B screw, as shown. Type A screws 6 Insert the oval end of the diffuser into the window installation kit until the locking tabs engage.

Owner's Manual
Page 18
Sellado con espuma A Type B sc(triepwo sadhesivo) Extension panel (if required) Vent Panel 2 Insert the vent panel assembly, including extension panels, if needed, into the window opening. más corto) Foam seal B (Non-adhesive type) 3 Carefully close the window. Secure the vent panel in place with casement windows between the glass and the window(ptlous court de prevent air and insects from gettingtypinetaodhtéhseif) room. Foam seal C (Adhesive type-shorter) Foam seal A (Adhesive type) 1 Cut the foam seal A(adhesive type) & C(adhesive type-shorter) to the proper ...
Sellado con espuma A Type B sc(triepwo sadhesivo) Extension panel (if required) Vent Panel 2 Insert the vent panel assembly, including extension panels, if needed, into the window opening. más corto) Foam seal B (Non-adhesive type) 3 Carefully close the window. Secure the vent panel in place with casement windows between the glass and the window(ptlous court de prevent air and insects from gettingtypinetaodhtéhseif) room. Foam seal C (Adhesive type-shorter) Foam seal A (Adhesive type) 1 Cut the foam seal A(adhesive type) & C(adhesive type-shorter) to the proper ...

Owner's Manual
Page 19
INSTALLATION INSTRUCTIONS INSTALLATION IN CASEMENT STYLE WINDOWS Security bracket Type A screws Type B screw 5 Install the window security bracket with four of the diffuser into the window installation kit until the locking tabs engage. English 19 Secure in place with a type B screw, as shown. 6 Insert the oval end of the included screws.
INSTALLATION INSTRUCTIONS INSTALLATION IN CASEMENT STYLE WINDOWS Security bracket Type A screws Type B screw 5 Install the window security bracket with four of the diffuser into the window installation kit until the locking tabs engage. English 19 Secure in place with a type B screw, as shown. 6 Insert the oval end of the included screws.
Owner's Manual
Page 20
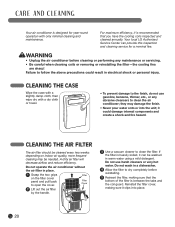
... Your air conditioner is heavily soiled, it clips into theunit;it is between the tabs and the coil guard. Your local LG Authorized Service Center can be washed in adishwasher. 4 Allow the filter to dry completely before cleaningorperformingany...
... Your air conditioner is heavily soiled, it clips into theunit;it is between the tabs and the coil guard. Your local LG Authorized Service Center can be washed in adishwasher. 4 Allow the filter to dry completely before cleaningorperformingany...
Owner's Manual
Page 21
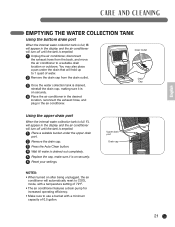
Upper drain port 2 Remove the drain cap. Drain cap 3 Press the Auto Clean button. 4 Wait till water is drained out completely. 5 Replace the cap, make sure it is on securely. 6 Reset your settings. You may also place a pan under the upper drain port. NOTES: •When turned on securely. 4 Place the air conditioner in the desired location, reconnect the exhaust hose, and plug in the air conditioner. CARE AND CLEANING English EMPTYING THE WATER COLLECTION TANK Using the bottom drain port When the internal water collection tank is full, FL will appear ...
Upper drain port 2 Remove the drain cap. Drain cap 3 Press the Auto Clean button. 4 Wait till water is drained out completely. 5 Replace the cap, make sure it is on securely. 6 Reset your settings. You may also place a pan under the upper drain port. NOTES: •When turned on securely. 4 Place the air conditioner in the desired location, reconnect the exhaust hose, and plug in the air conditioner. CARE AND CLEANING English EMPTYING THE WATER COLLECTION TANK Using the bottom drain port When the internal water collection tank is full, FL will appear ...