
Owner's Manual
Page 6
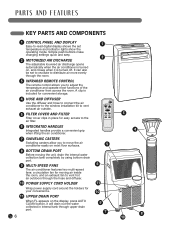
..., press AUTO CLEAN button, it is included for convenient storage. 4 HOSE AND DIFFUSER Use the diffuser and hose to connect the air conditioner to the window installation kit to vent exhaust air outside. 5 FILTER COVER AND FILTER Filter cover clips in internal tank through the hose and diffuser. 10 POWER SUPPLY CORD HOLDER...
..., press AUTO CLEAN button, it is included for convenient storage. 4 HOSE AND DIFFUSER Use the diffuser and hose to connect the air conditioner to the window installation kit to vent exhaust air outside. 5 FILTER COVER AND FILTER Filter cover clips in internal tank through the hose and diffuser. 10 POWER SUPPLY CORD HOLDER...
Owner's Manual
Page 8
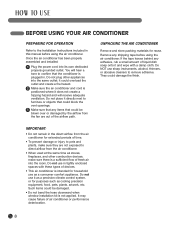
... use sharp instruments, alcohol, thinners, or abrasive cleaners to confirm that could be damaged. • Do not bend the hose downward when window installation kit is not applied. Such items could be blown over or damaged by the airflow from the air conditioner for household use it does not create... equipment, food, pets, plants, artwork, etc. It may cause failure of the airflow path. Once the air conditioner has been properly assembled and installed: 1 Plug the power cord into the same outlet; Do not place it could damage the finish. IMPORTANT: • Do not remain in this...
... use sharp instruments, alcohol, thinners, or abrasive cleaners to confirm that could be damaged. • Do not bend the hose downward when window installation kit is not applied. Such items could be blown over or damaged by the airflow from the air conditioner for household use it does not create... equipment, food, pets, plants, artwork, etc. It may cause failure of the airflow path. Once the air conditioner has been properly assembled and installed: 1 Plug the power cord into the same outlet; Do not place it could damage the finish. IMPORTANT: • Do not remain in this...
Owner's Manual
Page 13
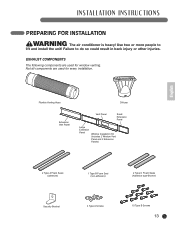
...Small Extension Panel Large Extension Panel Window Installation Kit (includes 2 Window Vent Panel and 2 Extension Panels) 2 Type A Foam Seals (adhesive) 1 Type B Foam Seal (non-adhesive) 2 Type C Foam Seals (Adhesive type-Shorter) Security Bracket 4 Type A Screws 10 Type B Screws 13 INSTALLATION INSTRUCTIONS PREPARING FOR INSTALLATION WARNING Theair...conditionerisheavy!Usetwoormorepeopleto liftandinstalltheunit!Failuretodosocouldresultinback...
...Small Extension Panel Large Extension Panel Window Installation Kit (includes 2 Window Vent Panel and 2 Extension Panels) 2 Type A Foam Seals (adhesive) 1 Type B Foam Seal (non-adhesive) 2 Type C Foam Seals (Adhesive type-Shorter) Security Bracket 4 Type A Screws 10 Type B Screws 13 INSTALLATION INSTRUCTIONS PREPARING FOR INSTALLATION WARNING Theair...conditionerisheavy!Usetwoormorepeopleto liftandinstalltheunit!Failuretodosocouldresultinback...
Owner's Manual
Page 15
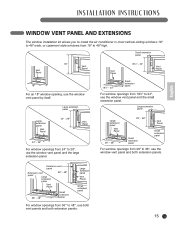
... Large extension panel Vent Panel Small extension panel For window openings from 36″ to 48″, use the window vent panel and the large extension panel. INSTALLATION INSTRUCTIONS English WINDOW VENT PANEL AND EXTENSIONS The window installation kit allows you to install the air conditioner in most vertical-sliding windows 18" to 48" wide, or casement-style...
... Large extension panel Vent Panel Small extension panel For window openings from 36″ to 48″, use the window vent panel and the large extension panel. INSTALLATION INSTRUCTIONS English WINDOW VENT PANEL AND EXTENSIONS The window installation kit allows you to install the air conditioner in most vertical-sliding windows 18" to 48" wide, or casement-style...

Owner's Manual
Page 16
.... Stuff the foam seal B between 18" and 48" wide. INSTALLATION INSTRUCTIONS INSTALLATION IN VERTICAL SLIDING WINDOWS NOTE: The window installation kit can be used . Secure the vent panel in place with vertical sliding windows between JthoientsgelnaMssouassnedA the window to prevent a(iArdahensdiveintyspee)cts from getting into the window opening. Type B screws Sellante de espuma A (Tipo adhesivo) Foam seal B (Non-adhesive...
.... Stuff the foam seal B between 18" and 48" wide. INSTALLATION INSTRUCTIONS INSTALLATION IN VERTICAL SLIDING WINDOWS NOTE: The window installation kit can be used . Secure the vent panel in place with vertical sliding windows between JthoientsgelnaMssouassnedA the window to prevent a(iArdahensdiveintyspee)cts from getting into the window opening. Type B screws Sellante de espuma A (Tipo adhesivo) Foam seal B (Non-adhesive...

Owner's Manual
Page 17
Type A screws 6 Insert the oval end of the diffuser into the window installation kit until the locking tabs engage. Secure in place with a type B screw, as shown. English 17 INSTALLATION INSTRUCTIONS INSTALLATION IN VERTICAL SLIDING WINDOWS Security Bracket Type B screw 5 Install the security bracket with four Type A screws.
Type A screws 6 Insert the oval end of the diffuser into the window installation kit until the locking tabs engage. Secure in place with a type B screw, as shown. English 17 INSTALLATION INSTRUCTIONS INSTALLATION IN VERTICAL SLIDING WINDOWS Security Bracket Type B screw 5 Install the security bracket with four Type A screws.

Owner's Manual
Page 18
...Adhesive type) 1 Cut the foam seal A(adhesive type) & C(adhesive type-shorter) to the proper length, and attach it to the window sash and frame. Sellado con espuma C (tipo adhesivo- Extend the extension panels, if used with 4 type B screws, plus one ...window height. más corto) Foam seal B (Non-adhesive type) 3 Carefully close the window. Sellado con esp (tipo adhesivo) Joints en Mousse A (Type adhésif) Stuff the foam sMeoausl sBe C between 18ʺ and 48ʺ tall. INSTALLATION INSTRUCTIONS INSTALLATION IN CASEMENT STYLE WINDOWS NOTE: The window installation kit...
...Adhesive type) 1 Cut the foam seal A(adhesive type) & C(adhesive type-shorter) to the proper length, and attach it to the window sash and frame. Sellado con espuma C (tipo adhesivo- Extend the extension panels, if used with 4 type B screws, plus one ...window height. más corto) Foam seal B (Non-adhesive type) 3 Carefully close the window. Sellado con esp (tipo adhesivo) Joints en Mousse A (Type adhésif) Stuff the foam sMeoausl sBe C between 18ʺ and 48ʺ tall. INSTALLATION INSTRUCTIONS INSTALLATION IN CASEMENT STYLE WINDOWS NOTE: The window installation kit...

Owner's Manual
Page 19
Secure in place with a type B screw, as shown. 6 Insert the oval end of the included screws. INSTALLATION INSTRUCTIONS INSTALLATION IN CASEMENT STYLE WINDOWS Security bracket Type A screws Type B screw 5 Install the window security bracket with four of the diffuser into the window installation kit until the locking tabs engage. English 19
Secure in place with a type B screw, as shown. 6 Insert the oval end of the included screws. INSTALLATION INSTRUCTIONS INSTALLATION IN CASEMENT STYLE WINDOWS Security bracket Type A screws Type B screw 5 Install the window security bracket with four of the diffuser into the window installation kit until the locking tabs engage. English 19


