

User Guide
Page 2
... Window Vent Panel and Extensions 14 Installation in Vertical Sliding Windows 15, 16 Installation in this manual, your purchase and welcome to the LG family. INTRODUCTION IMPORTANT SAFETY INSTRUCTIONS Basic Safety Precautions 3, 4 Electrical Safety 4, 5 PARTS AND FEATURES Key Parts and Components 6 Control Panel and Remote 7 HOW TO USE Before Using Your Air...
... Window Vent Panel and Extensions 14 Installation in Vertical Sliding Windows 15, 16 Installation in this manual, your purchase and welcome to the LG family. INTRODUCTION IMPORTANT SAFETY INSTRUCTIONS Basic Safety Precautions 3, 4 Electrical Safety 4, 5 PARTS AND FEATURES Key Parts and Components 6 Control Panel and Remote 7 HOW TO USE Before Using Your Air...
User Guide
Page 3
... recommended in the risk of electric shock or fire. • Do not use . If water enters the unit, unplug it immediately. IMPORTANT SAFETY INSTRUCTIONS English READ ALL INSTRUCTIONS BEFORE USE Your safety and the safety of others . It can result in this manual. It can result in this appliance, follow the safety...
... recommended in the risk of electric shock or fire. • Do not use . If water enters the unit, unplug it immediately. IMPORTANT SAFETY INSTRUCTIONS English READ ALL INSTRUCTIONS BEFORE USE Your safety and the safety of others . It can result in this manual. It can result in this appliance, follow the safety...

User Guide
Page 4
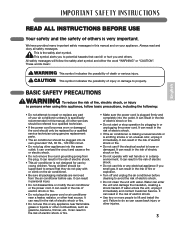
...; Secure the wheels with national wiring codes. • Do not alter or modify the plug or cord of this appliance, follow these instructions can result in result in accordance with blocks to prevent the air conditioner from rolling on smooth floors. • Install the air conditioner ... of time. Do not use an extension cord. Do not use only a soft cloth to the direct air flow. IMPORTANT SAFETY INSTRUCTIONS READ ALL INSTRUCTIONS BEFORE USE BASIC SAFETY PRECAUTIONS CAUTION To reduce the risk of fire, electric shock, or injury to persons when using genuine replacement parts...
...; Secure the wheels with national wiring codes. • Do not alter or modify the plug or cord of this appliance, follow these instructions can result in result in accordance with blocks to prevent the air conditioner from rolling on smooth floors. • Install the air conditioner ... of time. Do not use an extension cord. Do not use only a soft cloth to the direct air flow. IMPORTANT SAFETY INSTRUCTIONS READ ALL INSTRUCTIONS BEFORE USE BASIC SAFETY PRECAUTIONS CAUTION To reduce the risk of fire, electric shock, or injury to persons when using genuine replacement parts...

User Guide
Page 5
... use . • Frequent connection and disconnection can damage the ground terminal on the plug case. English IMPORTANT SAFETY INSTRUCTIONS READ ALL INSTRUCTIONS BEFORE USE ELECTRICAL SAFETY INTEGRATED CIRCUIT BREAKER Reset Test For additional safety, the power cord features an integrated circuit breaker. ... ground terminal to trip, or if the RESET button will not stay engaged, unplug the air conditioner immediately and contact your LG service technician. To prevent damage to the adapter's ground terminal, hold the adapter in place while plugging in the outlet. Test...
... use . • Frequent connection and disconnection can damage the ground terminal on the plug case. English IMPORTANT SAFETY INSTRUCTIONS READ ALL INSTRUCTIONS BEFORE USE ELECTRICAL SAFETY INTEGRATED CIRCUIT BREAKER Reset Test For additional safety, the power cord features an integrated circuit breaker. ... ground terminal to trip, or if the RESET button will not stay engaged, unplug the air conditioner immediately and contact your LG service technician. To prevent damage to the adapter's ground terminal, hold the adapter in place while plugging in the outlet. Test...
User Guide
Page 6
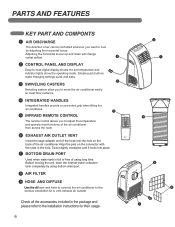
... remote control allows you to move the air conditioner easily on the connector with the slots in the package and please refer to the installation instructions for their usage. 6 2 1 9 6 8 7 Before moving the unit, drain the internal water collection tank completely by adjusting the horizontal louver. Adjusting the horizontal louver up and...
... remote control allows you to move the air conditioner easily on the connector with the slots in the package and please refer to the installation instructions for their usage. 6 2 1 9 6 8 7 Before moving the unit, drain the internal water collection tank completely by adjusting the horizontal louver. Adjusting the horizontal louver up and...

User Guide
Page 7
... BUTTON 9 CONTINUOUS After setting mightiness, the unit will keep running no matter what temperature it sets, and E4 E1 E2 E3 protection works. For detailed instructions on each function,see the following pages. 1 POWER Operation begins when this button is the same when using the remote or the control panel, unless...
... BUTTON 9 CONTINUOUS After setting mightiness, the unit will keep running no matter what temperature it sets, and E4 E1 E2 E3 protection works. For detailed instructions on each function,see the following pages. 1 POWER Operation begins when this button is the same when using the remote or the control panel, unless...

User Guide
Page 8
.... Do not plug ot her appliances into the same outlet; HOW TO USE BEFORE USING YOUR AIR CONDITIONER PREPARING FOR OPERATION Refer to the Installation Instructions included in the direct airflow from the air conditioner. • When used at the same time as cooling precision equipment, food, pets, plants, artwork, etc...
.... Do not plug ot her appliances into the same outlet; HOW TO USE BEFORE USING YOUR AIR CONDITIONER PREPARING FOR OPERATION Refer to the Installation Instructions included in the direct airflow from the air conditioner. • When used at the same time as cooling precision equipment, food, pets, plants, artwork, etc...

User Guide
Page 11
English INSTALLATION INSTRUCTIONS SELECTION OF INSTALLATION LOCATION 1 Install the unit on a flat and dry place. 2 For best performance,allow at least 50cm of air space on all sides of this could cause mal-function. 11 WARNING The length of the exhaust pipe is specially designed according to the specification of the unit for good air circulation. Do not replace or prolong it with your own private hose as this product.
English INSTALLATION INSTRUCTIONS SELECTION OF INSTALLATION LOCATION 1 Install the unit on a flat and dry place. 2 For best performance,allow at least 50cm of air space on all sides of this could cause mal-function. 11 WARNING The length of the exhaust pipe is specially designed according to the specification of the unit for good air circulation. Do not replace or prolong it with your own private hose as this product.

User Guide
Page 12
Simply reverse the steps below to remove. Insert the large adapter end of the hose into the hole on the back of the air conditioner. 12 The hose may be removed for cleaning and storage, if necessary. INSTALLATION INSTRUCTIONS ATTACHING THE HOSE AND DIFFUSER NOTE: The air conditioner is shipped with the hose installed.
Simply reverse the steps below to remove. Insert the large adapter end of the hose into the hole on the back of the air conditioner. 12 The hose may be removed for cleaning and storage, if necessary. INSTALLATION INSTRUCTIONS ATTACHING THE HOSE AND DIFFUSER NOTE: The air conditioner is shipped with the hose installed.

User Guide
Page 13
... Panels) 2 Type A Foam Seals (adhesive) 1 Type B Foam Seal (non-adhesive) 2 Type C Foam Seals (Adhesive type-Shorter) Security Bracket 4 Type A Screws 10 Type B Screws 13 INSTALLATION INSTRUCTIONS PREPARING FOR INSTALLATION WARNING The air conditioner is heavy!
... Panels) 2 Type A Foam Seals (adhesive) 1 Type B Foam Seal (non-adhesive) 2 Type C Foam Seals (Adhesive type-Shorter) Security Bracket 4 Type A Screws 10 Type B Screws 13 INSTALLATION INSTRUCTIONS PREPARING FOR INSTALLATION WARNING The air conditioner is heavy!

User Guide
Page 14
INSTALLATION INSTRUCTIONS WINDOW VENT PANEL AND EXTENSIONS The window installation kit allows you to install the air conditioner in most vertical-sliding windows 18" to 48" wide, ...
INSTALLATION INSTRUCTIONS WINDOW VENT PANEL AND EXTENSIONS The window installation kit allows you to install the air conditioner in most vertical-sliding windows 18" to 48" wide, ...

User Guide
Page 15
... type) & C(adhesive type-shorter) to the proper length, and attach it to the window width. Stuff the foam seal B between 18" and 48" wide. INSTALLATION INSTRUCTIONS INSTALLATION IN VERTICAL SLIDING WINDOWS NOTE: The window installation kit can be used . Extend the extension panels, if used with 4 type B screws, plus one screw...
... type) & C(adhesive type-shorter) to the proper length, and attach it to the window width. Stuff the foam seal B between 18" and 48" wide. INSTALLATION INSTRUCTIONS INSTALLATION IN VERTICAL SLIDING WINDOWS NOTE: The window installation kit can be used . Extend the extension panels, if used with 4 type B screws, plus one screw...

User Guide
Page 16
INSTALLATION INSTRUCTIONS INSTALLATION IN VERTICAL SLIDING WINDOWS Security Bracket Type B screw 5 Install the security bracket with four Type A screws. 16 Secure in place with a type B screw, as shown. 6 Insert the oval end of the diffuser into the window installation kit until the locking tabs engage.
INSTALLATION INSTRUCTIONS INSTALLATION IN VERTICAL SLIDING WINDOWS Security Bracket Type B screw 5 Install the security bracket with four Type A screws. 16 Secure in place with a type B screw, as shown. 6 Insert the oval end of the diffuser into the window installation kit until the locking tabs engage.

User Guide
Page 17
... the window to prevent air and insects from getting into the window opening. Stuff the foam seal B between 18″ and 48″ tall. INSTALLATION INSTRUCTIONS INSTALLATION IN CASEMENT STYLE WINDOWS NOTE: The window installation kit can be used .
... the window to prevent air and insects from getting into the window opening. Stuff the foam seal B between 18″ and 48″ tall. INSTALLATION INSTRUCTIONS INSTALLATION IN CASEMENT STYLE WINDOWS NOTE: The window installation kit can be used .

User Guide
Page 18
INSTALLATION INSTRUCTIONS INSTALLATION IN CASEMENT STYLE WINDOWS Security bracket Type B screw 5T Install the window security bracket with four of the diffuser into the window installation kit until the locking tabs engage. Secure in place with a type B screw, as shown. 6 Insert the oval end of the included screws. 18
INSTALLATION INSTRUCTIONS INSTALLATION IN CASEMENT STYLE WINDOWS Security bracket Type B screw 5T Install the window security bracket with four of the diffuser into the window installation kit until the locking tabs engage. Secure in place with a type B screw, as shown. 6 Insert the oval end of the included screws. 18

User Guide
Page 21
... it is in good condition, with no cracks or damage. 3 Place new batteries in the remote. 4 Install the air conditioner as described in the Installation Instructions. 4 Store the air conditioner in place 2 Check the cord to drain out.
... it is in good condition, with no cracks or damage. 3 Place new batteries in the remote. 4 Install the air conditioner as described in the Installation Instructions. 4 Store the air conditioner in place 2 Check the cord to drain out.

User Guide
Page 24
... A PARTICULAR PURPOSE. THIS LIMITED WARRANTY DOES NOT APPLY TO: 1. Repairs when your LG product is used in the appearance of the product that are warranted for delivery or pick-up, installation, instruction, replacement of house fuses, connection of God. 5. Date of the air conditoner. ...not allow the exclusion or limitation of Purchase. Improper repair includes the use or contrary to the instructions described in other warranty is good only to your LG Portable Air Conditioner prove to this product. 12.Products with altered or removed serial numbers. 13.Changes...
... A PARTICULAR PURPOSE. THIS LIMITED WARRANTY DOES NOT APPLY TO: 1. Repairs when your LG product is used in the appearance of the product that are warranted for delivery or pick-up, installation, instruction, replacement of house fuses, connection of God. 5. Date of the air conditoner. ...not allow the exclusion or limitation of Purchase. Improper repair includes the use or contrary to the instructions described in other warranty is good only to your LG Portable Air Conditioner prove to this product. 12.Products with altered or removed serial numbers. 13.Changes...


