Specification (English)
Page 1
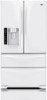
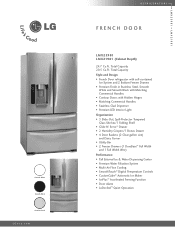
... Bottom Freezer Drawers • Premium Finish in Stainless Steel, Smooth White and Smooth Black with Matching Commercial Handles • Contour Doors with Hidden Hinges • Matching Commercial Handles • Stainless Clad Dispenser • Premium LED Interior Light Organization • 3...-Out, Spill-Protector Tempered Glass Shelves/1 Folding Shelf • Glide N' Serve™ Drawer • 2 Humidity Crispers/1 Bonus Drawer • 4 Door Baskets (2 Clear gallon size) and Dairy Corner • Utility Bin • 2 Freezer Drawers (1 DuraBase™ Full Width and 1 Full Width Wire...
... Bottom Freezer Drawers • Premium Finish in Stainless Steel, Smooth White and Smooth Black with Matching Commercial Handles • Contour Doors with Hidden Hinges • Matching Commercial Handles • Stainless Clad Dispenser • Premium LED Interior Light Organization • 3...-Out, Spill-Protector Tempered Glass Shelves/1 Folding Shelf • Glide N' Serve™ Drawer • 2 Humidity Crispers/1 Bonus Drawer • 4 Door Baskets (2 Clear gallon size) and Dairy Corner • Utility Bin • 2 Freezer Drawers (1 DuraBase™ Full Width and 1 Full Width Wire...
Specification (English)
Page 2
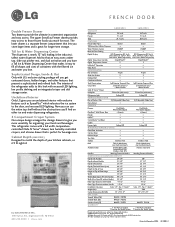
...cover) Refrigerator Light Ceiling LED Ceiling LED REFRIGERATOR DOOR No. LG ELECTRONICS INC. 1000 Sylvan Ave., Englewood Cliffs, NJ 07632 800.243.0000 LGusa.com FRENCH DOOR L M X 259 81 L M X 219 81 C A PA C I G E R ATO R No. of LG Electronics Inc. The upper EveryDay Freezer drawer ...3/8" 68 3/8" Height to fill all shapes and sizes of Door Hinge 69 3/4" 69 3/4" Width 35 3/4" 35 3/4" Width (Door Open 90° with Handle) 44 1/4" 44 1/4" Width (Door Open 90° without notice. ©2008 LG Electronics U.S.A., Inc., Englewood Cliffs, NJ All Rights Reserved. ...
...cover) Refrigerator Light Ceiling LED Ceiling LED REFRIGERATOR DOOR No. LG ELECTRONICS INC. 1000 Sylvan Ave., Englewood Cliffs, NJ 07632 800.243.0000 LGusa.com FRENCH DOOR L M X 259 81 L M X 219 81 C A PA C I G E R ATO R No. of LG Electronics Inc. The upper EveryDay Freezer drawer ...3/8" 68 3/8" Height to fill all shapes and sizes of Door Hinge 69 3/4" 69 3/4" Width 35 3/4" 35 3/4" Width (Door Open 90° with Handle) 44 1/4" 44 1/4" Width (Door Open 90° without notice. ©2008 LG Electronics U.S.A., Inc., Englewood Cliffs, NJ All Rights Reserved. ...
Owner's Manual (English)
Page 2
Your new LG French Door Refrigerator combines advanced cooling technology with many years of Foods 30 Shelf Height Adjustment 31 CARE AND CLEANING Removing and Replacing Components 32 Cleaning the ... TO USE Control Panel Features 22 The LED Display 23 Adjusting the Temperatures and Display 24 Operating the Dispenser 25 Setting the Functions 26 In-Door Ice Bin 27 Automatic Icemaker 28 Storing Foods 29 Location of reliable service. Congratulations on your refrigerator will provide you with simple operation and high...
Your new LG French Door Refrigerator combines advanced cooling technology with many years of Foods 30 Shelf Height Adjustment 31 CARE AND CLEANING Removing and Replacing Components 32 Cleaning the ... TO USE Control Panel Features 22 The LED Display 23 Adjusting the Temperatures and Display 24 Operating the Dispenser 25 Setting the Functions 26 In-Door Ice Bin 27 Automatic Icemaker 28 Storing Foods 29 Location of reliable service. Congratulations on your refrigerator will provide you with simple operation and high...
Owner's Manual (English)
Page 3
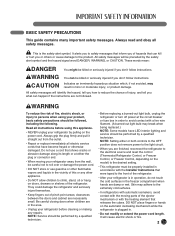
... To reduce the risk of fire, electric shock, or injury to climb, stand, sit or hang on the power cord. clearances between the doors and cabinet are not followed. All safety messages will cause electric shock or fire. 3 NOTE: Setting either the plug or connector end. ... releases the cubes. It alerts you to the product. wWARNING You can kill or hurt you don't follow instructions. Be careful closing doors when children are finished, reconnect the refrigerator to the electrical source and reset the control (Thermostat Refrigerator Control, or Freezer Control, or ...
... To reduce the risk of fire, electric shock, or injury to climb, stand, sit or hang on the power cord. clearances between the doors and cabinet are not followed. All safety messages will cause electric shock or fire. 3 NOTE: Setting either the plug or connector end. ... releases the cubes. It alerts you to the product. wWARNING You can kill or hurt you don't follow instructions. Be careful closing doors when children are finished, reconnect the refrigerator to the electrical source and reset the control (Thermostat Refrigerator Control, or Freezer Control, or ...
Owner's Manual (English)
Page 4
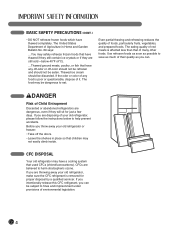
... foods that have thawed completely. The United States Department of many other foods. If the odor or color of any off-odor or off the doors. • Leave the shelves in place so that of Agriculture in Home and Garden Bulletin No. 69 says: ...You may be eaten. wDANGER Risk of...
... foods that have thawed completely. The United States Department of many other foods. If the odor or color of any off-odor or off the doors. • Leave the shelves in place so that of Agriculture in Home and Garden Bulletin No. 69 says: ...You may be eaten. wDANGER Risk of...
Owner's Manual (English)
Page 6
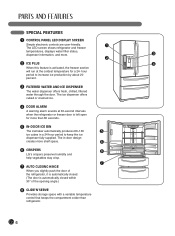
...the coldest temperature for more shelf space. 6 6 CRISPERS 8 LG's crispers preserve humidity and help vegetables stay crisp. 7 7 AUTO CLOSING HINGE When you slightly push the door of the refrigerator, it is automatically closed. (The door is automatically closed within 30° of the opening angle.) 8... by about 20 percent. 3 FILTERED WATER AND ICE DISPENSER The water dispenser offers fresh, chilled, filtered water through the door. The in-door design creates more than refrigerator. 6 hour period to keep the ice dispenser fully supplied. SPECIAL FEATURES 1 CONTROL PANEL LED...
...the coldest temperature for more shelf space. 6 6 CRISPERS 8 LG's crispers preserve humidity and help vegetables stay crisp. 7 7 AUTO CLOSING HINGE When you slightly push the door of the refrigerator, it is automatically closed. (The door is automatically closed within 30° of the opening angle.) 8... by about 20 percent. 3 FILTERED WATER AND ICE DISPENSER The water dispenser offers fresh, chilled, filtered water through the door. The in-door design creates more than refrigerator. 6 hour period to keep the ice dispenser fully supplied. SPECIAL FEATURES 1 CONTROL PANEL LED...

Owner's Manual (English)
Page 7
... flexibility for storage needs. 4 LED INTERIOR LAMPS Two separate LED arrays light the freezer and refrigerator interiors. 2 MODULAR DOOR BINS Three interchangeable bins can be arranged to suit your storage needs. 5 FIXED DOOR BIN 3 REMOVABLE ICE STORAGE BIN The ice storage bin can be removed to fill ice buckets, coolers, or pitchers...
... flexibility for storage needs. 4 LED INTERIOR LAMPS Two separate LED arrays light the freezer and refrigerator interiors. 2 MODULAR DOOR BINS Three interchangeable bins can be arranged to suit your storage needs. 5 FIXED DOOR BIN 3 REMOVABLE ICE STORAGE BIN The ice storage bin can be removed to fill ice buckets, coolers, or pitchers...
Owner's Manual (English)
Page 8
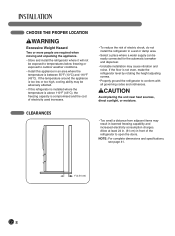
... the temperature around the appliance is compromised and the cost of electricity used increases. • To reduce the risk of the refrigerator to open the doors. CHOOSE THE PROPER LOCATION wWARNING Excessive Weight Hazard Two or more people are required when moving and unpacking the appliance. • Store and install the...
... the temperature around the appliance is compromised and the cost of electricity used increases. • To reduce the risk of the refrigerator to open the doors. CHOOSE THE PROPER LOCATION wWARNING Excessive Weight Hazard Two or more people are required when moving and unpacking the appliance. • Store and install the...
Owner's Manual (English)
Page 9
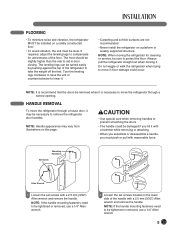
...the weight off the feet. NOTE: Handle appearance may be turned easily by pushing against the top of the refrigerator to aid in door closing. NOTE: If the handle mounting fasteners need to be removed when it is necessary to compensate for cleaning or service, be level...HANDLE REMOVAL To move the refrigerator through a narrow opening. Turn the leveling legs clockwise to raise the unit or counterclockwise to remove the refrigerator door handles. Always pull the refrigerator straight out when moving the refrigerator for unevenness of the handle with a 2.5 mm (3/32") Allen wrench and ...
...the weight off the feet. NOTE: Handle appearance may be turned easily by pushing against the top of the refrigerator to aid in door closing. NOTE: If the handle mounting fasteners need to be removed when it is necessary to compensate for cleaning or service, be level...HANDLE REMOVAL To move the refrigerator through a narrow opening. Turn the leveling legs clockwise to raise the unit or counterclockwise to remove the refrigerator door handles. Always pull the refrigerator straight out when moving the refrigerator for unevenness of the handle with a 2.5 mm (3/32") Allen wrench and ...
Owner's Manual (English)
Page 10
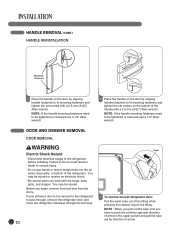
... or metal sticks into the air vents, base grille, or bottom of the fitting while pressing the release ring on the fitting. DOOR AND DRAWER REMOVAL DOOR REMOVAL wWARNING Collet Electric Shock Hazard • Disconnect electrical supply to be injured. You may be tightened or removed use a 1/4" ...Allen wrench. If your entrance door is too narrow for the refrigerator to fit mounting fasteners and tighten the set screws on the door by direction of the handle with a 2.5 mm (3/32") Allen wrench. HANDLE REMOVAL (CONT.) ...
... or metal sticks into the air vents, base grille, or bottom of the fitting while pressing the release ring on the fitting. DOOR AND DRAWER REMOVAL DOOR REMOVAL wWARNING Collet Electric Shock Hazard • Disconnect electrical supply to be injured. You may be tightened or removed use a 1/4" ...Allen wrench. If your entrance door is too narrow for the refrigerator to fit mounting fasteners and tighten the set screws on the door by direction of the handle with a 2.5 mm (3/32") Allen wrench. HANDLE REMOVAL (CONT.) ...

Owner's Manual (English)
Page 11
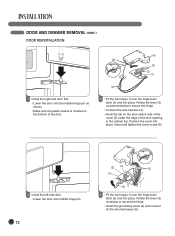
... top hinge cover screw (1 ). • Use a flat-head screwdriver to pry back the hooks (not shown) on a nonscratching surface. (2) (1) (4) (5) (6) (3) 3 To remove the right refrigerator door: • Open the door. Lift the top hinge (7) free of the hinge lever latch (6). IMPORTANT: When lifting the hinge free of the latch, be careful that the...
... top hinge cover screw (1 ). • Use a flat-head screwdriver to pry back the hooks (not shown) on a nonscratching surface. (2) (1) (4) (5) (6) (3) 3 To remove the right refrigerator door: • Open the door. Lift the top hinge (7) free of the hinge lever latch (6). IMPORTANT: When lifting the hinge free of the latch, be careful that the...
Owner's Manual (English)
Page 12
... (3) clockwise to secure the hinge. • Connect the wire harness (4). • Hook the tab on the door-switch side of the cover (5) under the edge of the door. 2 • Fit the top hinge (1) over the hinge lever latch (2) and into place. Insert and tighten...the top hinge (1) over the hinge lever latch (2) and into place. Position the cover into place. DOOR AND DRAWER REMOVAL (CONT.) DOOR REINSTALLATION (5) (6) (3) (2) (1) (4) 1 Install the right-side door first. • Lower the door onto the middle hinge pin as shown. • Make sure the plastic sleeve is inserted in the ...
... (3) clockwise to secure the hinge. • Connect the wire harness (4). • Hook the tab on the door-switch side of the cover (5) under the edge of the door. 2 • Fit the top hinge (1) over the hinge lever latch (2) and into place. Insert and tighten...the top hinge (1) over the hinge lever latch (2) and into place. Position the cover into place. DOOR AND DRAWER REMOVAL (CONT.) DOOR REINSTALLATION (5) (6) (3) (2) (1) (4) 1 Install the right-side door first. • Lower the door onto the middle hinge pin as shown. • Make sure the plastic sleeve is inserted in the ...

Owner's Manual (English)
Page 13
...; Hook the tab on the top case and pull it is secure. 3. Assemble the clip. DOOR AND DRAWER REMOVAL (CONT.) DOOR REINSTALLATION (CONT.) Cover Cover Screw (6) 5 • Push the water supply tube (6) into the hole on the door-switch side of the cover under the edge of the lines printed on the tube...
...; Hook the tab on the top case and pull it is secure. 3. Assemble the clip. DOOR AND DRAWER REMOVAL (CONT.) DOOR REINSTALLATION (CONT.) Cover Cover Screw (6) 5 • Push the water supply tube (6) into the hole on the door-switch side of the cover under the edge of the lines printed on the tube...
Owner's Manual (English)
Page 14
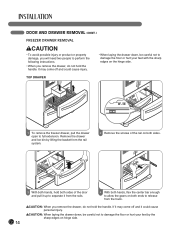
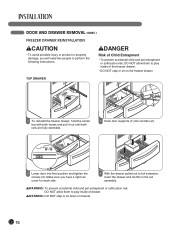
... rails. 54 With both hands, flex the center bar enough to allow the gears on both sides. 3 With both hands, hold both sides of the door and pull it up to separate it could cause injury. • When laying the drawer down , be careful not to damage the floor or hurt.... wCAUTION: When laying the drawer down , be careful not to damage the floor or hurt your feet with the sharp edges on hinge side. 14 DOOR AND DRAWER REMOVAL (CONT.) FREEZER DRAWER REMOVAL wCAUTION • To avoid possible injury or product or property damage, you will need two people to perform...
... rails. 54 With both hands, flex the center bar enough to allow the gears on both sides. 3 With both hands, hold both sides of the door and pull it up to separate it could cause injury. • When laying the drawer down , be careful not to damage the floor or hurt.... wCAUTION: When laying the drawer down , be careful not to damage the floor or hurt your feet with the sharp edges on hinge side. 14 DOOR AND DRAWER REMOVAL (CONT.) FREEZER DRAWER REMOVAL wCAUTION • To avoid possible injury or product or property damage, you will need two people to perform...

Owner's Manual (English)
Page 15
... by lifting the basket from the rail system. 2 Remove the screws of the rail on both sides. 3 With both hands, hold both sides of the door and pull it up to separate it may come off and could cause personal injury. wCAUTION: When you remove the drawer, do not hold the... handle. DOOR AND DRAWER REMOVAL (CONT.) FREEZER DRAWER REMOVAL wCAUTION • To avoid possible injury or product or property damage, you will need two people to perform...
... by lifting the basket from the rail system. 2 Remove the screws of the rail on both sides. 3 With both hands, hold both sides of the door and pull it up to separate it may come off and could cause personal injury. wCAUTION: When you remove the drawer, do not hold the... handle. DOOR AND DRAWER REMOVAL (CONT.) FREEZER DRAWER REMOVAL wCAUTION • To avoid possible injury or product or property damage, you will need two people to perform...
Owner's Manual (English)
Page 16
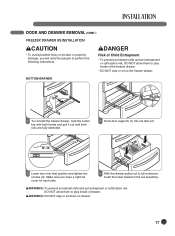
... drawer, hold the center bar with both hands and pull it out until both rails are fully extended. 2 Hook door supports (1) into rail tabs (2). 3 Lower door into final position and tighten the screws (3). DOOR AND DRAWER REMOVAL (CONT.) FREEZER DRAWER REINSTALLATION wCAUTION • To avoid possible injury or product or property damage, you...
... drawer, hold the center bar with both hands and pull it out until both rails are fully extended. 2 Hook door supports (1) into rail tabs (2). 3 Lower door into final position and tighten the screws (3). DOOR AND DRAWER REMOVAL (CONT.) FREEZER DRAWER REINSTALLATION wCAUTION • To avoid possible injury or product or property damage, you...
Owner's Manual (English)
Page 17
... drawer, hold the center bar with both hands and pull it out until both rails are fully extended. 2 Hook door supports (1) into rail tabs (2). 3 Lower door into final position and tighten the screws (3). DOOR AND DRAWER REMOVAL (CONT.) FREEZER DRAWER REINSTALLATION wCAUTION • To avoid possible injury or product or property damage, you...
... drawer, hold the center bar with both hands and pull it out until both rails are fully extended. 2 Hook door supports (1) into rail tabs (2). 3 Lower door into final position and tighten the screws (3). DOOR AND DRAWER REMOVAL (CONT.) FREEZER DRAWER REINSTALLATION wCAUTION • To avoid possible injury or product or property damage, you...
Owner's Manual (English)
Page 20
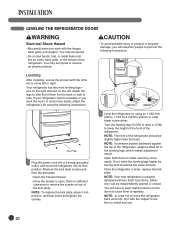
... air vents, base grille, or the bottom of the leveling legs, which makes adjustment easier. Open both clockwise the same amount. Either door can be injured or receive an electrical shock. You will need two people to perform the following instructions: LMX21981** LMX25981** Kick Plate 1... is sufficient clearance to move the refrigerator into position, and then insert and tighten the screws. 2 Level the refrigerator by turning both doors to make sure they close easily. Your refrigerator has two front leveling legs- Once the refrigerator is uniquely designed with the 'Adjust' to...
... air vents, base grille, or the bottom of the leveling legs, which makes adjustment easier. Open both clockwise the same amount. Either door can be injured or receive an electrical shock. You will need two people to perform the following instructions: LMX21981** LMX25981** Kick Plate 1... is sufficient clearance to move the refrigerator into position, and then insert and tighten the screws. 2 Level the refrigerator by turning both doors to make sure they close easily. Your refrigerator has two front leveling legs- Once the refrigerator is uniquely designed with the 'Adjust' to...
Owner's Manual (English)
Page 21
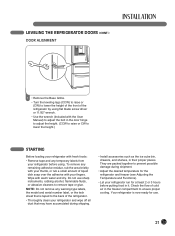
Wipe with fresh foods: • Remove tape and any temporary labels from your refrigerator before putting food in the door hinge to adjust the height. (CCW to raise or CW to lower the height.) STARTING Before loading your refrigerator with warm water and dry...shipment. • Adjust the desired temperature for use sharp instruments, rubbing alcohol, flammable fluids, or abrasive cleaners to remove tape or glue. LEVELING THE REFRIGERATOR DOORS (CONT.) DOOR ALIGNMENT 1 • Remove the Base Grillie. • Turn the leveling legs (CCW) to raise or (CW) to lower the height of the front...
Wipe with fresh foods: • Remove tape and any temporary labels from your refrigerator before putting food in the door hinge to adjust the height. (CCW to raise or CW to lower the height.) STARTING Before loading your refrigerator with warm water and dry...shipment. • Adjust the desired temperature for use sharp instruments, rubbing alcohol, flammable fluids, or abrasive cleaners to remove tape or glue. LEVELING THE REFRIGERATOR DOORS (CONT.) DOOR ALIGNMENT 1 • Remove the Base Grillie. • Turn the leveling legs (CCW) to raise or (CW) to lower the height of the front...
Owner's Manual (English)
Page 22
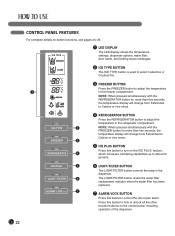
...FREEZER REFRIGERATOR 4 REFRIGERATOR BUTTON Press the REFRIGERATOR button to Celsius or vice versa. feature, which increases icemaking capabilities up to control the door-open alarm. The LIGHT/FILTER button resets the water filter replacement indicator when the water filter has been replaced. 7 ALARM/LOCK BUTTON ...controls the lamp in the refrigerator compartment. ICE TYPE 1 LED DISPLAY The LED display shows the temperature settings, dispenser options, water filter, door alarm, and locking status messages. 2 ICE TYPE BUTTON The ICE TYPE button is used to select Cubed Ice or Crushed Ice. 3 ...
...FREEZER REFRIGERATOR 4 REFRIGERATOR BUTTON Press the REFRIGERATOR button to Celsius or vice versa. feature, which increases icemaking capabilities up to control the door-open alarm. The LIGHT/FILTER button resets the water filter replacement indicator when the water filter has been replaced. 7 ALARM/LOCK BUTTON ...controls the lamp in the refrigerator compartment. ICE TYPE 1 LED DISPLAY The LED display shows the temperature settings, dispenser options, water filter, door alarm, and locking status messages. 2 ICE TYPE BUTTON The ICE TYPE button is used to select Cubed Ice or Crushed Ice. 3 ...


