Installation Instructions
Page 2
Multi Air Conditioner Installation Manual TABLE OF CONTENTS Installation Requirements Installation Parts Provided 3 Product Introduction 4 Indoor Unit 4 Outdoor Unit ..., Insulating the Pipe and Special Piping Applications 40 Insulating the Pipe and Special Piping Applications .......40 Long Pipe Setting 41 Air Purging and Evacuation 42 Leak Checking 42 Evacuation 43 Charging 44 Combination indoor units 45 Required Tools ❏ Level gauge ...10063; Vacuum pump ❏ Gauge manifold ❏ Owner's manual ❏ Thermometer ❏ Remote Control Holder 2 Multi Air Conditioner
Multi Air Conditioner Installation Manual TABLE OF CONTENTS Installation Requirements Installation Parts Provided 3 Product Introduction 4 Indoor Unit 4 Outdoor Unit ..., Insulating the Pipe and Special Piping Applications 40 Insulating the Pipe and Special Piping Applications .......40 Long Pipe Setting 41 Air Purging and Evacuation 42 Leak Checking 42 Evacuation 43 Charging 44 Combination indoor units 45 Required Tools ❏ Level gauge ...10063; Vacuum pump ❏ Gauge manifold ❏ Owner's manual ❏ Thermometer ❏ Remote Control Holder 2 Multi Air Conditioner
Installation Instructions
Page 4
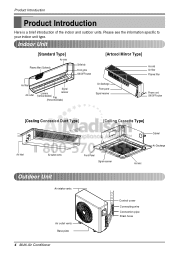
...units. Indoor Unit [Standard Type] Air inlet Plasma filter (Optional) Grille tab Front grille ON/OFF button [Artcool Mirror Type] Air inlet Air filter Plasma filter Air filter Air outlet Signal Louvers receiver (Vertical blades) Flap (Horizontal blade) Air discharge Front panel Signal receiver Power ... hose more than 70 cm (27.6 inch) Air intake vents Air Outlet more than 60 cm (23.6 inch) Air outlet vents Base plate Air Inlet Control cover Connecting wire Connection pipe Drain hose Air Discharge 4 Multi Air Conditioner Please see the information specific to your indoor unit...
...units. Indoor Unit [Standard Type] Air inlet Plasma filter (Optional) Grille tab Front grille ON/OFF button [Artcool Mirror Type] Air inlet Air filter Plasma filter Air filter Air outlet Signal Louvers receiver (Vertical blades) Flap (Horizontal blade) Air discharge Front panel Signal receiver Power ... hose more than 70 cm (27.6 inch) Air intake vents Air Outlet more than 60 cm (23.6 inch) Air outlet vents Base plate Air Inlet Control cover Connecting wire Connection pipe Drain hose Air Discharge 4 Multi Air Conditioner Please see the information specific to your indoor unit...
Installation Instructions
Page 5
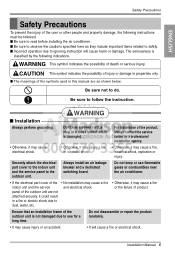
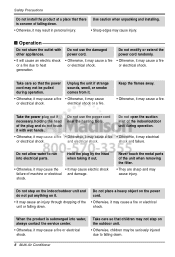
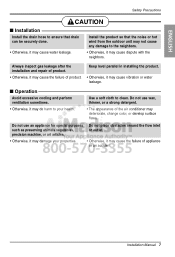
... the indoor unit and the service panel to do. Always install an air leakage breaker and a dedicated switching board. I Incorrect operation due to properties only. Don't use flammable gases or combustibles near the air conditioner. • If the electrical part cover of the • No... installation may cause a fire or the failure of product. I Be sure to read before installing the air conditioner. Do not disassemble or repair the product randomly. • It may cause a fire, electrical shock, explosion or injury. Installation Manual 5 ...
... the indoor unit and the service panel to do. Always install an air leakage breaker and a dedicated switching board. I Incorrect operation due to properties only. Don't use flammable gases or combustibles near the air conditioner. • If the electrical part cover of the • No... installation may cause a fire or the failure of product. I Be sure to read before installing the air conditioner. Do not disassemble or repair the product randomly. • It may cause a fire, electrical shock, explosion or injury. Installation Manual 5 ...
Installation Instructions
Page 6
... smoke comes from it. • Otherwise, it may cause a fire • Otherwise, it may cause electric shock failure of the unit or falling down . 6 Multi Air Conditioner electrical shock or a fire. shock. Do not modify or extend the power cord randomly. • It will cause an electric shock • Otherwise, it may...
... smoke comes from it. • Otherwise, it may cause a fire • Otherwise, it may cause electric shock failure of the unit or falling down . 6 Multi Air Conditioner electrical shock or a fire. shock. Do not modify or extend the power cord randomly. • It will cause an electric shock • Otherwise, it may...
Installation Instructions
Page 7
... the flow inlet or outlet. • Otherwise, it may damage your health. Do not use wax, thinner, or a strong detergent. • The appearance of the air conditioner may deteriorate, change color, or develop surface flaws. I Installation Install the drain hose to the neighbors. • Otherwise, it may cause dispute with the neighbors...
... the flow inlet or outlet. • Otherwise, it may damage your health. Do not use wax, thinner, or a strong detergent. • The appearance of the air conditioner may deteriorate, change color, or develop surface flaws. I Installation Install the drain hose to the neighbors. • Otherwise, it may cause dispute with the neighbors...
Installation Instructions
Page 8
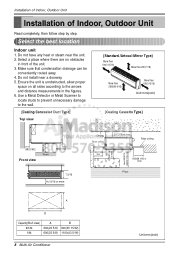
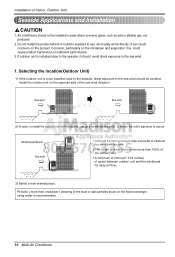
... False ceiling 1500(59 1/16) or more Floor A B Capacity(Btu/h class) 9/12k 18k A 600(23 5/8) 600(23 5/8) B 900(35 15/32) 1100(43 5/16) 8 Multi Air Conditioner Unit:mm(inch) Use a Metal Detector or Metal Scanner to locate studs to prevent unnecessary damage to the arrows and distance measurements in front of...
... False ceiling 1500(59 1/16) or more Floor A B Capacity(Btu/h class) 9/12k 18k A 600(23 5/8) 600(23 5/8) B 900(35 15/32) 1100(43 5/16) 8 Multi Air Conditioner Unit:mm(inch) Use a Metal Detector or Metal Scanner to locate studs to prevent unnecessary damage to the arrows and distance measurements in front of...
Installation Instructions
Page 9
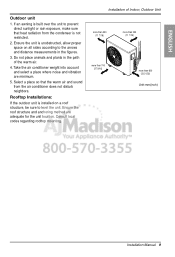
Take the air conditioner weight into account and select a place where noise and vibration are adequate for the unit location. .... 2. Ensure the unit is built over the unit to prevent direct sunlight or rain exposure, make sure that the warm air and sound from the condenser is installed on all sides according to level the unit. Ensure the roof structure and anchoring method... 700 (27 9/16) more than 600 (23 21/32) Unit:mm(inch) Installation Manual 9 Installation of the warm air. 4. Select a place so that heat radiation from the air conditioner does not disturb neighbors.
Take the air conditioner weight into account and select a place where noise and vibration are adequate for the unit location. .... 2. Ensure the unit is built over the unit to prevent direct sunlight or rain exposure, make sure that the warm air and sound from the condenser is installed on all sides according to level the unit. Ensure the roof structure and anchoring method... 700 (27 9/16) more than 600 (23 21/32) Unit:mm(inch) Installation Manual 9 Installation of the warm air. 4. Select a place so that heat radiation from the air conditioner does not disturb neighbors.
Installation Instructions
Page 10
... the product where it should not be exposed to the sea wind should be avoided. Sea wind Sea wind 2) In case, to the sea wind. 1. Air conditioners should avoid direct exposure to install the outdoor unit on the condenser and evaporator fins, could be installed in areas where corrosive gases, such as... 1/16 inches) of the sea wind direction. Installation of the dust or salt particles stuck on the heat exchanger using water is recommended. 10 Multi Air Conditioner Periodic ( more than once/year ) cleaning of Indoor, Outdoor Unit Seaside Applications and Installation 1.
... the product where it should not be exposed to the sea wind should be avoided. Sea wind Sea wind 2) In case, to the sea wind. 1. Air conditioners should avoid direct exposure to install the outdoor unit on the condenser and evaporator fins, could be installed in areas where corrosive gases, such as... 1/16 inches) of the sea wind direction. Installation of the dust or salt particles stuck on the heat exchanger using water is recommended. 10 Multi Air Conditioner Periodic ( more than once/year ) cleaning of Indoor, Outdoor Unit Seaside Applications and Installation 1.
Installation Instructions
Page 12
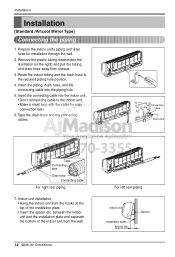
... etc. Remove the plastic tubing retainer(see the illustration on the right) and pull the tubing and drain hose away from the wall. 12 Multi Air Conditioner For left rear piping Indoor unit Installation plate 80(33/16) Spacer Insert the connecting cable into the piping hole. 5.
... etc. Remove the plastic tubing retainer(see the illustration on the right) and pull the tubing and drain hose away from the wall. 12 Multi Air Conditioner For left rear piping Indoor unit Installation plate 80(33/16) Spacer Insert the connecting cable into the piping hole. 5.
Installation Instructions
Page 14
... no gap. 2) Wrap the area which they fit into their slots(clicking sound). Piping for passage through piping hole Connecting cable Drain hose 14 Multi Air Conditioner Bind them together with vinyl tape so that the hooks are properly seated on the installation plate by wrapping them with vinyl tape(wide) 10...
... no gap. 2) Wrap the area which they fit into their slots(clicking sound). Piping for passage through piping hole Connecting cable Drain hose 14 Multi Air Conditioner Bind them together with vinyl tape so that the hooks are properly seated on the installation plate by wrapping them with vinyl tape(wide) 10...
Installation Instructions
Page 16
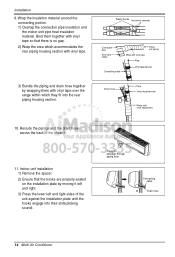
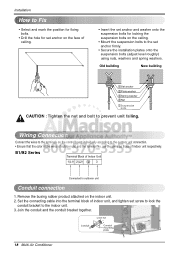
... cabinet. • Grasp the lower left and right side of outdoor unit and the terminal No. Connecting cable Lock nut Conduit bracket Conduit 16 Multi Air Conditioner Installation Wiring Connection 1. Terminal Block in Indoor 1(L1) 2(L2) 3 4 Connected to the outdoor unit connection. • Ensure that the color of the wires of the...
... cabinet. • Grasp the lower left and right side of outdoor unit and the terminal No. Connecting cable Lock nut Conduit bracket Conduit 16 Multi Air Conditioner Installation Wiring Connection 1. Terminal Block in Indoor 1(L1) 2(L2) 3 4 Connected to the outdoor unit connection. • Ensure that the color of the wires of the...
Installation Instructions
Page 18
... control board individually according to prevent unit falling. B1/B2 Series Terminal Block of indoor unit respectively. Lock nut Conduit Conduit mounting plate 18 Multi Air Conditioner Join the conduit and the conduit bracket together. Set the connecting cable into the terminal block of indoor unit, and tighten set anchor firmly. •...
... control board individually according to prevent unit falling. B1/B2 Series Terminal Block of indoor unit respectively. Lock nut Conduit Conduit mounting plate 18 Multi Air Conditioner Join the conduit and the conduit bracket together. Set the connecting cable into the terminal block of indoor unit, and tighten set anchor firmly. •...
Installation Instructions
Page 19
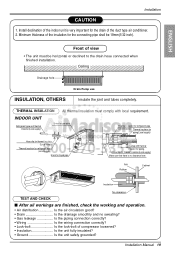
... TEST AND CHECK I After all workings are finished, check the working and operation. • Air distribution Is the air circulation good? • Drain Is the drainage smoothly and no clearance here. Minimum thickness of the duct type air conditioner. 2. THERMAL INSULATION All thermal insulation must be 19mm(1/32 inch). Install declination of the indoor...
... TEST AND CHECK I After all workings are finished, check the working and operation. • Air distribution Is the air circulation good? • Drain Is the drainage smoothly and no clearance here. Minimum thickness of the duct type air conditioner. 2. THERMAL INSULATION All thermal insulation must be 19mm(1/32 inch). Install declination of the indoor...
Installation Instructions
Page 20
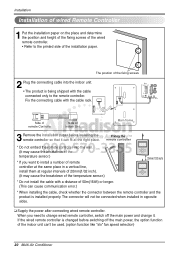
... sides. ❏ Supply the power after connecting wired remote controller. The connector will not be used. (option function like "slo" fan speed selection) 20 Multi Air Conditioner If the wired remote controller is changed before installing the Fixing the remote controller so that it . C01K CN-M C CN-ZONE CN-REMO J15 J14...
... sides. ❏ Supply the power after connecting wired remote controller. The connector will not be used. (option function like "slo" fan speed selection) 20 Multi Air Conditioner If the wired remote controller is changed before installing the Fixing the remote controller so that it . C01K CN-M C CN-ZONE CN-REMO J15 J14...
Installation Instructions
Page 22
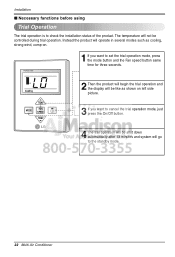
... the On/Off button. 4 The trail operation will be shut down automatically after 18 minutes and system will go to the standby mode. 22 Multi Air Conditioner PQRCUCS0C Defrost Preheat Out door Room Temp Total on Central Run MODE TEMP FAN SPEED TEMP 1 If you want to check the installation status of...
... the On/Off button. 4 The trail operation will be shut down automatically after 18 minutes and system will go to the standby mode. 22 Multi Air Conditioner PQRCUCS0C Defrost Preheat Out door Room Temp Total on Central Run MODE TEMP FAN SPEED TEMP 1 If you want to check the installation status of...
Installation Instructions
Page 24
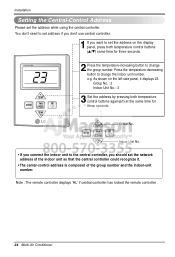
... both temperature control buttons (L/M) same time for three seconds. Note : The remote controller displays 'HL' if central controller has locked the remote controller . 24 Multi Air Conditioner PQRCUCS0C Defrost Preheat Out door Room Temp Total on the left side panel, it . • The center-control address is composed of the indoor unit...
... both temperature control buttons (L/M) same time for three seconds. Note : The remote controller displays 'HL' if central controller has locked the remote controller . 24 Multi Air Conditioner PQRCUCS0C Defrost Preheat Out door Room Temp Total on the left side panel, it . • The center-control address is composed of the indoor unit...

Installation Instructions
Page 26
...the drain direction after considering the direction of drain hose. • Drill the hole for smoke-collecting hood with sufficient capacity. 26 Multi Air Conditioner NOTICE • Avoid the following actions; • Make sure that ventilation fan is enough to cover all noxious gases from this place.... • Install the unit horizontally using a level gauge. • During the installation, care should be taken not to install the air conditioner in such places where cooking oil or iron powder is generated. Avoid place where noxious gas is generated. 4. These may not suck oily...
...the drain direction after considering the direction of drain hose. • Drill the hole for smoke-collecting hood with sufficient capacity. 26 Multi Air Conditioner NOTICE • Avoid the following actions; • Make sure that ventilation fan is enough to cover all noxious gases from this place.... • Install the unit horizontally using a level gauge. • During the installation, care should be taken not to install the air conditioner in such places where cooking oil or iron powder is generated. Avoid place where noxious gas is generated. 4. These may not suck oily...
Installation Instructions
Page 27
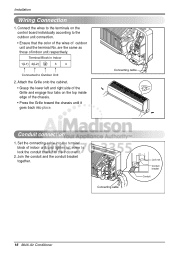
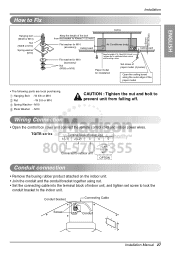
...TQ/TR series Terminal Block of Indoor Unit 1(L1) 2(L2) 3 4 5 Connected to outdoor unit TO AIR FRESH KIT OPTION Conduit connection • Remove the busing rubber product attached on the indoor unit. • Join... conduit bracket to 40mm(1-1/2 inch) Flat washer for M10 (accessory) Ceiling board Air Conditioner body Ceiling board Flat washer for M10 (accessory) Nut (W3/8 or M10) Keep the length of... 15~18mm(5/8~3/4 inch) between the air conditioner bottom surface and the ceiling surface Paper model for installation Set screw of paper model (4...
...TQ/TR series Terminal Block of Indoor Unit 1(L1) 2(L2) 3 4 5 Connected to outdoor unit TO AIR FRESH KIT OPTION Conduit connection • Remove the busing rubber product attached on the indoor unit. • Join... conduit bracket to 40mm(1-1/2 inch) Flat washer for M10 (accessory) Ceiling board Air Conditioner body Ceiling board Flat washer for M10 (accessory) Nut (W3/8 or M10) Keep the length of... 15~18mm(5/8~3/4 inch) between the air conditioner bottom surface and the ceiling surface Paper model for installation Set screw of paper model (4...

Installation Instructions
Page 28
... wired remote controller from the installation board, use the driver as shown in the front direction, the wired remote controller will be separated. 28 Multi Air Conditioner Wall Side Wall Side Guide slot Top Bottom Fixate the remote controller cable to the installation board as factory default.
... wired remote controller from the installation board, use the driver as shown in the front direction, the wired remote controller will be separated. 28 Multi Air Conditioner Wall Side Wall Side Guide slot Top Bottom Fixate the remote controller cable to the installation board as factory default.

Installation Instructions
Page 30
... the Corner covers of panel with the ceiling. Hook clip Hook 4. Front grille 2. Insert the other two screws and tighten all screws completely. 30 Multi Air Conditioner Do not tighten the bolts completely. (The fixing screws are included in the indoor unit box.) Check the alignment of the panel. Height can be... panel, always remove the paper template. 1. Insert two screws on the unit by inserting hooks as shown in picture. Remove the packing and take out air inlet grille from front panel. Installation Installation of panel.
... the Corner covers of panel with the ceiling. Hook clip Hook 4. Front grille 2. Insert the other two screws and tighten all screws completely. 30 Multi Air Conditioner Do not tighten the bolts completely. (The fixing screws are included in the indoor unit box.) Check the alignment of the panel. Height can be... panel, always remove the paper template. 1. Insert two screws on the unit by inserting hooks as shown in picture. Remove the packing and take out air inlet grille from front panel. Installation Installation of panel.


