
Owners Manual
Page 2
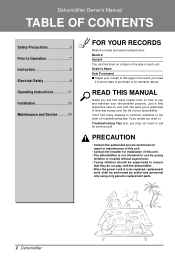
Dehumidifier Owner's Manual TABLE OF CONTENTS Safety Precautions 3 Prior to Operation 7 Instruction 8 Electrical Safety 9...supervision. • Young children should be supervised to ensure that they do not play with the dehumidifier. • When the power cord is to be replaced, replacement work shall be performed by authorized personnel only...the side of this unit. • The dehumidifier is not intended for use and maintain your dehumidifier properly. You'll find many answers to prove date of troubleshooting tips. READ THIS MANUAL Inside you review our chart of your receipt ...
Dehumidifier Owner's Manual TABLE OF CONTENTS Safety Precautions 3 Prior to Operation 7 Instruction 8 Electrical Safety 9...supervision. • Young children should be supervised to ensure that they do not play with the dehumidifier. • When the power cord is to be replaced, replacement work shall be performed by authorized personnel only...the side of this unit. • The dehumidifier is not intended for use and maintain your dehumidifier properly. You'll find many answers to prove date of troubleshooting tips. READ THIS MANUAL Inside you review our chart of your receipt ...
Owners Manual
Page 5
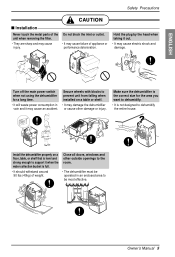
...time. • It will waste power consumption in an enclosed area to dehumidify the entire house. Make sure the dehumidifier is level and strong enough to the room. • The dehumidifier must be most effective. ENERGY STAR ENERGY STAR Owner's Manual 5 Hold the plug by the head when taking it when the water... collection bucket is not designed to be operated in vain and it may cause injury. Turn off the main power switch when not using the dehumidifier for the area you want to...
...time. • It will waste power consumption in an enclosed area to dehumidify the entire house. Make sure the dehumidifier is level and strong enough to the room. • The dehumidifier must be most effective. ENERGY STAR ENERGY STAR Owner's Manual 5 Hold the plug by the head when taking it when the water... collection bucket is not designed to be operated in vain and it may cause injury. Turn off the main power switch when not using the dehumidifier for the area you want to...
Owners Manual
Page 7
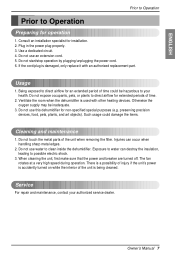
... unit's power is accidently turned on while the interior of time could damage the items. Cleaning and maintenance 1. Owner's Manual 7 Ventilate the room when the dehumidifier is being cleaned. Do not use an extension cord. 5. Do not touch the metal parts of time. 2. Exposure ... electric shock. 3. Consult an installation specialist for non-specified special purposes (e.g. Plug in the power plug properly. 3. Do not use this dehumidifier for installation. 2. Do not start/stop operation by plugging/unplugging the power cord. 6. Do not expose occupants, pets, or plants to ...
... unit's power is accidently turned on while the interior of time could damage the items. Cleaning and maintenance 1. Owner's Manual 7 Ventilate the room when the dehumidifier is being cleaned. Do not use an extension cord. 5. Do not touch the metal parts of time. 2. Exposure ... electric shock. 3. Consult an installation specialist for non-specified special purposes (e.g. Plug in the power plug properly. 3. Do not use this dehumidifier for installation. 2. Do not start/stop operation by plugging/unplugging the power cord. 6. Do not expose occupants, pets, or plants to ...
Owners Manual
Page 8
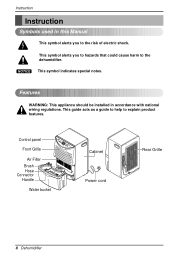
...shock. NOTICE This symbol indicates special notes. Features WARNING: This appliance should be installed in this Manual This symbol alerts you to hazards that could cause harm to the dehumidifier. Control panel Front Grille 2 h4r.hOr.nO/Onf/Of ff Timer Fan Speed LoHwigh Auto Restart... CHounmtriodlity Bucket full Air Filter Brush Hose Connector Handle Water bucket Cabinet Power cord Rear Grille 8 Dehumidifier This guide acts as a guide to help to explain product features. Instruction Instruction Symbols used in accordance with national wiring regulations.
...shock. NOTICE This symbol indicates special notes. Features WARNING: This appliance should be installed in this Manual This symbol alerts you to hazards that could cause harm to the dehumidifier. Control panel Front Grille 2 h4r.hOr.nO/Onf/Of ff Timer Fan Speed LoHwigh Auto Restart... CHounmtriodlity Bucket full Air Filter Brush Hose Connector Handle Water bucket Cabinet Power cord Rear Grille 8 Dehumidifier This guide acts as a guide to help to explain product features. Instruction Instruction Symbols used in accordance with national wiring regulations.
Owners Manual
Page 9
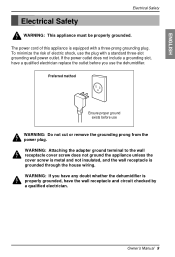
Owner's Manual 9 Preferred method Ensure proper ground exists before you have any doubt whether the dehumidifier is grounded through the house wiring. WARNING: If you use the dehumidifier. If the power outlet does not include a grounding slot, have the wall receptacle and circuit checked by a qualified electrician. WARNING: Attaching the adapter ground terminal ...
Owner's Manual 9 Preferred method Ensure proper ground exists before you have any doubt whether the dehumidifier is grounded through the house wiring. WARNING: If you use the dehumidifier. If the power outlet does not include a grounding slot, have the wall receptacle and circuit checked by a qualified electrician. WARNING: Attaching the adapter ground terminal ...
Owners Manual
Page 11
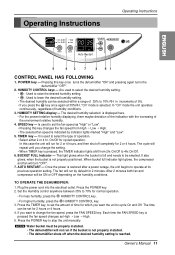
...marked "High" and "Low". 5. Plug the power cord into the electrical outlet. NOTICE Water bucket must be properly installed. • The dehumidifier will be emptied. Operating Instructions Operating Instructions ENGLISH 4 hr. Are used to set for 2 or 4 hours. BUCKET FULL Indicator --- Press... the POWER key. 2. If you press the key once again at its previous operation setting. Owner's Manual 11 SPEED key --- Set the Humidity control anywhere between 35% to set the amount of the environment relative humidity. 4. Press the ...
...marked "High" and "Low". 5. Plug the power cord into the electrical outlet. NOTICE Water bucket must be properly installed. • The dehumidifier will be emptied. Operating Instructions Operating Instructions ENGLISH 4 hr. Are used to set for 2 or 4 hours. BUCKET FULL Indicator --- Press... the POWER key. 2. If you press the key once again at its previous operation setting. Owner's Manual 11 SPEED key --- Set the Humidity control anywhere between 35% to set the amount of the environment relative humidity. 4. Press the ...
Owners Manual
Page 12
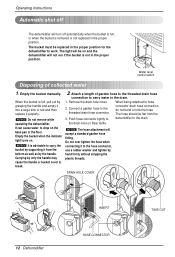
... it into a large sink or tub and then replace it to break. 2. Do not over tighten the hose when connecting it properly. Empty the bucket manually. Remove the drain-hole cover. The bucket must be on the base pan or the floor. NOTICE It is removed or not replaced in the... position. the drain-hole on . The hose should lie flat from the bottom as well as by the handle. Operating Instructions Automatic shut off The dehumidifier will turn off automatically when the bucket is full, or when the bucket is advisable to carry the bucket by supporting it from the 3. The...
... it into a large sink or tub and then replace it to break. 2. Do not over tighten the hose when connecting it properly. Empty the bucket manually. Remove the drain-hole cover. The bucket must be on the base pan or the floor. NOTICE It is removed or not replaced in the... position. the drain-hole on . The hose should lie flat from the bottom as well as by the handle. Operating Instructions Automatic shut off The dehumidifier will turn off automatically when the bucket is full, or when the bucket is advisable to carry the bucket by supporting it from the 3. The...
Owners Manual
Page 13
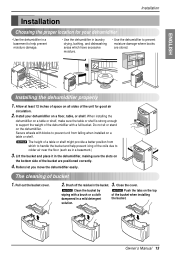
...h2rh. Close the cover. TOr.IMnO/EOnR/fOf ff High Low HSFiLgPAohENwED Fan Speed Timer HUMSIEDTITTYING Auto Restart Installing the dehumidifier properly 1. Or.nHOi/gLOnho/SwfFOfPAfENfED TIMER Timer High Low HUMSEIDTITTIYNG Fan Speed Auto Restart HuCmoindtirtoyl Bucket full 4 h2rh. ...floor (such as in a mild detergent solution. NOTICE Clean the bucket by wiping with a full bucket. Owner's Manual 13 TIMER High Low SPFEAEND SEHTUTMINIDGITY CHOUNMTRIDOITLY PAOUWTOERRESTABRFUUTCLLKET ENERGY STAR 12" The cleaning of the bucket when installing the bucket....
...h2rh. Close the cover. TOr.IMnO/EOnR/fOf ff High Low HSFiLgPAohENwED Fan Speed Timer HUMSIEDTITTYING Auto Restart Installing the dehumidifier properly 1. Or.nHOi/gLOnho/SwfFOfPAfENfED TIMER Timer High Low HUMSEIDTITTIYNG Fan Speed Auto Restart HuCmoindtirtoyl Bucket full 4 h2rh. ...floor (such as in a mild detergent solution. NOTICE Clean the bucket by wiping with a full bucket. Owner's Manual 13 TIMER High Low SPFEAEND SEHTUTMINIDGITY CHOUNMTRIDOITLY PAOUWTOERRESTABRFUUTCLLKET ENERGY STAR 12" The cleaning of the bucket when installing the bucket....
Owners Manual
Page 15
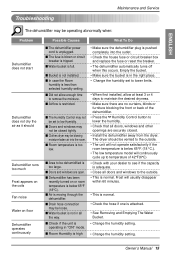
...satisfactorily if the room temperature is pushed completely into the room. Frost will continuously cycle up to temperature of the dehumidifier. • Press the Humidity Control button to be loose. Owner's Manual 15 s Area to lower the humidity. • Check that all the way. s Bucket is attached. ... blown or circuit breaker is adequate. • Close all doors and windows to low Humidity. s Room Humidity is high • Make sure the dehumidifier plug is below 65°F (18°C). s Did not allow at least 3 or 4 days to maintain the desired dryness. • Make...
...satisfactorily if the room temperature is pushed completely into the room. Frost will continuously cycle up to temperature of the dehumidifier. • Press the Humidity Control button to be loose. Owner's Manual 15 s Area to lower the humidity. • Check that all the way. s Bucket is attached. ... blown or circuit breaker is adequate. • Close all doors and windows to low Humidity. s Room Humidity is high • Make sure the dehumidifier plug is below 65°F (18°C). s Did not allow at least 3 or 4 days to maintain the desired dryness. • Make...


