
Owners Manual
Page 2
... service technician for repair or maintenance of this unit. • Contact the installer for installation of this page in the chart of troubleshooting tips. Dehumidifier Owner's Manual TABLE OF CONTENTS Safety Precautions 3 Prior to prove date of purchase or for warranty issues. Dealer's Name Date Purchased s Staple your dehumidifier. Just a little preventive...
... service technician for repair or maintenance of this unit. • Contact the installer for installation of this page in the chart of troubleshooting tips. Dehumidifier Owner's Manual TABLE OF CONTENTS Safety Precautions 3 Prior to prove date of purchase or for warranty issues. Dealer's Name Date Purchased s Staple your dehumidifier. Just a little preventive...
Owners Manual
Page 3
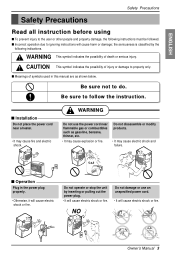
... follow the instruction. Be sure to do. NO Owner's Manual 3 s Installation Do not place the power cord near flammable gas or combustibles such as shown below. Do not disassemble or modify products. • It may cause fire and electric shock. s Operation Plug in this manual are as gasoline, benzene, thinner, etc. • It...
... follow the instruction. Be sure to do. NO Owner's Manual 3 s Installation Do not place the power cord near flammable gas or combustibles such as shown below. Do not disassemble or modify products. • It may cause fire and electric shock. s Operation Plug in this manual are as gasoline, benzene, thinner, etc. • It...
Owners Manual
Page 5
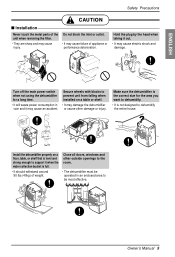
... and it may damage the dehumidifier or cause other outside openings to the room. • The dehumidifier must be most effective. ENERGY STAR ENERGY STAR Owner's Manual 5 Hold the plug by the head when taking it when the water collection bucket is full. • It should withstand around 90 lbs (40kg) of...
... and it may damage the dehumidifier or cause other outside openings to the room. • The dehumidifier must be most effective. ENERGY STAR ENERGY STAR Owner's Manual 5 Hold the plug by the head when taking it when the water collection bucket is full. • It should withstand around 90 lbs (40kg) of...

Owners Manual
Page 7
... and maintenance 1. Injuries can destroy the insulation, leading to water can occur when handling sharp metal edges. 2. Service For repair and maintenance, contact your health. Owner's Manual 7 Being exposed to direct airflow for operation 1. Use a dedicated circuit. 4. If the cord/plug is used with an authorized replacement part. Usage 1. Such usage could...
... and maintenance 1. Injuries can destroy the insulation, leading to water can occur when handling sharp metal edges. 2. Service For repair and maintenance, contact your health. Owner's Manual 7 Being exposed to direct airflow for operation 1. Use a dedicated circuit. 4. If the cord/plug is used with an authorized replacement part. Usage 1. Such usage could...
Owners Manual
Page 9
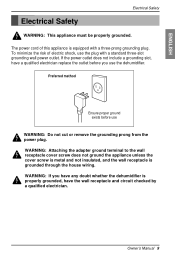
... the appliance unless the cover screw is metal and not insulated, and the wall receptacle is equipped with a standard three-slot grounding wall power outlet. Owner's Manual 9 WARNING: If you use WARNING: Do not cut or remove the grounding prong from the power plug. ENGLISH Electrical Safety Electrical Safety WARNING: This appliance...
... the appliance unless the cover screw is metal and not insulated, and the wall receptacle is equipped with a standard three-slot grounding wall power outlet. Owner's Manual 9 WARNING: If you use WARNING: Do not cut or remove the grounding prong from the power plug. ENGLISH Electrical Safety Electrical Safety WARNING: This appliance...

Owners Manual
Page 11
...ON or OFF depending on the humidity conditions. AUTO RESTART --- Press the POWER key to set the amount of the environment relative humidity. 4. Owner's Manual 11 Is used to 70% RH in increments of humidity conditions. 3. This light glows when the bucket is indicated by default for cycled operation...Off to 70% for which you want the unit to change the setting. • When TIMER key is used to stop the unit manually. Pressing this case the unit will repeat until you press the key once again at its previous operation setting. Each time the FAN ...
...ON or OFF depending on the humidity conditions. AUTO RESTART --- Press the POWER key to set the amount of the environment relative humidity. 4. Owner's Manual 11 Is used to 70% RH in increments of humidity conditions. 3. This light glows when the bucket is indicated by default for cycled operation...Off to 70% for which you want the unit to change the setting. • When TIMER key is used to stop the unit manually. Pressing this case the unit will repeat until you press the key once again at its previous operation setting. Each time the FAN ...
Owners Manual
Page 13
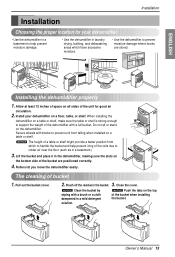
....ntOl/yOnOf/fOnf.f TIMER High Low SFPAENED HUMSIEDTITTYING BUFCUKLELT HCUOMNIDTIRTOYL HuCmoindtirtoyl AUTO REPSOTWBAREuTRcket full ENERGY STAR Co4nhs2rt.ahOnr.ntOl/yOnOf/fOnf.f 4 h2rh. Close the cover. Owner's Manual 13 When installing the dehumidifier on a table or shelf, make sure the table or shelf is strong enough to support the weight of the unit...
....ntOl/yOnOf/fOnf.f TIMER High Low SFPAENED HUMSIEDTITTYING BUFCUKLELT HCUOMNIDTIRTOYL HuCmoindtirtoyl AUTO REPSOTWBAREuTRcket full ENERGY STAR Co4nhs2rt.ahOnr.ntOl/yOnOf/fOnf.f 4 h2rh. Close the cover. Owner's Manual 13 When installing the dehumidifier on a table or shelf, make sure the table or shelf is strong enough to support the weight of the unit...
Owners Manual
Page 15
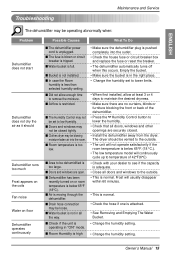
... completely into the room. The dryer should Dehumidifier runs too much Frost appears on the coils Fan noise Water on or room temperature is normal. Owner's Manual 15 s In case the Room humidity is too large. s Doors and windows may not be set to lower limits. • When first installed, allow enough...
... completely into the room. The dryer should Dehumidifier runs too much Frost appears on the coils Fan noise Water on or room temperature is normal. Owner's Manual 15 s In case the Room humidity is too large. s Doors and windows may not be set to lower limits. • When first installed, allow enough...


