Owner's Manual
Page 2
... the power cord is to be replaced, replacement work shall be performed by authorized personnel only using only genuine replacement parts. 2 Dehumidifier Dealer's Name Date Purchased s Staple your dehumidifier properly. Dehumidifier Owner's Manual TABLE OF CONTENTS Safety Precautions 3 Prior to Operation 7 Instruction 8 Electrical Safety 9 Operating Instructions 11 Installation 13 Maintenance and Service...........14 FOR...
... the power cord is to be replaced, replacement work shall be performed by authorized personnel only using only genuine replacement parts. 2 Dehumidifier Dealer's Name Date Purchased s Staple your dehumidifier properly. Dehumidifier Owner's Manual TABLE OF CONTENTS Safety Precautions 3 Prior to Operation 7 Instruction 8 Electrical Safety 9 Operating Instructions 11 Installation 13 Maintenance and Service...........14 FOR...

Owner's Manual
Page 5
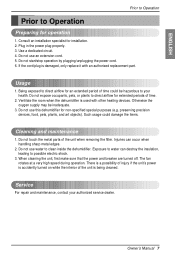
...Close all doors, windows and other damage or injury. Make sure the dehumidifier is the correct size for a long time. • It will waste power consumption in an enclosed area to dehumidify the entire house. Hold the plug by the head when taking it ...may cause failure of weight. ENGLISH Safety Precautions CAUTION s Installation Never touch the metal parts of the unit when removing the filter. • They are sharp and may cause electric shock and damage. ENERGY STAR ENERGY STAR Owner's Manual...
...Close all doors, windows and other damage or injury. Make sure the dehumidifier is the correct size for a long time. • It will waste power consumption in an enclosed area to dehumidify the entire house. Hold the plug by the head when taking it ...may cause failure of weight. ENGLISH Safety Precautions CAUTION s Installation Never touch the metal parts of the unit when removing the filter. • They are sharp and may cause electric shock and damage. ENERGY STAR ENERGY STAR Owner's Manual...
Owner's Manual
Page 7
...preserving precision devices, food, pets, plants, and art objects). Do not use an extension cord. 5. Owner's Manual 7 Do not use water to clean inside the dehumidifier. Exposure to water can occur when handling sharp metal edges. 2. Being exposed to direct airflow for an extended period...(e.g. Plug in the power plug properly. 3. Do not start/stop operation by plugging/unplugging the power cord. 6. Do not use this dehumidifier for installation. 2. Injuries can destroy the insulation, leading to possible electric shock. 3. The fan rotates at a very high speed during ...
...preserving precision devices, food, pets, plants, and art objects). Do not use an extension cord. 5. Owner's Manual 7 Do not use water to clean inside the dehumidifier. Exposure to water can occur when handling sharp metal edges. 2. Being exposed to direct airflow for an extended period...(e.g. Plug in the power plug properly. 3. Do not start/stop operation by plugging/unplugging the power cord. 6. Do not use this dehumidifier for installation. 2. Injuries can destroy the insulation, leading to possible electric shock. 3. The fan rotates at a very high speed during ...
Owner's Manual
Page 8
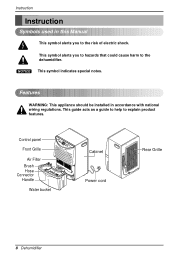
.../Onf/Of ff Timer Fan Speed LoHwigh Auto Restart CHounmtriodlity Bucket full Air Filter Brush Hose Connector Handle Water bucket Cabinet Power cord Rear Grille 8 Dehumidifier Instruction Instruction Symbols used in accordance with national wiring regulations. This symbol alerts you to the risk of electric shock. Features WARNING: This appliance should...
.../Onf/Of ff Timer Fan Speed LoHwigh Auto Restart CHounmtriodlity Bucket full Air Filter Brush Hose Connector Handle Water bucket Cabinet Power cord Rear Grille 8 Dehumidifier Instruction Instruction Symbols used in accordance with national wiring regulations. This symbol alerts you to the risk of electric shock. Features WARNING: This appliance should...
Owner's Manual
Page 9
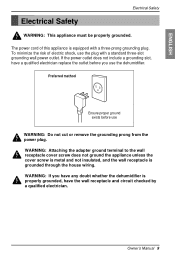
...method Ensure proper ground exists before you have the wall receptacle and circuit checked by a qualified electrician. WARNING: If you use the dehumidifier. Owner's Manual 9 The power cord of electric shock, use WARNING: Do not cut or remove the grounding prong from the power plug. To... minimize the risk of this appliance is properly grounded, have any doubt whether the dehumidifier is equipped with a standard three-slot grounding wall power...
...method Ensure proper ground exists before you have the wall receptacle and circuit checked by a qualified electrician. WARNING: If you use the dehumidifier. Owner's Manual 9 The power cord of electric shock, use WARNING: Do not cut or remove the grounding prong from the power plug. To... minimize the risk of this appliance is properly grounded, have any doubt whether the dehumidifier is equipped with a standard three-slot grounding wall power...
Owner's Manual
Page 11
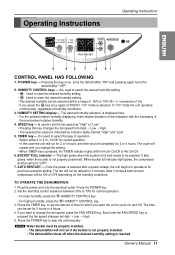
... set for which you change the fan speed, press the FAN SPEED key. Press the POWER key to 70% for cycled operation. Owner's Manual 11 Pressing this case the unit will not run for 2 or 4 hours, and then shut off when the desired humidity setting is selected....• For higher humidity, press the HUMIDITY CONTROL key. 3. This light glows when the bucket is indicated by default for 2 or 4 hours. TO OPERATE THE DEHUMIDIFIER: 1. TIMER key --- Press the POWER key. 2. Press the TIMER key, to set the amount of time for 2 hours or 4 hours. 4. It is ...
... set for which you change the fan speed, press the FAN SPEED key. Press the POWER key to 70% for cycled operation. Owner's Manual 11 Pressing this case the unit will not run for 2 or 4 hours, and then shut off when the desired humidity setting is selected....• For higher humidity, press the HUMIDITY CONTROL key. 3. This light glows when the bucket is indicated by default for 2 or 4 hours. TO OPERATE THE DEHUMIDIFIER: 1. TIMER key --- Press the POWER key. 2. Press the TIMER key, to set the amount of time for 2 hours or 4 hours. 4. It is ...
Owner's Manual
Page 12
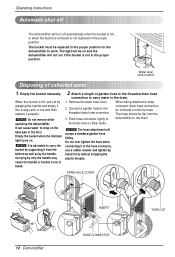
... shut off automatically when the bucket is full, or when the bucket is removed or not replaced in the proper position. Empty the bucket manually. Carrying by only the handle may cause the handle or bucket cover to the threaded drain hose connector. Attach a length of collected water... 1. Connect a garden hose to break. 2. the drain-hole on . DRAIN HOLE COVER 12 Dehumidifier INSERT HOSE-CONNECTOR TAKE OUT NOTICE It is full, pull out by the handle. Remove the drain-hole cover. When being attached to work. ...
... shut off automatically when the bucket is full, or when the bucket is removed or not replaced in the proper position. Empty the bucket manually. Carrying by only the handle may cause the handle or bucket cover to the threaded drain hose connector. Attach a length of collected water... 1. Connect a garden hose to break. 2. the drain-hole on . DRAIN HOLE COVER 12 Dehumidifier INSERT HOSE-CONNECTOR TAKE OUT NOTICE It is full, pull out by the handle. Remove the drain-hole cover. When being attached to work. ...
Owner's Manual
Page 13
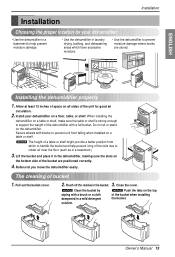
...High Low SFPAENED HUMSIEDTITTYING BUFCUKLELT HCUOMNIDTIRTOYL HuCmoindtirtoyl AUTO REPSOTWBAREuTRcket full ENERGY STAR Co4nhs2rt.ahOnr.ntOl/yOnOf/fOnf.f 4 h2rh. When installing the dehumidifier on a floor, table, or shelf. Do not sit or stand on the top of bucket 1. TIMER High Low SPFEAEND SEHTUTMINIDGITY...2. Brush off the residue in a mild detergent solution. Owner's Manual 13 Rollers let you move the dehumidifier easily. 12" 2hr4.hOrC.noO/Onnsf/fOtafnftly On. Lift the bucket and place it in the dehumidifier, making sure the slots on the bottom side of a table or...
...High Low SFPAENED HUMSIEDTITTYING BUFCUKLELT HCUOMNIDTIRTOYL HuCmoindtirtoyl AUTO REPSOTWBAREuTRcket full ENERGY STAR Co4nhs2rt.ahOnr.ntOl/yOnOf/fOnf.f 4 h2rh. When installing the dehumidifier on a floor, table, or shelf. Do not sit or stand on the top of bucket 1. TIMER High Low SPFEAEND SEHTUTMINIDGITY...2. Brush off the residue in a mild detergent solution. Owner's Manual 13 Rollers let you move the dehumidifier easily. 12" 2hr4.hOrC.noO/Onnsf/fOtafnftly On. Lift the bucket and place it in the dehumidifier, making sure the slots on the bottom side of a table or...
Owner's Manual
Page 15
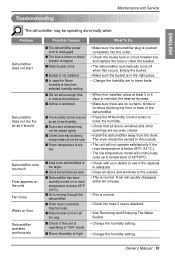
...lower limits. • When first installed, allow enough time to low Humidity. s Room temperature is restricted. The dryer should Dehumidifier runs too much Frost appears on the coils Fan noise Water on or room temperature is below 65°F. (18 °...openings are securely closed tightly. Owner's Manual 15 s Dehumidifier has been recently turned on floor Dehumidifier operates continuously Possible Causes What To Do s The dehumidifier power cord is unplugged. s Drain hose connection may be closed . • Install the dehumidifier away from the dryer. s Clothes ...
...lower limits. • When first installed, allow enough time to low Humidity. s Room temperature is restricted. The dryer should Dehumidifier runs too much Frost appears on the coils Fan noise Water on or room temperature is below 65°F. (18 °...openings are securely closed tightly. Owner's Manual 15 s Dehumidifier has been recently turned on floor Dehumidifier operates continuously Possible Causes What To Do s The dehumidifier power cord is unplugged. s Drain hose connection may be closed . • Install the dehumidifier away from the dryer. s Clothes ...