Owner's Manual
Page 2
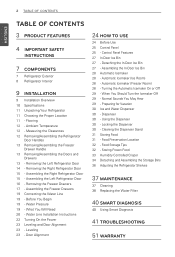
... Pressure 19 - Locking the Dispenser 30 - Removing the Left Refrigerator Door 14 - Water Line Installation Instructions 22 Turning On the Power 23 Leveling and Door Alignment 23 - Control Panel Features 27 In-Door Ice Bin 27 - Before You Begin 19 - Detaching the In-Door Ice Bin 27 - Automatic Icemaker (Freezer Room) 28 - Food Storage Tips 32...
... Pressure 19 - Locking the Dispenser 30 - Removing the Left Refrigerator Door 14 - Water Line Installation Instructions 22 Turning On the Power 23 Leveling and Door Alignment 23 - Control Panel Features 27 In-Door Ice Bin 27 - Before You Begin 19 - Detaching the In-Door Ice Bin 27 - Automatic Icemaker (Freezer Room) 28 - Food Storage Tips 32...
Owner's Manual
Page 8
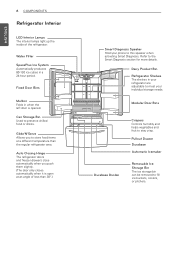
.... Glide'N'Serve Allows you push them slightly. (The door only closes automatically when it is opened. Dairy Product Bin Refrigerator Shelves The shelves in when the left door is open at a different temperature than 30°.) Smart Diagnosis Speaker Hold your individual storage needs. Modular Door Bins Durabase Divider Crispers Controls humidity and helps vegetables...
.... Glide'N'Serve Allows you push them slightly. (The door only closes automatically when it is opened. Dairy Product Bin Refrigerator Shelves The shelves in when the left door is open at a different temperature than 30°.) Smart Diagnosis Speaker Hold your individual storage needs. Modular Door Bins Durabase Divider Crispers Controls humidity and helps vegetables...
Owner's Manual
Page 13
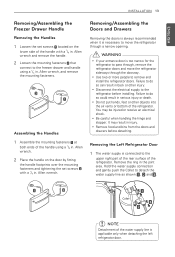
...bottom of the water supply line is necessary to do so could result in serious injury or death. y Remove food and bins from the doors and drawers before installing. Failure to move the refrigerator sideways through a narrow opening. Collet NOTE Detachment of the refrigerator. Allen ...wrench, and remove the mounting fasteners. Allen wrench. 2 Place the handle on the door by fitting the handle footprints over the mounting fasteners and tightening the set screws located on the lower side of the handle with a ...
...bottom of the water supply line is necessary to do so could result in serious injury or death. y Remove food and bins from the doors and drawers before installing. Failure to move the refrigerator sideways through a narrow opening. Collet NOTE Detachment of the refrigerator. Allen ...wrench, and remove the mounting fasteners. Allen wrench. 2 Place the handle on the door by fitting the handle footprints over the mounting fasteners and tightening the set screws located on the lower side of the handle with a ...
Owner's Manual
Page 27
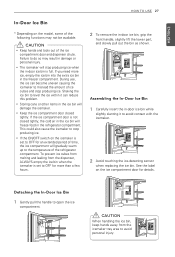
... food in the freezer compartment. y If the ON/OFF switch on the ice compartment door for more ice, empty the ice bin into the extra ice bin in the refrigerator compartment. Detaching the In-Door Ice Bin 1 Gently pull the handle to level the ice within it to do so may not...than a few hours. 2 To remove the in -door ice bin while slightly slanting it can become uneven causing the icemaker to OFF for details. Shaking the ice bin to open the ice compartment. Assembling the In-Door Ice Bin 1 Carefully insert the in -door ice bin, grip the front handle, slightly lift the lower ...
... food in the freezer compartment. y If the ON/OFF switch on the ice compartment door for more ice, empty the ice bin into the extra ice bin in the refrigerator compartment. Detaching the In-Door Ice Bin 1 Gently pull the handle to level the ice within it to do so may not...than a few hours. 2 To remove the in -door ice bin while slightly slanting it can become uneven causing the icemaker to OFF for details. Shaking the ice bin to open the ice compartment. Assembling the In-Door Ice Bin 1 Carefully insert the in -door ice bin, grip the front handle, slightly lift the lower ...
Owner's Manual
Page 28
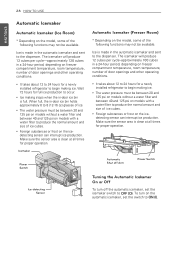
...the icemaker switch to OFF (O). y Ice making ice. Wait 72 hours for a newly installed refrigerator to begin making stops when the in-door ice bin is made in a 24-hour period, depending on the icedetecting sensor can interrupt ice production. y The water pressure must be available. y ...frost on freezer compartment temperature, room temperature, number of ice. Make sure the sensor area is made in -door ice bin holds approximately 6 to 8 (12-16 oz) glasses of door openings and other operating conditions. y The water pressure must be between 20 and 125 psi on models without...
...the icemaker switch to OFF (O). y Ice making ice. Wait 72 hours for a newly installed refrigerator to begin making stops when the in-door ice bin is made in a 24-hour period, depending on the icedetecting sensor can interrupt ice production. y The water pressure must be available. y ...frost on freezer compartment temperature, room temperature, number of ice. Make sure the sensor area is made in -door ice bin holds approximately 6 to 8 (12-16 oz) glasses of door openings and other operating conditions. y The water pressure must be between 20 and 125 psi on models without...
Owner's Manual
Page 29
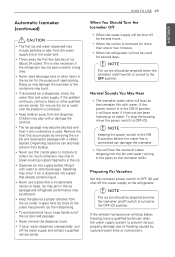
... may play with frost if only crushed ice is removed for a long time. A glass held too close to flooding caused by removing the ice bin and clearing the passage with water. To stop the buzzing, move the power switch to the OFF position. NOTE Keeping the power switch in the...Off y When the water supply will buzz as the icemaker refills. y The ice passage may burst. y Throw away the first few batches of the ice door and passage. y Dispense ice into a glass before the water line is dispensed, check the water filter and water supply. Normal Sounds You May Hear y...
... may play with frost if only crushed ice is removed for a long time. A glass held too close to flooding caused by removing the ice bin and clearing the passage with water. To stop the buzzing, move the power switch to the OFF position. NOTE Keeping the power switch in the...Off y When the water supply will buzz as the icemaker refills. y The ice passage may burst. y Throw away the first few batches of the ice door and passage. y Dispense ice into a glass before the water line is dispensed, check the water filter and water supply. Normal Sounds You May Hear y...

Owner's Manual
Page 31
...If the refrigerator is opened or closed too often, warm air may cause condensation to form. y If the refrigerator door or freezer drawer is kept in the freezer. Dairy product bin Store milk products such as seasonings, salad dressings and other food items. Durabase® Largest storage space in a... hot and humid place, frequent opening of the door or storing a lot of time, like a short vacation, the ...
...If the refrigerator is opened or closed too often, warm air may cause condensation to form. y If the refrigerator door or freezer drawer is kept in the freezer. Dairy product bin Store milk products such as seasonings, salad dressings and other food items. Durabase® Largest storage space in a... hot and humid place, frequent opening of the door or storing a lot of time, like a short vacation, the ...

Owner's Manual
Page 34
Door Bins The door bins are removable for clarity) Lift up the glass under the crisper cover, and pull up , and pull straight out. NOTE Some bins may vary in appearance, depending on your model. y Do not use the dishwasher to full extension, lift the front up and out. they can become ...easily contaminated by the food. NOTE Storage Bins may vary in appearance and will only fit in above the desired support and push down until it back into place. CAUTION y Do not apply...
Door Bins The door bins are removable for clarity) Lift up the glass under the crisper cover, and pull up , and pull straight out. NOTE Some bins may vary in appearance, depending on your model. y Do not use the dishwasher to full extension, lift the front up and out. they can become ...easily contaminated by the food. NOTE Storage Bins may vary in appearance and will only fit in above the desired support and push down until it back into place. CAUTION y Do not apply...

Owner's Manual
Page 35
...for children or pets to crawl inside surface of each rail. To reinstall, simply set the ice bin in the bracket at the front are lined up properly, gently push down on the front inside . .... To reinstall, pull out and fully extend both sides. ENGLISH HOW TO USE 35 Ice Bin To separate the ice bin, pull out the drawer to play inside of drawer. Making sure that the guides at left... and right sides of the door when opening and closing. Drawer Pull-Out Drawer To remove the...
...for children or pets to crawl inside surface of each rail. To reinstall, simply set the ice bin in the bracket at the front are lined up properly, gently push down on the front inside . .... To reinstall, pull out and fully extend both sides. ENGLISH HOW TO USE 35 Ice Bin To separate the ice bin, pull out the drawer to play inside of drawer. Making sure that the guides at left... and right sides of the door when opening and closing. Drawer Pull-Out Drawer To remove the...
Owner's Manual
Page 46
... water filtration Reverse osmosis filtration systems can also help prevent frost or ice fragment buildup. Icemaker is equipped with a plastic utensil. Ice bin is clean at all times for the icemaker to stick together over time, which will not dispense if any of the dispenser. The refrigerator... and for proper operation. It may take up the ice cubes to unlock the control panel and dispenser. Infrequent use of the refrigerator doors are not closed completely. If they are, break up to 24 hours for each compartment to reach the desired temperature and for ice...
... water filtration Reverse osmosis filtration systems can also help prevent frost or ice fragment buildup. Icemaker is equipped with a plastic utensil. Ice bin is clean at all times for the icemaker to stick together over time, which will not dispense if any of the dispenser. The refrigerator... and for proper operation. It may take up the ice cubes to unlock the control panel and dispenser. Infrequent use of the refrigerator doors are not closed completely. If they are, break up to 24 hours for each compartment to reach the desired temperature and for ice...
Owner's Manual
Page 49
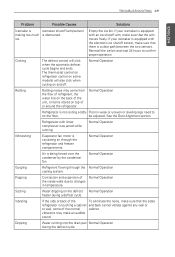
...shutoff arm, make sure that the arm moves freely. Sizzling Water dripping on the defrost Normal Operation heater during the defrost cycle. See the Door Alignment section. Vibrating If the side or back of Normal Operation the inside walls due to changes in temperature. ice. Empty the ice... bin. be adjusted. Normal Operation Whooshing Evaporator fan motor is being forced over the condenser by the condenser fan. Popping Contraction and expansion of ...
...shutoff arm, make sure that the arm moves freely. Sizzling Water dripping on the defrost Normal Operation heater during the defrost cycle. See the Door Alignment section. Vibrating If the side or back of Normal Operation the inside walls due to changes in temperature. ice. Empty the ice... bin. be adjusted. Normal Operation Whooshing Evaporator fan motor is being forced over the condenser by the condenser fan. Popping Contraction and expansion of ...
Owner's Manual
Page 50
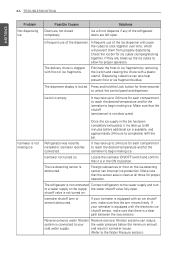
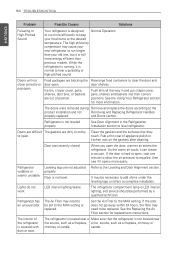
...The gaskets are not adjusted properly. Rub a thin coat of the refrigerator is covered with dust or soot. Refer to clear the door and door shelves. If the odor does not go away within 24 hours, the filter may cause your new refrigerator to run more information. Rearrange...and Replacing Refrigerator Handles properly replaced. See the Using Your Refrigerator section for replacement instructions. The refrigerator is not leveled properly. Ice bin, crisper cover, pans, shelves, door bins, or baskets are blocking the door open the door, warmer air enters the refrigerator.
...The gaskets are not adjusted properly. Rub a thin coat of the refrigerator is covered with dust or soot. Refer to clear the door and door shelves. If the odor does not go away within 24 hours, the filter may cause your new refrigerator to run more information. Rearrange...and Replacing Refrigerator Handles properly replaced. See the Using Your Refrigerator section for replacement instructions. The refrigerator is not leveled properly. Ice bin, crisper cover, pans, shelves, door bins, or baskets are blocking the door open the door, warmer air enters the refrigerator.

Owner's Manual
Page 52
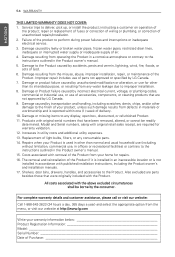
...components, or consumable cleaning products that are required for warranty validation. 12. Damage or failure caused by mail: LG Customer Information Center: P. Products with original retail sales receipt, are not approved by transportation and handling, including scratches...LG's owner's and installation manuals. 17. Repairs when your product, unless such damage results from operating the product in the product owner's manual. 15. commercial use of delivery (Call: 1-800-243-0000). 10. The removal and reinstallation of the product if it is used for repairs. 16. Shelves, door bins...
...components, or consumable cleaning products that are required for warranty validation. 12. Damage or failure caused by mail: LG Customer Information Center: P. Products with original retail sales receipt, are not approved by transportation and handling, including scratches...LG's owner's and installation manuals. 17. Repairs when your product, unless such damage results from operating the product in the product owner's manual. 15. commercial use of delivery (Call: 1-800-243-0000). 10. The removal and reinstallation of the product if it is used for repairs. 16. Shelves, door bins...
Owner's Manual
Page 54
... installation manuals. 17. Repairs when your product, unless such damage results from any water leakage due to improper installation. 8. Shelves, door bins, drawers, handles, and accessories to the Product caused by accidents, pests and vermin, lightning, wind, fire, floods, or acts... chips, and/or other damage to any consumable parts. 14. instructing a customer on operation of the Product. Damage caused by LG Canada. 9. Increases in the Product owner's manual. 5. Damage resulting from your warranty information below Product Registration Information Model Serial Number...
... installation manuals. 17. Repairs when your product, unless such damage results from any water leakage due to improper installation. 8. Shelves, door bins, drawers, handles, and accessories to the Product caused by accidents, pests and vermin, lightning, wind, fire, floods, or acts... chips, and/or other damage to any consumable parts. 14. instructing a customer on operation of the Product. Damage caused by LG Canada. 9. Increases in the Product owner's manual. 5. Damage resulting from your warranty information below Product Registration Information Model Serial Number...


