User Guide
Page 3
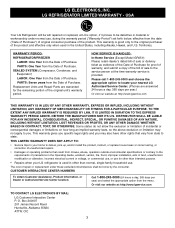
...This warranty gives you specific legal rights and you . The cost of sale to state. HOW SERVICE IS HANDLED: In-Home Service (Except Model GR051): Please retain dealer's dated bill of sale or delivery ticket as evidence of the Date of Purchase for the remaining portion of Purchase...., LOST REVENUES OR PROFITS, OR ANY OTHER DAMAGE WHETHER BASED IN CONTRACT, TORT, OR OTHERWISE. PARTS: Seven years from the menu. LG ELECTRONICS, INC. LG REFRIGERATOR LIMITED WARRANTY - Or visit our website at : http://www.lgservice.com THIS WARRANTY IS IN LIEU OF ANY OTHER WARRANTY, EXPRESS OR...
...This warranty gives you specific legal rights and you . The cost of sale to state. HOW SERVICE IS HANDLED: In-Home Service (Except Model GR051): Please retain dealer's dated bill of sale or delivery ticket as evidence of the Date of Purchase for the remaining portion of Purchase...., LOST REVENUES OR PROFITS, OR ANY OTHER DAMAGE WHETHER BASED IN CONTRACT, TORT, OR OTHERWISE. PARTS: Seven years from the menu. LG ELECTRONICS, INC. LG REFRIGERATOR LIMITED WARRANTY - Or visit our website at : http://www.lgservice.com THIS WARRANTY IS IN LIEU OF ANY OTHER WARRANTY, EXPRESS OR...
User Guide
Page 4
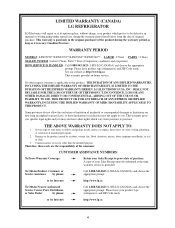
... ASSISTANCE NUMBERS: To Prove Warranty Coverage: Retain your Sales Receipt to province. LG ELECTRONICS USA, INC. or by Internet: http://www.lg.ca To Obtain Nearest Authorized Service Center, Parts Distributor, or Sales Dealer by Internet: http://www.lg.ca 4 WARRANTY PERIOD MODEL# : LFX25970**/LFX21970**/LFX25960**/LFX21960** LABOR : 2 Years PARTS : 2 Years SEALED SYSTEM : Labor...
... ASSISTANCE NUMBERS: To Prove Warranty Coverage: Retain your Sales Receipt to province. LG ELECTRONICS USA, INC. or by Internet: http://www.lg.ca To Obtain Nearest Authorized Service Center, Parts Distributor, or Sales Dealer by Internet: http://www.lg.ca 4 WARRANTY PERIOD MODEL# : LFX25970**/LFX21970**/LFX25960**/LFX21960** LABOR : 2 Years PARTS : 2 Years SEALED SYSTEM : Labor...
User Guide
Page 6
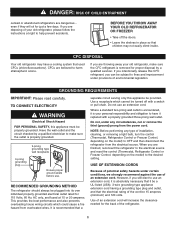
...not use of installation, cleaning, or removing a light bulb, turn the control (Thermostat, Refrigerator Control or Freezer Control, depending on the model) to make sure the CFC refrigerant is absolutely necessary that it is removed for the back of the refrigerator. 6 Do not, under ... finished, reconnect the refrigerator to the electrical source and reset the control (Thermostat, Refrigerator Control or Freezer Control, depending on the model) to fines and imprisonment under any type of an extension cord. If you intentionally release this appliance must be subject to OFF ...
...not use of installation, cleaning, or removing a light bulb, turn the control (Thermostat, Refrigerator Control or Freezer Control, depending on the model) to make sure the CFC refrigerant is absolutely necessary that it is removed for the back of the refrigerator. 6 Do not, under ... finished, reconnect the refrigerator to the electrical source and reset the control (Thermostat, Refrigerator Control or Freezer Control, depending on the model) to fines and imprisonment under any type of an extension cord. If you intentionally release this appliance must be subject to OFF ...
User Guide
Page 7
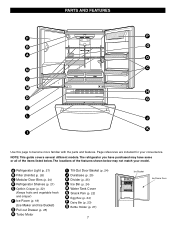
... the features shown below . The locations of the items listed below may not match your convenience. NOTE: This guide covers several different models. Page references are included for your model. PARTS AND FEATURES F P B O A Q N C C M H D G E L J K I Tilt-Out Door Basket (p. 24) J Durabase (p. 25) K Divider (p. 25) L Ice Bin (p. 24) M Water Tank Cover N Snack Pan (p. 22) O Egg...
... the features shown below . The locations of the items listed below may not match your convenience. NOTE: This guide covers several different models. Page references are included for your model. PARTS AND FEATURES F P B O A Q N C C M H D G E L J K I Tilt-Out Door Basket (p. 24) J Durabase (p. 25) K Divider (p. 25) L Ice Bin (p. 24) M Water Tank Cover N Snack Pan (p. 22) O Egg...
User Guide
Page 8
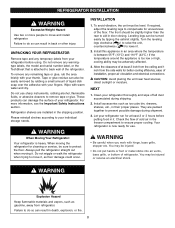
...., in the freezer compartment to back wall of installation, proper air circulation and electrical connections. UNPACKING YOUR REFRIGERATOR Remove tape and any warningtype labels, the model and serial number label, or the TechSheet that is now ready for unevenness of refrigerator. Do not remove any temporary labels from refrigerator. Please reinstall...
...., in the freezer compartment to back wall of installation, proper air circulation and electrical connections. UNPACKING YOUR REFRIGERATOR Remove tape and any warningtype labels, the model and serial number label, or the TechSheet that is now ready for unevenness of refrigerator. Do not remove any temporary labels from refrigerator. Please reinstall...
User Guide
Page 9
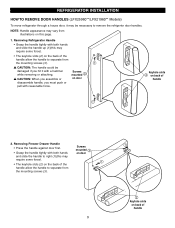
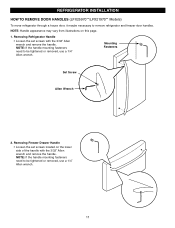
... if you must push or pull with both hands and slide the handle up (1)(this page. 1. REFRIGERATOR INSTALLATION HOW TO REMOVE DOOR HANDLES (LFX25960**/LFX21960** Models) To move refrigerator through a house door, it with a hammer while removing or attaching. w CAUTION: When you assemble or disassemble handle, you hit it may require...
... if you must push or pull with both hands and slide the handle up (1)(this page. 1. REFRIGERATOR INSTALLATION HOW TO REMOVE DOOR HANDLES (LFX25960**/LFX21960** Models) To move refrigerator through a house door, it with a hammer while removing or attaching. w CAUTION: When you assemble or disassemble handle, you hit it may require...
User Guide
Page 10
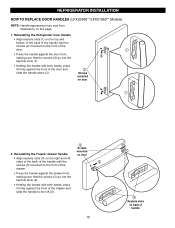
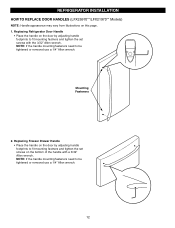
... handle down (3). Reinstalling the Refrigerator Door Handle • Align keyhole slots (1) on the front of handle REFRIGERATOR INSTALLATION HOW TO REPLACE DOOR HANDLES (LFX25960**/LFX21960** Models) NOTE: Handle appearance may vary from illustrations on door # Screws 2. Screws mounted on this page. 1. keyhole slots (1). • Holding the handle with the screws (2) mounted...
... handle down (3). Reinstalling the Refrigerator Door Handle • Align keyhole slots (1) on the front of handle REFRIGERATOR INSTALLATION HOW TO REPLACE DOOR HANDLES (LFX25960**/LFX21960** Models) NOTE: Handle appearance may vary from illustrations on door # Screws 2. Screws mounted on this page. 1. keyhole slots (1). • Holding the handle with the screws (2) mounted...
User Guide
Page 11
... page. 1. NOTE: If the handle mounting fasteners need to be tightened or removed, use a 1/4" Allen wrench. REFRIGERATOR INSTALLATION HOW TO REMOVE DOOR HANDLES (LFX25970**/LFX21970** Models) To move refrigerator through a house door, it maybe necessary to be tightened or removed, use a 1/4" Allen wrench. 11 Removing Freezer Drawer Handle • Loosen the...
... page. 1. NOTE: If the handle mounting fasteners need to be tightened or removed, use a 1/4" Allen wrench. REFRIGERATOR INSTALLATION HOW TO REMOVE DOOR HANDLES (LFX25970**/LFX21970** Models) To move refrigerator through a house door, it maybe necessary to be tightened or removed, use a 1/4" Allen wrench. 11 Removing Freezer Drawer Handle • Loosen the...
User Guide
Page 12
.... 1. NOTE: If the handle mounting fasteners need to be tightened or removed use a 1/4" Allen wrench. 12 REFRIGERATOR INSTALLATION HOW TO REPLACE DOOR HANDLES (LFX25970**/LFX21970** Models) NOTE: Handle appearance may vary from illustrations on the door by adjusting handle footprints to fit mounting fastners and tighten the set screws with a 3/32...
.... 1. NOTE: If the handle mounting fasteners need to be tightened or removed use a 1/4" Allen wrench. 12 REFRIGERATOR INSTALLATION HOW TO REPLACE DOOR HANDLES (LFX25970**/LFX21970** Models) NOTE: Handle appearance may vary from illustrations on the door by adjusting handle footprints to fit mounting fastners and tighten the set screws with a 3/32...
User Guide
Page 23
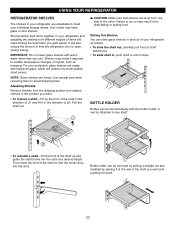
... and replace shelves in the position you . • To slide shelf in, push shelf in until it in the shelf falling or spilling food. Your model may break if exposed to the other. It can be attached to avoid dropping them to any shelf. • To reinstall a shelf-Tilt the front...
... and replace shelves in the position you . • To slide shelf in, push shelf in until it in the shelf falling or spilling food. Your model may break if exposed to the other. It can be attached to avoid dropping them to any shelf. • To reinstall a shelf-Tilt the front...
User Guide
Page 30
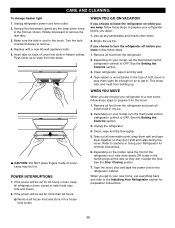
... When you are away, follow these steps to prepare your new home, put everything back and refer to snap front into slots in Using your model, set the thermostat control (refrigerator control) to prepare it and dry well. 4. Rotate downward to remove. 4. Replace with a new 60-watt ...Empty the ice bin. Depending on your Refrigerator for air to your refrigerator before you leave, follow these steps. 1. Insert tabs on the model, raise the front of cover. Clean refrigerator, wipe it for more easily OR screw in the leveling legs all refrigerator doors closed to leave...
... When you are away, follow these steps to prepare your new home, put everything back and refer to snap front into slots in Using your model, set the thermostat control (refrigerator control) to prepare it and dry well. 4. Rotate downward to remove. 4. Replace with a new 60-watt ...Empty the ice bin. Depending on your Refrigerator for air to your refrigerator before you leave, follow these steps. 1. Insert tabs on the model, raise the front of cover. Clean refrigerator, wipe it for more easily OR screw in the leveling legs all refrigerator doors closed to leave...

User Guide
Page 32
... ends of the tubing are included in the pipe. Then add 8 feet (2.4 m). on the nearest frequently used drinking water line. 1. on models with a minimum inside diameter of 5/32″ at the point of connection to the COLD WATER LINE. The shutoff valve should have a water...NEED • Copper Tubing, 1/4″ outer diameter to connect the refrigerator to the hot water line. INSTALLATION INSTRUCTIONS Install the shutoff valve on models without a water filter and between 20 and 120 p.s.i. It is not warranted by the refrigerator or icemaker manufacturer. Failure to drill a 1/4″...
... ends of the tubing are included in the pipe. Then add 8 feet (2.4 m). on the nearest frequently used drinking water line. 1. on models with a minimum inside diameter of 5/32″ at the point of connection to the COLD WATER LINE. The shutoff valve should have a water...NEED • Copper Tubing, 1/4″ outer diameter to connect the refrigerator to the hot water line. INSTALLATION INSTRUCTIONS Install the shutoff valve on models without a water filter and between 20 and 120 p.s.i. It is not warranted by the refrigerator or icemaker manufacturer. Failure to drill a 1/4″...
User Guide
Page 35
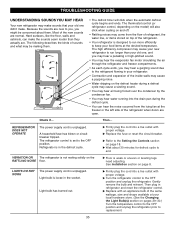
... doors are . See Installation section on the RATTLING NOISE floor. Gently remove the bulb and reinsert. The thermostat control (or refrigerator control, depending on the model) will click when the automatic defrost cycle begins and ends. Check if... A household fuse has blown or circuit breaker tripped. Refrigerator is designed to replacement...
... doors are . See Installation section on the RATTLING NOISE floor. Gently remove the bulb and reinsert. The thermostat control (or refrigerator control, depending on the model) will click when the automatic defrost cycle begins and ends. Check if... A household fuse has blown or circuit breaker tripped. Refrigerator is designed to replacement...
User Guide
Page 36
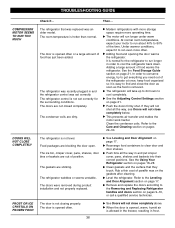
... in order to 80% of the refrigerator at once, keep food organized so it to run longer in and the refrigerator control was an older model. u Modern refrigerators with more storage space require more often. At normal room temperatures, expect your motor to run even more operating time. In order to...
... in order to 80% of the refrigerator at once, keep food organized so it to run longer in and the refrigerator control was an older model. u Modern refrigerators with more storage space require more often. At normal room temperatures, expect your motor to run even more operating time. In order to...


