User Guide
Page 2
TABLE OF CONTENTS English Version 2 Crisper Humidity Control 24 Spanish Version 40 Removing Crisper 24 French Version 78 Warranty (U.S.A.) 3 Warranty (CANADA) 4 Safety Instructions 5-6 Grounding Requirements 6 Parts And Features 7 Refrigerator Installation 8-17 Unpacking Your Refrigerator 8 Installation 8 Removing And Replacing Your Refrigerator Handles And Doors 9-16 Leveling And Door Alignment 17 Base Cover 17 Using Your Refrigerator 18-28 Setting The Controls 18 Ensuring Proper Air Circulation 19 Diagnosis (Failure Detection) Function 19 How To Use A ...
TABLE OF CONTENTS English Version 2 Crisper Humidity Control 24 Spanish Version 40 Removing Crisper 24 French Version 78 Warranty (U.S.A.) 3 Warranty (CANADA) 4 Safety Instructions 5-6 Grounding Requirements 6 Parts And Features 7 Refrigerator Installation 8-17 Unpacking Your Refrigerator 8 Installation 8 Removing And Replacing Your Refrigerator Handles And Doors 9-16 Leveling And Door Alignment 17 Base Cover 17 Using Your Refrigerator 18-28 Setting The Controls 18 Ensuring Proper Air Circulation 19 Diagnosis (Failure Detection) Function 19 How To Use A ...
User Guide
Page 3
...LIEU OF ANY OTHER WARRANTY, EXPRESS OR IMPLIED, INCLUDING WITHOUT LIMITATION, ANY WARRANTY OF MERCHANTABILITY OR FITNESS FOR A PARTICULAR PURPOSE. O. LG REFRIGERATOR LIMITED WARRANTY - HOW SERVICE IS HANDLED: In-Home Service (Except Model GR051): Please retain dealer's dated bill of sale or...have other than normal, single-family household use. Box 240007 201 James Record Road Huntsville, Alabama 35824 ATTN: CIC 3 USA Your LG Refrigerator will be defective in the Operating Guide, accident, vermin, fire, flood, improper installation, acts of God, unauthorized modification or ...
...LIEU OF ANY OTHER WARRANTY, EXPRESS OR IMPLIED, INCLUDING WITHOUT LIMITATION, ANY WARRANTY OF MERCHANTABILITY OR FITNESS FOR A PARTICULAR PURPOSE. O. LG REFRIGERATOR LIMITED WARRANTY - HOW SERVICE IS HANDLED: In-Home Service (Except Model GR051): Please retain dealer's dated bill of sale or...have other than normal, single-family household use. Box 240007 201 James Record Road Huntsville, Alabama 35824 ATTN: CIC 3 USA Your LG Refrigerator will be defective in the Operating Guide, accident, vermin, fire, flood, improper installation, acts of God, unauthorized modification or ...
User Guide
Page 4
...SEALED SYSTEM : Labor/ 2 Years, Parts/ 5 Years (Compressor, condenser, and evaporator) HOW SERVICE IS HANDLED : Call 1-888-542-2623 (1-888-LG-CANADA) and choose the appropriate prompt. CUSTOMER ASSISTANCE NUMBERS: To Prove Warranty Coverage: Retain your product type (refrigerator) and ZIP Code ready. THE ABOVE...OF ANY EXPRESS OR IMPLIED WARRANTY, INCLUDING THE IMPLIED WARRANTY OF MERCHANTABILITY APPLICABLE TO THIS PRODUCT. LIMITED WARRANTY (CANADA) LG REFRIGERATOR LG Electronics will repair or at its option replace, without charge, your home to deliver and pickup, install, instruct, or...
...SEALED SYSTEM : Labor/ 2 Years, Parts/ 5 Years (Compressor, condenser, and evaporator) HOW SERVICE IS HANDLED : Call 1-888-542-2623 (1-888-LG-CANADA) and choose the appropriate prompt. CUSTOMER ASSISTANCE NUMBERS: To Prove Warranty Coverage: Retain your product type (refrigerator) and ZIP Code ready. THE ABOVE...OF ANY EXPRESS OR IMPLIED WARRANTY, INCLUDING THE IMPLIED WARRANTY OF MERCHANTABILITY APPLICABLE TO THIS PRODUCT. LIMITED WARRANTY (CANADA) LG REFRIGERATOR LG Electronics will repair or at its option replace, without charge, your home to deliver and pickup, install, instruct, or...

User Guide
Page 5
These words mean: DANGER You will identify the hazard, tell you don't follow instructions. WARNING You can . • Do not modify or extend the power cord length. All safety messages will be killed or seriously injured if you don't follow instructions. Do not use gasoline or other appliance. • DO NOT allow children to reduce the chance of injury, and tell you what can kill or hurt you of it straight out from the wall, be followed, including the following. Be careful closing doors when children are in the area. • Unplug your refrigerator before using your ...
These words mean: DANGER You will identify the hazard, tell you don't follow instructions. WARNING You can . • Do not modify or extend the power cord length. All safety messages will be killed or seriously injured if you don't follow instructions. Do not use gasoline or other appliance. • DO NOT allow children to reduce the chance of injury, and tell you what can kill or hurt you of it straight out from the wall, be followed, including the following. Be careful closing doors when children are in the area. • Unplug your refrigerator before using your ...
User Guide
Page 6
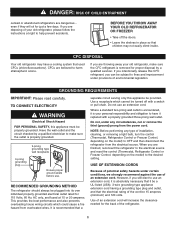
TO CONNECT ELECTRICITY WARNING Electrical Shock Hazard FOR PERSONAL SAFETY, this CFC refrigerant, you are throwing away your old refrigerator, make sure the outlet is properly grounded. 3-prong grounding type wall receptacle 3-prong grounding plug Ensure proper ground exists before use an extension cord. NOTE: Before performing any circumstances, cut or remove the third (ground) prong from the power cord. Use of the refrigerator. 6 even if they will increase the clearance needed for the back of an extension cord will sit for just a few days. CFC DISPOSAL Your old ...
TO CONNECT ELECTRICITY WARNING Electrical Shock Hazard FOR PERSONAL SAFETY, this CFC refrigerant, you are throwing away your old refrigerator, make sure the outlet is properly grounded. 3-prong grounding type wall receptacle 3-prong grounding plug Ensure proper ground exists before use an extension cord. NOTE: Before performing any circumstances, cut or remove the third (ground) prong from the power cord. Use of the refrigerator. 6 even if they will increase the clearance needed for the back of an extension cord will sit for just a few days. CFC DISPOSAL Your old ...
User Guide
Page 7
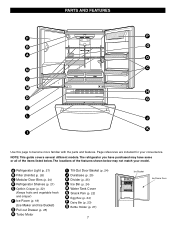
The locations of the items listed below may not match your convenience. The refrigerator you have purchased may have some or all of the features shown below . PARTS AND FEATURES F P B O A Q N C C M H D G E L J K I Tilt-Out Door Basket (p. 24) J Durabase (p. 25) K Divider (p. 25) L Ice Bin (p. 24) M Water Tank Cover N Snack Pan (p. 22) O Egg Box (p. 24) P Dairy Bin (p. 23) Q Bottle Holder (p. 21) 7 Ice Bucket Ice Room Door A Refrigerator Light (p. 27) B Filter (Inside) (p. 26) C Modular Door Bins (p. 24) D Refrigerator Shelves (p. 21) E Optibin Crisper (p. 22) (Keeps ...
The locations of the items listed below may not match your convenience. The refrigerator you have purchased may have some or all of the features shown below . PARTS AND FEATURES F P B O A Q N C C M H D G E L J K I Tilt-Out Door Basket (p. 24) J Durabase (p. 25) K Divider (p. 25) L Ice Bin (p. 24) M Water Tank Cover N Snack Pan (p. 22) O Egg Box (p. 24) P Dairy Bin (p. 23) Q Bottle Holder (p. 21) 7 Ice Bucket Ice Room Door A Refrigerator Light (p. 27) B Filter (Inside) (p. 26) C Modular Door Bins (p. 24) D Refrigerator Shelves (p. 21) E Optibin Crisper (p. 22) (Keeps ...
User Guide
Page 8
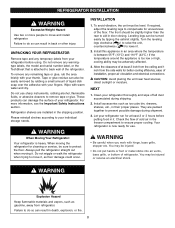
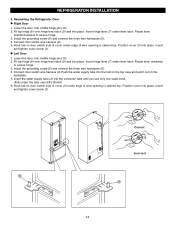
To remove any remaining tape or glue, rub the area briskly with your fingers. These products can damage the surface of at least 2 or 3 hours before using. INSTALLATION 1. The front should be level. Turn the leveling legs clockwise ( ) to raise the unit, counterclockwise ( ) to do so can also be injured or receive an electrical shock. w CAUTION: Avoid placing the unit near heat sources, direct sunlight or moisture. Clean your refrigerator before putting food in back or other injury. w WARNING • Be careful when you work with warm water and dry. Failure to lower it. 2....
To remove any remaining tape or glue, rub the area briskly with your fingers. These products can damage the surface of at least 2 or 3 hours before using. INSTALLATION 1. The front should be level. Turn the leveling legs clockwise ( ) to raise the unit, counterclockwise ( ) to do so can also be injured or receive an electrical shock. w CAUTION: Avoid placing the unit near heat sources, direct sunlight or moisture. Clean your refrigerator before putting food in back or other injury. w WARNING • Be careful when you work with warm water and dry. Failure to lower it. 2....
User Guide
Page 9
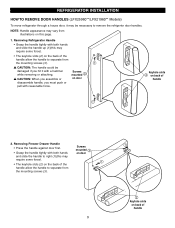
Removing Refrigerator Handle • Grasp the handle tightly with both hands and slide the handle up (1)(this may require some force). • The keyhole slots (2) on back of the handle allow the handle to remove the refrigertor door handles. REFRIGERATOR INSTALLATION HOW TO REMOVE DOOR HANDLES (LFX25960**/LFX21960** Models) To move refrigerator through a house door, it with reasonable force. Screws mounted ! NOTE: Handle appearance may vary from illustrations on the back of handle 9 Screws mounted ! • Grasp the handle tightly with both hands on ...
Removing Refrigerator Handle • Grasp the handle tightly with both hands and slide the handle up (1)(this may require some force). • The keyhole slots (2) on back of the handle allow the handle to remove the refrigertor door handles. REFRIGERATOR INSTALLATION HOW TO REMOVE DOOR HANDLES (LFX25960**/LFX21960** Models) To move refrigerator through a house door, it with reasonable force. Screws mounted ! NOTE: Handle appearance may vary from illustrations on the back of handle 9 Screws mounted ! • Grasp the handle tightly with both hands on ...
User Guide
Page 10
Reinstalling the Refrigerator Door Handle • Align keyhole slots (1) on the top and bottom of the back of the handle with the screws (2) mounted on the front of the door. • Press the handle against the door front, making sure that the screws (2) go into the ! Reinstalling the Freezer Drawer Handle mounted on door • Align keyhole slots (4) on the right and left (6). 10 $ " Keyhole slots on the front of the drawer. • Press the handle against the front of handle REFRIGERATOR INSTALLATION HOW TO REPLACE DOOR HANDLES (LFX25960**/LFX21960** Models) ...
Reinstalling the Refrigerator Door Handle • Align keyhole slots (1) on the top and bottom of the back of the handle with the screws (2) mounted on the front of the door. • Press the handle against the door front, making sure that the screws (2) go into the ! Reinstalling the Freezer Drawer Handle mounted on door • Align keyhole slots (4) on the right and left (6). 10 $ " Keyhole slots on the front of the drawer. • Press the handle against the front of handle REFRIGERATOR INSTALLATION HOW TO REPLACE DOOR HANDLES (LFX25960**/LFX21960** Models) ...
User Guide
Page 11
NOTE: Handle appearance may vary from illustrations on the lower side of the handle with the 3/32" Allen wrench and remove the handle. Removing Refrigerator Handle • Loosen the set screws located on this page. 1. Removing Freezer Drawer Handle • Loosen the set screws with the 3/32" Allen wrench and remove the handle. NOTE: If the handle mounting fasteners need to be tightened or removed, use a 1/4" Allen wrench. 11 REFRIGERATOR INSTALLATION HOW TO REMOVE DOOR HANDLES (LFX25970**/LFX21970** Models) To move refrigerator through a house door, it maybe necessary to be...
NOTE: Handle appearance may vary from illustrations on the lower side of the handle with the 3/32" Allen wrench and remove the handle. Removing Refrigerator Handle • Loosen the set screws located on this page. 1. Removing Freezer Drawer Handle • Loosen the set screws with the 3/32" Allen wrench and remove the handle. NOTE: If the handle mounting fasteners need to be tightened or removed, use a 1/4" Allen wrench. 11 REFRIGERATOR INSTALLATION HOW TO REMOVE DOOR HANDLES (LFX25970**/LFX21970** Models) To move refrigerator through a house door, it maybe necessary to be...
User Guide
Page 12
Replacing Freezer Drawer Handle • Place the handle on the door by adjusting handle footprints to be tightened or removed use a 1/4" Allen wrench. 12 Mounting Fasteners 2. NOTE: If the handle mounting fasteners need to fit mounting fastners and tighten the set screws on this page. 1. Replacing Refrigerator Door Handle • Place the handle on the door by adjusting handle footprints to be tightened or removed use a 1/4" Allen wrench. REFRIGERATOR INSTALLATION HOW TO REPLACE DOOR HANDLES (LFX25970**/LFX21970** Models) NOTE: Handle appearance may vary from ...
Replacing Freezer Drawer Handle • Place the handle on the door by adjusting handle footprints to be tightened or removed use a 1/4" Allen wrench. 12 Mounting Fasteners 2. NOTE: If the handle mounting fasteners need to fit mounting fastners and tighten the set screws on this page. 1. Replacing Refrigerator Door Handle • Place the handle on the door by adjusting handle footprints to be tightened or removed use a 1/4" Allen wrench. REFRIGERATOR INSTALLATION HOW TO REPLACE DOOR HANDLES (LFX25970**/LFX21970** Models) NOTE: Handle appearance may vary from ...
User Guide
Page 13
Remove food and bins from middle hinge pin (10) and remove door. 6. Disconnect water supply tube by pushing back on front underside of cover (3). Lift up from middle hinge pin and remove door. 8. Pull out the tube. 5. Open door. Disconnect door switch wire harness (2). Use flat tip screwdriver to pry back hooks on the disconnect ring (4). - Disconnect door switch wire harness (2). Remove cover. 4. Rotate hinge lever (7) counterclockwise and remove. Place door, inside facing up from doors. Loosen top hinge cover screw (1). Rotate hinge lever (7) clockwise and ...
Remove food and bins from middle hinge pin (10) and remove door. 6. Disconnect water supply tube by pushing back on front underside of cover (3). Lift up from middle hinge pin and remove door. 8. Pull out the tube. 5. Open door. Disconnect door switch wire harness (2). Use flat tip screwdriver to pry back hooks on the disconnect ring (4). - Disconnect door switch wire harness (2). Remove cover. 4. Rotate hinge lever (7) counterclockwise and remove. Place door, inside facing up from doors. Loosen top hinge cover screw (1). Rotate hinge lever (7) clockwise and ...
User Guide
Page 14
Reinsalling the Refrigerator Door u Right Door 1. Install the grounding screw (6) and connect the three wire harnesses (5). 4. Position cover (3) into place. Insert and tighten cover screw (1). Lower the door onto middle hinge pin (10). 2. Hook tab on door switch side of cover (3) under edge of wire opening in cabinet top. Insert hinge lever (7) under lever latch. Insert and tighten cover screw (1). Fit top hinge (8) over hinge lever latch (9) and into place. Rotate lever counterclockwise to secure hinge. 3. u Left Door 1. Correct Incorrect 14 Fit ...
Reinsalling the Refrigerator Door u Right Door 1. Install the grounding screw (6) and connect the three wire harnesses (5). 4. Position cover (3) into place. Insert and tighten cover screw (1). Lower the door onto middle hinge pin (10). 2. Hook tab on door switch side of cover (3) under edge of wire opening in cabinet top. Insert hinge lever (7) under lever latch. Insert and tighten cover screw (1). Fit top hinge (8) over hinge lever latch (9) and into place. Rotate lever counterclockwise to secure hinge. 3. u Left Door 1. Correct Incorrect 14 Fit ...
User Guide
Page 15
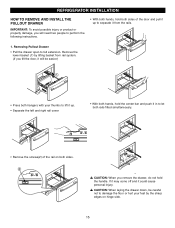
Removing Pullout Drawer • Pull the drawer open to perform the following instructions. • With both hands, hold the handle. REFRIGERATOR INSTALLATION HOW TO REMOVE AND INSTALL THE PULLOUT DRAWER IMPORTANT: To avoid possible injury or product or property damage, you will be careful not to damage the floor or hurt your thumbs to lift it up to separate it from rail system. (If you remove the drawer, do not hold both sides. w CAUTION: When laying the drawer down, be easier.) • Press both hangers with your feet by lifting basket from the rails. 1. ...
Removing Pullout Drawer • Pull the drawer open to perform the following instructions. • With both hands, hold the handle. REFRIGERATOR INSTALLATION HOW TO REMOVE AND INSTALL THE PULLOUT DRAWER IMPORTANT: To avoid possible injury or product or property damage, you will be careful not to damage the floor or hurt your thumbs to lift it up to separate it from rail system. (If you remove the drawer, do not hold both sides. w CAUTION: When laying the drawer down, be easier.) • Press both hangers with your feet by lifting basket from the rails. 1. ...
User Guide
Page 16
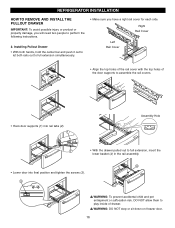
Right Rail Cover Left Rail Cover • Align the top holes of the rail cover with the top holes of drawer. Installing Pullout Drawer • With both hands, hold the center bar and push it out to let both rails out to full extension, insert the lower basket (4) in the rail assembly. " • Lower door into rail tabs (2). Assembly Hole • With the drawer pulled out to full extension simultaneously. • Make sure you will need two people to play inside of the door supports to assemble the rail covers. • Hook door supports (1) into final position and ...
Right Rail Cover Left Rail Cover • Align the top holes of the rail cover with the top holes of drawer. Installing Pullout Drawer • With both hands, hold the center bar and push it out to let both rails out to full extension, insert the lower basket (4) in the rail assembly. " • Lower door into rail tabs (2). Assembly Hole • With the drawer pulled out to full extension simultaneously. • Make sure you will need two people to play inside of the door supports to assemble the rail covers. • Hook door supports (1) into final position and ...
User Guide
Page 17
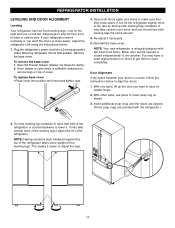
Open both doors again and check to make sure that side of cover. You may take several turns of the leveling leg to align the doors: 1. Door Alignment If the space between your refrigerator seems unsteady or you want the doors to the rear by turning both leveling legs the same amount. 4. With other hand, use pliers to -side. It may have to exert slight pressure on doors to get them to adjust the legs. 17 This makes it . REFRIGERATOR INSTALLATION LEVELING AND DOOR ALIGNMENT Leveling Your refrigerator has two front leveling legs-one on the right and one another. Move ...
Open both doors again and check to make sure that side of cover. You may take several turns of the leveling leg to align the doors: 1. Door Alignment If the space between your refrigerator seems unsteady or you want the doors to the rear by turning both leveling legs the same amount. 4. With other hand, use pliers to -side. It may have to exert slight pressure on doors to get them to adjust the legs. 17 This makes it . REFRIGERATOR INSTALLATION LEVELING AND DOOR ALIGNMENT Leveling Your refrigerator has two front leveling legs-one on the right and one another. Move ...
User Guide
Page 18
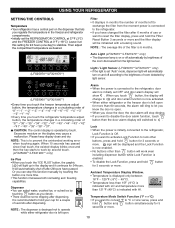
USING YOUR REFRIGERATOR SETTING THE CONTROLS Temperature • Your refrigerator has a control pad on the display may cause a malfunction. Excessive moisture on the dispenser that lets you touch button, the display will change to and door alram function is now activated. • When either refrigerator door is enabled. • To disable the Lock Function, press and hold button and button simultaneously for 24hours. NOTE: This is initially set OFF and door alarm display will show . Alarm • When the power is connected to the refrigerator, door alarm is ...
USING YOUR REFRIGERATOR SETTING THE CONTROLS Temperature • Your refrigerator has a control pad on the display may cause a malfunction. Excessive moisture on the dispenser that lets you touch button, the display will change to and door alram function is now activated. • When either refrigerator door is enabled. • To disable the Lock Function, press and hold button and button simultaneously for 24hours. NOTE: This is initially set OFF and door alarm display will show . Alarm • When the power is connected to the refrigerator, door alarm is ...
User Guide
Page 19
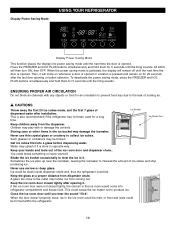
Press the FREEZER and ICE PLUS buttons simultaneously and hold them for 5 seconds until the Ding sounds. Then, it . Storing cans or other items in the ice room would come on whenever a door is opened or a button is opened . Never use narrow or deep glass. You could be formed within the refrigerator. 19 Ice could be broken. Display Power Saving Mode USING YOUR REFRIGERATOR Display Power Saving Mode This function places the display into power saving mode until the next time the door is pressed and remain on for a long time. ENSURING PROPER AIR CIRCULATION Do not ...
Press the FREEZER and ICE PLUS buttons simultaneously and hold them for 5 seconds until the Ding sounds. Then, it . Storing cans or other items in the ice room would come on whenever a door is opened or a button is opened . Never use narrow or deep glass. You could be formed within the refrigerator. 19 Ice could be broken. Display Power Saving Mode USING YOUR REFRIGERATOR Display Power Saving Mode This function places the display into power saving mode until the next time the door is pressed and remain on for a long time. ENSURING PROPER AIR CIRCULATION Do not ...
User Guide
Page 20
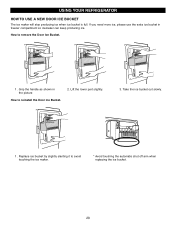
Lift the lower part slightly. 3. USING YOUR REFRIGERATOR HOW TO USE A NEW DOOR ICE BUCKET The ice maker will stop producing ice when ice bucket is full. If you need more ice, please use the extra ice bucket in the picture How to remove the Door Ice Bucket. 1 . Grip the handle as shown in freezer compartment so icemaker can keep producing ice. How to reinstall the Door Ice Bucket. 2. Take the ice bucket out slowly. 1 . Replace ice bucket by slightly slanting it to avoid touching the ice maker. * Avoid touching the automatic shut off arm when replacing the ice bucket. 20
Lift the lower part slightly. 3. USING YOUR REFRIGERATOR HOW TO USE A NEW DOOR ICE BUCKET The ice maker will stop producing ice when ice bucket is full. If you need more ice, please use the extra ice bucket in the picture How to remove the Door Ice Bucket. 1 . Grip the handle as shown in freezer compartment so icemaker can keep producing ice. How to reinstall the Door Ice Bucket. 2. Take the ice bucket out slowly. 1 . Replace ice bucket by slightly slanting it to avoid touching the ice maker. * Avoid touching the automatic shut off arm when replacing the ice bucket. 20
User Guide
Page 21
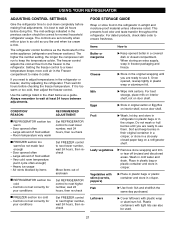
It is firm. The higher the number setting, the longer the compressor will run to keep berries in their original container in a crisper, or store in the refrigerator or freezer, start by items Set FREEZER control to next lower number, wait 24 hours, then recheck Move items out of airstream I FREEZER section too cold - Use the settings listed in the crisper. Door opened often - Large amount of food added - Controls not set correctly for normal household refrigerator usage. Fruit u Wash, let dry, and store in refrigerator in plastic bags or in the chart below as a guide. ...
It is firm. The higher the number setting, the longer the compressor will run to keep berries in their original container in a crisper, or store in the refrigerator or freezer, start by items Set FREEZER control to next lower number, wait 24 hours, then recheck Move items out of airstream I FREEZER section too cold - Use the settings listed in the crisper. Door opened often - Large amount of food added - Controls not set correctly for normal household refrigerator usage. Fruit u Wash, let dry, and store in refrigerator in plastic bags or in the chart below as a guide. ...