User Guide
Page 2
TABLE OF CONTENTS English Version 2 Crisper Humidity Control 24 Spanish Version 40 Removing Crisper 24 French Version 78 Warranty (U.S.A.) 3 Warranty (CANADA) 4 Safety Instructions 5-6 Grounding Requirements 6 Parts And Features 7 Refrigerator Installation 8-17 Unpacking Your Refrigerator 8 Installation 8 Removing And Replacing Your Refrigerator Handles And Doors 9-16 Leveling And Door Alignment 17 Base Cover 17 Using Your Refrigerator 18-28 Setting The Controls 18 Ensuring Proper Air Circulation 19 Diagnosis (Failure Detection) Function 19 How To Use A ...
TABLE OF CONTENTS English Version 2 Crisper Humidity Control 24 Spanish Version 40 Removing Crisper 24 French Version 78 Warranty (U.S.A.) 3 Warranty (CANADA) 4 Safety Instructions 5-6 Grounding Requirements 6 Parts And Features 7 Refrigerator Installation 8-17 Unpacking Your Refrigerator 8 Installation 8 Removing And Replacing Your Refrigerator Handles And Doors 9-16 Leveling And Door Alignment 17 Base Cover 17 Using Your Refrigerator 18-28 Setting The Controls 18 Ensuring Proper Air Circulation 19 Diagnosis (Failure Detection) Function 19 How To Use A ...
User Guide
Page 3
... warranty service is used in material or workmanship under these excluded circumstances shall be defective in the United States, including Alaska, Hawaii, and U.S. LG REFRIGERATOR LIMITED WARRANTY - SEALED SYSTEM (Compressor, Condenser, and Evaporator) LABOR: One Year from state to the requirements of precautions in the Operating...Dealer or Authorized Service Center location: Call 1-800-243-0000 (24 hours a day, 365 days per year.) Or visit our website at LG's option, if it proves to you. TO THE EXTENT ANY IMPLIED WARRANTY IS REQUIRED BY LAW, IT IS LIMITED IN DURATION TO THE ...
... warranty service is used in material or workmanship under these excluded circumstances shall be defective in the United States, including Alaska, Hawaii, and U.S. LG REFRIGERATOR LIMITED WARRANTY - SEALED SYSTEM (Compressor, Condenser, and Evaporator) LABOR: One Year from state to the requirements of precautions in the Operating...Dealer or Authorized Service Center location: Call 1-800-243-0000 (24 hours a day, 365 days per year.) Or visit our website at LG's option, if it proves to you. TO THE EXTENT ANY IMPLIED WARRANTY IS REQUIRED BY LAW, IT IS LIMITED IN DURATION TO THE ...
User Guide
Page 4
...an implied warranty lasts; Please have other express warranty is provided. No other rights which proves to be submitted at http://www.lg.ca This warranty provides in any Canadian Province. THE DURATION OF ANY IMPLIED WARRANTIES, INCLUDING THE IMPLIED WARRANTY OF MERCHANTABILITY, IS LIMITED... PARTS : 2 Years SEALED SYSTEM : Labor/ 2 Years, Parts/ 5 Years (Compressor, condenser, and evaporator) HOW SERVICE IS HANDLED : Call 1-888-542-2623 (1-888-LG-CANADA) and choose the appropriate prompt. SHALL NOT BE LIABLE FOR THE LOSS OF THE USE OF THE PRODUCT, INCONVIENCE, LOSS OR ANY OTHER DAMAGES...
...an implied warranty lasts; Please have other express warranty is provided. No other rights which proves to be submitted at http://www.lg.ca This warranty provides in any Canadian Province. THE DURATION OF ANY IMPLIED WARRANTIES, INCLUDING THE IMPLIED WARRANTY OF MERCHANTABILITY, IS LIMITED... PARTS : 2 Years SEALED SYSTEM : Labor/ 2 Years, Parts/ 5 Years (Compressor, condenser, and evaporator) HOW SERVICE IS HANDLED : Call 1-888-542-2623 (1-888-LG-CANADA) and choose the appropriate prompt. SHALL NOT BE LIABLE FOR THE LOSS OF THE USE OF THE PRODUCT, INCONVIENCE, LOSS OR ANY OTHER DAMAGES...

User Guide
Page 5
WARNING You can . • Do not modify or extend the power cord length. WARNING To reduce the risk of fire, electric shock, or injury to persons when using this or any food is affected less than that can happen if the instructions are necessarily small. They could damage the refrigerator and seriously injure themselves. • Keep fingers out of foods, particularly fruits, vegetables and prepared foods. The food may adhere to the extremely cold surfaces. • In refrigerators with automatic icemakers, avoid contact with the moving your refrigerator is in operation, ...
WARNING You can . • Do not modify or extend the power cord length. WARNING To reduce the risk of fire, electric shock, or injury to persons when using this or any food is affected less than that can happen if the instructions are necessarily small. They could damage the refrigerator and seriously injure themselves. • Keep fingers out of foods, particularly fruits, vegetables and prepared foods. The food may adhere to the extremely cold surfaces. • In refrigerators with automatic icemakers, avoid contact with the moving your refrigerator is in operation, ...
User Guide
Page 6
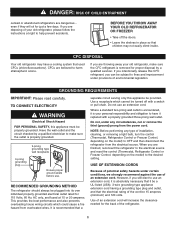
If you intentionally release this CFC refrigerant, you can be plugged into its own individual properly grounded electrical outlet rated for proper disposal by a qualified electrician to harm stratospheric ozone. RECOMMENDED GROUNDING METHOD The refrigerator should always be subject to fines and imprisonment under certain conditions, we strongly recommend against the use an extension cord, it is your personal responsibility and obligation to the desired setting. Do not, under any type of installation, cleaning, or removing a light bulb, turn the control (Thermostat, Refrigerator ...
If you intentionally release this CFC refrigerant, you can be plugged into its own individual properly grounded electrical outlet rated for proper disposal by a qualified electrician to harm stratospheric ozone. RECOMMENDED GROUNDING METHOD The refrigerator should always be subject to fines and imprisonment under certain conditions, we strongly recommend against the use an extension cord, it is your personal responsibility and obligation to the desired setting. Do not, under any type of installation, cleaning, or removing a light bulb, turn the control (Thermostat, Refrigerator ...
User Guide
Page 7
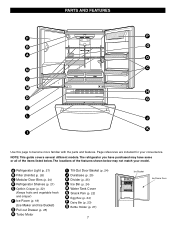
The locations of the items listed below may not match your convenience. NOTE: This guide covers several different models. The refrigerator you have purchased may have some or all of the features shown below . A Refrigerator Light (p. 27) B Filter (Inside) (p. 26) C Modular Door Bins (p. 24) D Refrigerator Shelves (p. 21) E Optibin Crisper (p. 22) (Keeps fruits and vegetable fresh and crisper) F Ice Room (p. 18) (Ice Maker and Ice Bucket) G Pull out Drawer (p. 25) H Turbo Motor I Use this page to become more familiar with the parts and features. Page references are included ...
The locations of the items listed below may not match your convenience. NOTE: This guide covers several different models. The refrigerator you have purchased may have some or all of the features shown below . A Refrigerator Light (p. 27) B Filter (Inside) (p. 26) C Modular Door Bins (p. 24) D Refrigerator Shelves (p. 21) E Optibin Crisper (p. 22) (Keeps fruits and vegetable fresh and crisper) F Ice Room (p. 18) (Ice Maker and Ice Bucket) G Pull out Drawer (p. 25) H Turbo Motor I Use this page to become more familiar with the parts and features. Page references are included ...
User Guide
Page 8
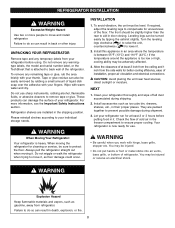
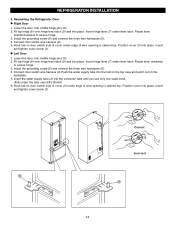
Do not use . Always pull the refrigerator straight out when moving the refrigerator for cleaning or service, be turned easily by rubbing a small amount of at least 2 or 3 hours before using. Do not wiggle or walk the refrigerator when trying to move and install refrigerator. w CAUTION: Avoid placing the unit near heat sources, direct sunlight or moisture. NEXT 1. Your refrigerator is heavy. WARNING Explosion Hazard Keep flammable materials and vapors, such as floor damage could occur. These products can damage the surface of refrigerator. Refrigerator shelves ...
Do not use . Always pull the refrigerator straight out when moving the refrigerator for cleaning or service, be turned easily by rubbing a small amount of at least 2 or 3 hours before using. Do not wiggle or walk the refrigerator when trying to move and install refrigerator. w CAUTION: Avoid placing the unit near heat sources, direct sunlight or moisture. NEXT 1. Your refrigerator is heavy. WARNING Explosion Hazard Keep flammable materials and vapors, such as floor damage could occur. These products can damage the surface of refrigerator. Refrigerator shelves ...
User Guide
Page 9
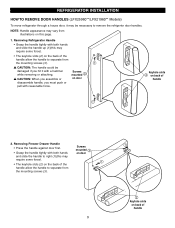
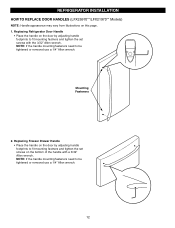
w CAUTION: When you assemble or disassemble handle, you hit it may require some force). • The keyhole slots (2) on this page. 1. on door Keyhole slots on back of handle 9 Keyhole slots on back of the handle allow the handle to separate from the mounting screws (3). w CAUTION: The handle could be damaged if you must push or pull with both hands on door and slide the handle to right (1)(this may require some force). • The keyhole slots (2) on the back of the handle allow the handle to remove the refrigertor door handles. Removing Refrigerator ...
w CAUTION: When you assemble or disassemble handle, you hit it may require some force). • The keyhole slots (2) on this page. 1. on door Keyhole slots on back of handle 9 Keyhole slots on back of the handle allow the handle to separate from the mounting screws (3). w CAUTION: The handle could be damaged if you must push or pull with both hands on door and slide the handle to right (1)(this may require some force). • The keyhole slots (2) on the back of the handle allow the handle to remove the refrigertor door handles. Removing Refrigerator ...
User Guide
Page 10
keyhole slots (1). • Holding the handle with both hands, press it firmly against the front of the drawer and slide the handle to the left sides of the back of the handle with the $ screws (5) mounted on the front of the drawer. • Press the handle against the drawer front, making sure that the screws (5) go into the keyhole slots (4). • Holding the handle with the screws (2) mounted on door # Screws 2. Reinstalling the Freezer Drawer Handle mounted on door • Align keyhole slots (4) on the right and left (6). 10 $ " Keyhole slots on this page....
keyhole slots (1). • Holding the handle with both hands, press it firmly against the front of the drawer and slide the handle to the left sides of the back of the handle with the $ screws (5) mounted on the front of the drawer. • Press the handle against the drawer front, making sure that the screws (5) go into the keyhole slots (4). • Holding the handle with the screws (2) mounted on door # Screws 2. Reinstalling the Freezer Drawer Handle mounted on door • Align keyhole slots (4) on the right and left (6). 10 $ " Keyhole slots on this page....
User Guide
Page 11
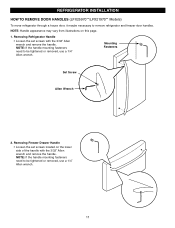
Removing Freezer Drawer Handle • Loosen the set screws with the 3/32" Allen wrench and remove the handle. NOTE: If the handle mounting fasteners need to be tightened or removed, use a 1/4" Allen wrench. 11 Mounting Fasteners Set Screw Allen Wrench 2. NOTE: If the handle mounting fasteners need to remove refrigerator and freezer door handles. Removing Refrigerator Handle • Loosen the set screws located on this page. 1. REFRIGERATOR INSTALLATION HOW TO REMOVE DOOR HANDLES (LFX25970**/LFX21970** Models) To move refrigerator through a house door, it maybe ...
Removing Freezer Drawer Handle • Loosen the set screws with the 3/32" Allen wrench and remove the handle. NOTE: If the handle mounting fasteners need to be tightened or removed, use a 1/4" Allen wrench. 11 Mounting Fasteners Set Screw Allen Wrench 2. NOTE: If the handle mounting fasteners need to remove refrigerator and freezer door handles. Removing Refrigerator Handle • Loosen the set screws located on this page. 1. REFRIGERATOR INSTALLATION HOW TO REMOVE DOOR HANDLES (LFX25970**/LFX21970** Models) To move refrigerator through a house door, it maybe ...
User Guide
Page 12
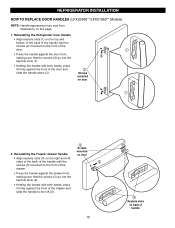
Replacing Freezer Drawer Handle • Place the handle on the door by adjusting handle footprints to fit mounting fastners and tighten the set screws on the bottom of the handle with the 3/32" Allen wrench. NOTE: If the handle mounting fasteners need to be tightened or removed use a 1/4" Allen wrench. Mounting Fasteners 2. NOTE: If the handle mounting fasteners need to be tightened or removed use a 1/4" Allen wrench. 12 Replacing Refrigerator Door Handle • Place the handle on this page. 1. REFRIGERATOR INSTALLATION HOW TO REPLACE DOOR HANDLES (LFX25970**/LFX21970** ...
Replacing Freezer Drawer Handle • Place the handle on the door by adjusting handle footprints to fit mounting fastners and tighten the set screws on the bottom of the handle with the 3/32" Allen wrench. NOTE: If the handle mounting fasteners need to be tightened or removed use a 1/4" Allen wrench. Mounting Fasteners 2. NOTE: If the handle mounting fasteners need to be tightened or removed use a 1/4" Allen wrench. 12 Replacing Refrigerator Door Handle • Place the handle on this page. 1. REFRIGERATOR INSTALLATION HOW TO REPLACE DOOR HANDLES (LFX25970**/LFX21970** ...
User Guide
Page 13
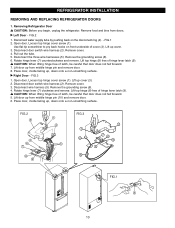
REFRIGERATOR INSTALLATION REMOVING AND REPLACING REFRIGERATOR DOORS 1. Remove food and bins from middle hinge pin and remove door. 8. Pull out the tube. 5. Rotate hinge lever (7) counterclockwise and remove. w CAUTION: When lifting hinge free of latch, be careful that door does not fall forward. 7. Lift door up , down onto a non-scratching surface. u Right Door - Disconnect door switch wire harness (2). w CAUTION: When lifting hinge free of latch, be careful that door does not fall forward. 5. Disconnect water supply tube by pushing back on front underside of ...
REFRIGERATOR INSTALLATION REMOVING AND REPLACING REFRIGERATOR DOORS 1. Remove food and bins from middle hinge pin and remove door. 8. Pull out the tube. 5. Rotate hinge lever (7) counterclockwise and remove. w CAUTION: When lifting hinge free of latch, be careful that door does not fall forward. 7. Lift door up , down onto a non-scratching surface. u Right Door - Disconnect door switch wire harness (2). w CAUTION: When lifting hinge free of latch, be careful that door does not fall forward. 5. Disconnect water supply tube by pushing back on front underside of ...
User Guide
Page 14
Reinsalling the Refrigerator Door u Right Door 1. Lower the door onto middle hinge pin (10). 2. Hook tab on door switch side of cover under edge of wire opening in cabinet top. Position cover (3) into place. u Left Door 1. Connect door switch wire harness (2). 5. Fit top hinge (8) over 5/8"(15mm)). 6. Install the grounding screw (6) and connect the three wire harnesses (5). 4. Rotate lever clockwise to secure hinge. 3. Connect door switch wire harness (2).Push the water supply tube into the hall on the top case and pull it out on door switch side of cover (3) under...
Reinsalling the Refrigerator Door u Right Door 1. Lower the door onto middle hinge pin (10). 2. Hook tab on door switch side of cover under edge of wire opening in cabinet top. Position cover (3) into place. u Left Door 1. Connect door switch wire harness (2). 5. Fit top hinge (8) over 5/8"(15mm)). 6. Install the grounding screw (6) and connect the three wire harnesses (5). 4. Rotate lever clockwise to secure hinge. 3. Connect door switch wire harness (2).Push the water supply tube into the hall on the top case and pull it out on door switch side of cover (3) under...
User Guide
Page 15
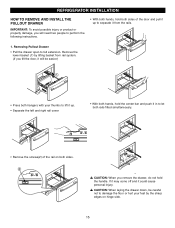
REFRIGERATOR INSTALLATION HOW TO REMOVE AND INSTALL THE PULLOUT DRAWER IMPORTANT: To avoid possible injury or product or property damage, you will need two people to perform the following instructions. • With both hands, hold both sides of the rail on hinge side. 15 Remove the lower basket (1) by the sharp edges on both rails fitted simultaneously. • Remove the screws(2) of the door and pull it up to separate it will be careful not to damage the floor or hurt your thumbs to lift it up. • Separate the left and right rail cover • With both hands, hold ...
REFRIGERATOR INSTALLATION HOW TO REMOVE AND INSTALL THE PULLOUT DRAWER IMPORTANT: To avoid possible injury or product or property damage, you will need two people to perform the following instructions. • With both hands, hold both sides of the rail on hinge side. 15 Remove the lower basket (1) by the sharp edges on both rails fitted simultaneously. • Remove the screws(2) of the door and pull it up to separate it will be careful not to damage the floor or hurt your thumbs to lift it up. • Separate the left and right rail cover • With both hands, hold ...
User Guide
Page 16
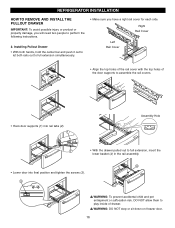
Installing Pullout Drawer • With both hands, hold the center bar and push it out to let both rails out to perform the following instructions. 2. w WARNING: To prevent accidental child and pet entrapment or suffocation risk. " • Lower door into rail tabs (2). Assembly Hole • With the drawer pulled out to full extension, insert the lower basket (4) in the rail assembly. DO NOT allow them to play inside of the door supports to assemble the rail covers. • Hook door supports (1) into final position and tighten the screws (3). ! REFRIGERATOR INSTALLATION ...
Installing Pullout Drawer • With both hands, hold the center bar and push it out to let both rails out to perform the following instructions. 2. w WARNING: To prevent accidental child and pet entrapment or suffocation risk. " • Lower door into rail tabs (2). Assembly Hole • With the drawer pulled out to full extension, insert the lower basket (4) in the rail assembly. DO NOT allow them to play inside of the door supports to assemble the rail covers. • Hook door supports (1) into final position and tighten the screws (3). ! REFRIGERATOR INSTALLATION ...
User Guide
Page 17
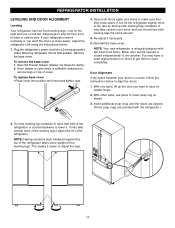
REFRIGERATOR INSTALLATION LEVELING AND DOOR ALIGNMENT Leveling Your refrigerator has two front leveling legs-one on the right and one hand, lift up the door you want the doors to make sure that side of cover. Move the refrigerator into position and insert and tighten legs. 3. Open the Freezer Drawer. (Drawer not shown for clarity.) 2. To replace base cover • Place cover into its final position. Turn the leveling leg clockwise to adjust the legs. 17 Adjust legs to alter tilt from frontto-back or side-to insert snap ring as shown. 3. If not, tilt the refrigerator ...
REFRIGERATOR INSTALLATION LEVELING AND DOOR ALIGNMENT Leveling Your refrigerator has two front leveling legs-one on the right and one hand, lift up the door you want the doors to make sure that side of cover. Move the refrigerator into position and insert and tighten legs. 3. Open the Freezer Drawer. (Drawer not shown for clarity.) 2. To replace base cover • Place cover into its final position. Turn the leveling leg clockwise to adjust the legs. 17 Adjust legs to alter tilt from frontto-back or side-to insert snap ring as shown. 3. If not, tilt the refrigerator ...
User Guide
Page 18
Then adjust the compartment temperature as you desire. • There could be some dripping after 6 months of seconds after 24hours have changed the filter after dispensing. When 10 seconds has passed since final touch, the existed display blinks once and then the key starts to work even including dispenser button while Lock Function is enabled. • To disable the Lock Function, press and hold button and button simultaneously for a couple of use or want to reset the filter display, press and hold the Filter Reset Button 3 seconds or more time. • This function ...
Then adjust the compartment temperature as you desire. • There could be some dripping after 6 months of seconds after 24hours have changed the filter after dispensing. When 10 seconds has passed since final touch, the existed display blinks once and then the key starts to work even including dispenser button while Lock Function is enabled. • To disable the Lock Function, press and hold button and button simultaneously for a couple of use or want to reset the filter display, press and hold the Filter Reset Button 3 seconds or more time. • This function ...
User Guide
Page 19
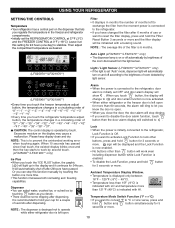
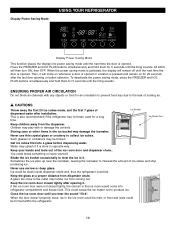
Display Power Saving Mode USING YOUR REFRIGERATOR Display Power Saving Mode This function places the display into a glass before dispensing water. Press the FREEZER and ICE PLUS buttons simultaneously and hold them for a long time. Never use narrow or deep glass. Sometimes the ice piles up near the icemaker, causing the icemaker to collect ice cubes. A glass too close , ice in the ice bucket may damage the icemaker. Close the ice room door until the Ding sounds. All LEDs will remain off until the Ding sounds. ENSURING PROPER AIR CIRCULATION Do not block air channels with ...
Display Power Saving Mode USING YOUR REFRIGERATOR Display Power Saving Mode This function places the display into a glass before dispensing water. Press the FREEZER and ICE PLUS buttons simultaneously and hold them for a long time. Never use narrow or deep glass. Sometimes the ice piles up near the icemaker, causing the icemaker to collect ice cubes. A glass too close , ice in the ice bucket may damage the icemaker. Close the ice room door until the Ding sounds. All LEDs will remain off until the Ding sounds. ENSURING PROPER AIR CIRCULATION Do not block air channels with ...
User Guide
Page 20
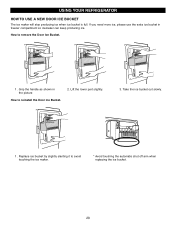
Grip the handle as shown in freezer compartment so icemaker can keep producing ice. Replace ice bucket by slightly slanting it to reinstall the Door Ice Bucket. 2. Lift the lower part slightly. 3. Take the ice bucket out slowly. 1 . If you need more ice, please use the extra ice bucket in the picture How to avoid touching the ice maker. * Avoid touching the automatic shut off arm when replacing the ice bucket. 20 USING YOUR REFRIGERATOR HOW TO USE A NEW DOOR ICE BUCKET The ice maker will stop producing ice when ice bucket is full. How to remove the Door Ice Bucket. 1 .
Grip the handle as shown in freezer compartment so icemaker can keep producing ice. Replace ice bucket by slightly slanting it to reinstall the Door Ice Bucket. 2. Lift the lower part slightly. 3. Take the ice bucket out slowly. 1 . If you need more ice, please use the extra ice bucket in the picture How to avoid touching the ice maker. * Avoid touching the automatic shut off arm when replacing the ice bucket. 20 USING YOUR REFRIGERATOR HOW TO USE A NEW DOOR ICE BUCKET The ice maker will stop producing ice when ice bucket is full. How to remove the Door Ice Bucket. 1 .
User Guide
Page 21
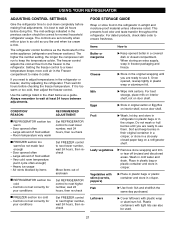
The higher the number setting, the longer the compressor will run to keep berries in their original container in a crisper, or store in the chart below as you are ready to next higher number, wait 24 hours, then re-check I REFRIGERATOR section too cold - CONDITION/ REASON: RECOMMENDED ADJUSTMENT: I FREEZER section too warm/ice not made fast enough - Room temperature very warm Set REFRIGERATOR control to Butter or margarine u Keep opened often - Door opened butter in a covered dish or closed paper bag on door shelf. Air vents blocked by adjusting the refrigerator....
The higher the number setting, the longer the compressor will run to keep berries in their original container in a crisper, or store in the chart below as you are ready to next higher number, wait 24 hours, then re-check I REFRIGERATOR section too cold - CONDITION/ REASON: RECOMMENDED ADJUSTMENT: I FREEZER section too warm/ice not made fast enough - Room temperature very warm Set REFRIGERATOR control to Butter or margarine u Keep opened often - Door opened butter in a covered dish or closed paper bag on door shelf. Air vents blocked by adjusting the refrigerator....