User Guide
Page 2
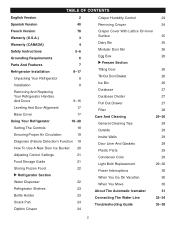
... Control 24 Spanish Version 40 Removing Crisper 24 French Version 78 Warranty (U.S.A.) 3 Warranty (CANADA) 4 Safety Instructions 5-6 Grounding Requirements 6 Parts And Features 7 Refrigerator Installation 8-17 Unpacking Your Refrigerator 8 Installation 8 Removing And Replacing Your Refrigerator Handles And Doors 9-16 Leveling And ...And Cleaning 29-30 General Cleaning Tips 29 Outside 29 Inside Walls 29 Door Liner And Gaskets 29 Plastic Parts 29 Condenser Coils 29 Light Bulb Replacement 29-30 Power Interruptions 30 When You Go On Vacation 30 When...
... Control 24 Spanish Version 40 Removing Crisper 24 French Version 78 Warranty (U.S.A.) 3 Warranty (CANADA) 4 Safety Instructions 5-6 Grounding Requirements 6 Parts And Features 7 Refrigerator Installation 8-17 Unpacking Your Refrigerator 8 Installation 8 Removing And Replacing Your Refrigerator Handles And Doors 9-16 Leveling And ...And Cleaning 29-30 General Cleaning Tips 29 Outside 29 Inside Walls 29 Door Liner And Gaskets 29 Plastic Parts 29 Condenser Coils 29 Light Bulb Replacement 29-30 Power Interruptions 30 When You Go On Vacation 30 When...
User Guide
Page 3
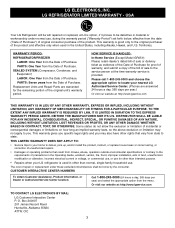
...misuse, abuse, operation outside environmental specifications or contrary to the service person at : http://www.lgservice.com TO CONTACT LG ELECTRONICS BY MAIL: LG Customer Interactive Center P. CUSTOMER INTERACTIVE CENTER NUMBERS To obtain Customer Assistance, Product Information, or Dealer or Authorized Service ... select the appropriate option from the menu. Box 240007 201 James Record Road Huntsville, Alabama 35824 ATTN: CIC 3 LG REFRIGERATOR LIMITED WARRANTY - PARTS: Seven years from the Date of the original unit's warranty period. THIS LIMITED WARRANTY DOES NOT APPLY TO: •...
...misuse, abuse, operation outside environmental specifications or contrary to the service person at : http://www.lgservice.com TO CONTACT LG ELECTRONICS BY MAIL: LG Customer Interactive Center P. CUSTOMER INTERACTIVE CENTER NUMBERS To obtain Customer Assistance, Product Information, or Dealer or Authorized Service ... select the appropriate option from the menu. Box 240007 201 James Record Road Huntsville, Alabama 35824 ATTN: CIC 3 LG REFRIGERATOR LIMITED WARRANTY - PARTS: Seven years from the Date of the original unit's warranty period. THIS LIMITED WARRANTY DOES NOT APPLY TO: •...
User Guide
Page 4
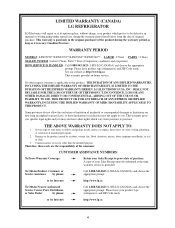
...: LFX25970**/LFX21970**/LFX25960**/LFX21960** LABOR : 2 Years PARTS : 2 Years SEALED SYSTEM : Labor/ 2 Years, Parts/ 5 Years (Compressor, condenser, and evaporator) HOW SERVICE IS HANDLED : Call 1-888-542-2623 (1-888-LG-CANADA) and choose the appropriate prompt. LG ELECTRONICS USA, INC. THE ABOVE WARRANTY DOES NOT...material or workmanship under normal use for other than the intended purpose. or by Internet: http://www.lg.ca To Obtain Nearest Authorized Service Center, Parts Distributor, or Sales Dealer by accident, vermin, fire, flood, alteration, misues, abuse, improper ...
...: LFX25970**/LFX21970**/LFX25960**/LFX21960** LABOR : 2 Years PARTS : 2 Years SEALED SYSTEM : Labor/ 2 Years, Parts/ 5 Years (Compressor, condenser, and evaporator) HOW SERVICE IS HANDLED : Call 1-888-542-2623 (1-888-LG-CANADA) and choose the appropriate prompt. LG ELECTRONICS USA, INC. THE ABOVE WARRANTY DOES NOT...material or workmanship under normal use for other than the intended purpose. or by Internet: http://www.lg.ca To Obtain Nearest Authorized Service Center, Parts Distributor, or Sales Dealer by accident, vermin, fire, flood, alteration, misues, abuse, improper ...

User Guide
Page 5
... in Home and Garden Bulletin No. 69 says: ...You may break when being replaced.) NOTE: Setting either the plug or connector end. • When moving parts of hazards that can happen if the instructions are still cold-below 40°F (4°C). ...Thawed ground meats, poultry or fish that were taped to...
... in Home and Garden Bulletin No. 69 says: ...You may break when being replaced.) NOTE: Setting either the plug or connector end. • When moving parts of hazards that can happen if the instructions are still cold-below 40°F (4°C). ...Thawed ground meats, poultry or fish that were taped to...
User Guide
Page 7
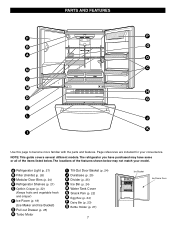
... crisper) F Ice Room (p. 18) (Ice Maker and Ice Bucket) G Pull out Drawer (p. 25) H Turbo Motor I Use this page to become more familiar with the parts and features. PARTS AND FEATURES F P B O A Q N C C M H D G E L J K I Tilt-Out Door Basket (p. 24) J Durabase (p. 25) K Divider (p. 25) L Ice Bin (p. 24) M Water Tank Cover N Snack Pan (p. 22) O Egg Box (p. 24) P Dairy...
... crisper) F Ice Room (p. 18) (Ice Maker and Ice Bucket) G Pull out Drawer (p. 25) H Turbo Motor I Use this page to become more familiar with the parts and features. PARTS AND FEATURES F P B O A Q N C C M H D G E L J K I Tilt-Out Door Basket (p. 24) J Durabase (p. 25) K Divider (p. 25) L Ice Bin (p. 24) M Water Tank Cover N Snack Pan (p. 22) O Egg Box (p. 24) P Dairy...
User Guide
Page 20
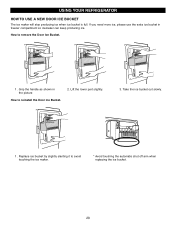
How to avoid touching the ice maker. * Avoid touching the automatic shut off arm when replacing the ice bucket. 20 If you need more ice, please use the extra ice bucket in the picture How to reinstall the Door Ice Bucket. 2. Lift the lower part slightly. 3. Replace ice bucket by slightly slanting it to remove the Door Ice Bucket. 1 . Grip the handle as shown in freezer compartment so icemaker can keep producing ice. Take the ice bucket out slowly. 1 . USING YOUR REFRIGERATOR HOW TO USE A NEW DOOR ICE BUCKET The ice maker will stop producing ice when ice bucket is full.
How to avoid touching the ice maker. * Avoid touching the automatic shut off arm when replacing the ice bucket. 20 If you need more ice, please use the extra ice bucket in the picture How to reinstall the Door Ice Bucket. 2. Lift the lower part slightly. 3. Replace ice bucket by slightly slanting it to remove the Door Ice Bucket. 1 . Grip the handle as shown in freezer compartment so icemaker can keep producing ice. Take the ice bucket out slowly. 1 . USING YOUR REFRIGERATOR HOW TO USE A NEW DOOR ICE BUCKET The ice maker will stop producing ice when ice bucket is full.
User Guide
Page 27
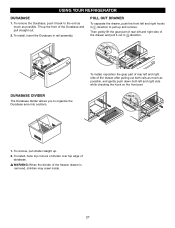
To remove the Durabase, push it out in rail assembly. Then gently lift the gear part of rear left and right side of the drawer and pull it back to the end as much as possible, and gently push down both ... and right hooks in direction to organize the Durabase area into sections. 1 32 To install, reposition the gear part of rear left and right side while checking the hook on the front part. To install, hook top corners of divider over top edge of the freezer drawer is removed, children may crawl...
To remove the Durabase, push it out in rail assembly. Then gently lift the gear part of rear left and right side of the drawer and pull it back to the end as much as possible, and gently push down both ... and right hooks in direction to organize the Durabase area into sections. 1 32 To install, reposition the gear part of rear left and right side while checking the hook on the front part. To install, hook top corners of divider over top edge of the freezer drawer is removed, children may crawl...
User Guide
Page 28
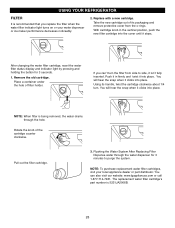
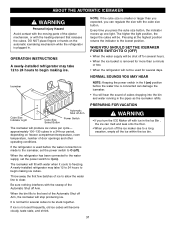
...isn't fully inserted. If you replace the filter when the water filter indicator light turns on or your local appliance dealer or part distributor. Using its packaging and remove protective cover from side to purge the system. Push it in the vertical position, push...3. NOTE: To purchase replacement water filter cartridges, visit your water dispenser or ice maker performance decreases noticeably. 2. The replacement water filter cartridge's part number is being removed, the water drains through the water dispenser for 3 seconds. 1. NOTE: When filter is 5231JA2006B. 28 Remove the old...
...isn't fully inserted. If you replace the filter when the water filter indicator light turns on or your local appliance dealer or part distributor. Using its packaging and remove protective cover from side to purge the system. Push it in the vertical position, push...3. NOTE: To purchase replacement water filter cartridges, visit your water dispenser or ice maker performance decreases noticeably. 2. The replacement water filter cartridge's part number is being removed, the water drains through the water dispenser for 3 seconds. 1. NOTE: When filter is 5231JA2006B. 28 Remove the old...
User Guide
Page 29
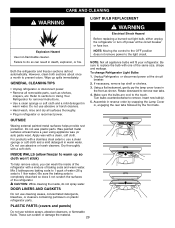
... • Use a clean sponge or soft cloth and a mild detergent in the front as shelves, crispers, etc. Do not wax plastic parts. w CAUTION: While cleaning the inside of the refrigerator with one of the refrigerator. Explosion Hazard Use non-flammable cleaner. Wipe up so cloth...wattage. Both the refrigerator and freezer sections defrost automatically. GENERAL CLEANING TIPS • Unplug refrigerator or disconnect power. • Remove all removable parts, such as shown. Do not use abrasive or harsh cleaners. • Hand wash, rinse and dry all appliance bulbs will fit your ...
... • Use a clean sponge or soft cloth and a mild detergent in the front as shelves, crispers, etc. Do not wax plastic parts. w CAUTION: While cleaning the inside of the refrigerator with one of the refrigerator. Explosion Hazard Use non-flammable cleaner. Wipe up so cloth...wattage. Both the refrigerator and freezer sections defrost automatically. GENERAL CLEANING TIPS • Unplug refrigerator or disconnect power. • Remove all removable parts, such as shown. Do not use abrasive or harsh cleaners. • Hand wash, rinse and dry all appliance bulbs will fit your ...
User Guide
Page 30
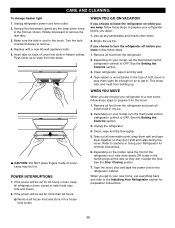
... will be out for air to get to your Refrigerator for the move . This stops odor and mold from the refrigerator. 2. Take out all removable parts, wrap them well and tape them open far enough for 24 hours or less, keep all the way so they don't shift and rattle during...
... will be out for air to get to your Refrigerator for the move . This stops odor and mold from the refrigerator. 2. Take out all removable parts, wrap them well and tape them open far enough for 24 hours or less, keep all the way so they don't shift and rattle during...
User Guide
Page 31
... the ejector mechanism, or with the heating element that releases the cubes. ABOUT THE AUTOMATIC ICEMAKER WARNING Personal Injury Hazard Avoid contact with the moving parts of ice to allow the water line to clear.
... the ejector mechanism, or with the heating element that releases the cubes. ABOUT THE AUTOMATIC ICEMAKER WARNING Personal Injury Hazard Avoid contact with the moving parts of ice to allow the water line to clear.

User Guide
Page 32
... water valve on the nearest frequently used drinking water line. 1. Follow these instructions carefully to the water supply. If you can cause damage to refrigerator parts and lead to water leakage or flooding. Do not install the icemaker tubing in a manner to prevent the hazard of electric shock, or is sufficient...
... water valve on the nearest frequently used drinking water line. 1. Follow these instructions carefully to the water supply. If you can cause damage to refrigerator parts and lead to water leakage or flooding. Do not install the icemaker tubing in a manner to prevent the hazard of electric shock, or is sufficient...


