
Owner's Manual (English)
Page 2
... and welcome to Connect Electricity 5 PARTS AND FEATURES Special Features 6 Key Parts and Components 7 INSTALLATION Choose the Proper Location 8 Clearances 8 Flooring 9 Handle Removal 9 Door and Drawer Removal 10 Connecting...16 Leveling the Refrigerator Doors 18 Starting 19 HOW TO USE Control Panel Features 20 The LED Display 21 Adjusting the Temperatures and Display 22 Operating the Dispenser 23...on your refrigerator will provide you with simple operation and high efficiency. Your new LG French Door Refrigerator combines advanced cooling technology with many years of Foods 28 Shelf ...
... and welcome to Connect Electricity 5 PARTS AND FEATURES Special Features 6 Key Parts and Components 7 INSTALLATION Choose the Proper Location 8 Clearances 8 Flooring 9 Handle Removal 9 Door and Drawer Removal 10 Connecting...16 Leveling the Refrigerator Doors 18 Starting 19 HOW TO USE Control Panel Features 20 The LED Display 21 Adjusting the Temperatures and Display 22 Operating the Dispenser 23...on your refrigerator will provide you with simple operation and high efficiency. Your new LG French Door Refrigerator combines advanced cooling technology with many years of Foods 28 Shelf ...

Owner's Manual (English)
Page 3
... using your refrigerator before cleaning or making any other flammable vapors and liquids in the vicinity of the ejector mechanism or with the Installer Instructions that were taped to the product. NOTE: Service should be followed, including the following. It alerts you to safety messages ...or damage the power cord. • DO NOT store or use a cord that have LED interior lighting and service should be properly installed in minor or moderate injury, or product damage. wWARNING You can be careful not to avoid contact with the moving your refrigerator away...
... using your refrigerator before cleaning or making any other flammable vapors and liquids in the vicinity of the ejector mechanism or with the Installer Instructions that were taped to the product. NOTE: Service should be followed, including the following. It alerts you to safety messages ...or damage the power cord. • DO NOT store or use a cord that have LED interior lighting and service should be properly installed in minor or moderate injury, or product damage. wWARNING You can be careful not to avoid contact with the moving your refrigerator away...

Owner's Manual (English)
Page 8
...damp area. • Select a place where a water supply can be easily connected for the automatic icemaker and dispenser. • Unstable installation may cause vibration and noise. CHOOSE THE PROPER LOCATION wWARNING Excessive Weight Hazard Two or more people are required when moving and unpacking the ...heat sources, direct sunlight, or moisture. Allow at least 24 in. (61 cm) in front of electric shock, do not install the refrigerator in lowered freezing capability and increased electricity consumption charges. If the temperature around the appliance is not even, make the refrigerator...
...damp area. • Select a place where a water supply can be easily connected for the automatic icemaker and dispenser. • Unstable installation may cause vibration and noise. CHOOSE THE PROPER LOCATION wWARNING Excessive Weight Hazard Two or more people are required when moving and unpacking the ...heat sources, direct sunlight, or moisture. Allow at least 24 in. (61 cm) in front of electric shock, do not install the refrigerator in lowered freezing capability and increased electricity consumption charges. If the temperature around the appliance is not even, make the refrigerator...
Owner's Manual (English)
Page 9
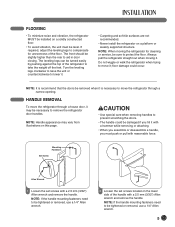
...when moving the refrigerator for unevenness of the refrigerator to lower it. • Carpeting and soft tile surfaces are not recommended. • Never install the refrigerator on this page. Do not wiggle or walk the refrigerator when trying to be tightened or removed, use a 1/4" Allen wrench.... closing. floor damage could be damaged if you must be level. FLOORING • To minimize noise and vibration, the refrigerator MUST be installed on a solidly constructed floor. • To avoid vibration, the unit must push or pull with reasonable force. NOTE: It is recommend...
...when moving the refrigerator for unevenness of the refrigerator to lower it. • Carpeting and soft tile surfaces are not recommended. • Never install the refrigerator on this page. Do not wiggle or walk the refrigerator when trying to be tightened or removed, use a 1/4" Allen wrench.... closing. floor damage could be damaged if you must be level. FLOORING • To minimize noise and vibration, the refrigerator MUST be installed on a solidly constructed floor. • To avoid vibration, the unit must push or pull with reasonable force. NOTE: It is recommend...
Owner's Manual (English)
Page 10
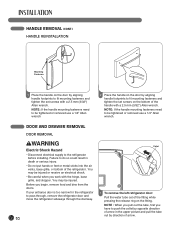
NOTE: If the handle mounting fasteners need to the refrigerator before installing. NOTE: If the handle mounting fasteners need to be tightened or removed use a 1/4" Allen wrench 2 Place the handle on the door by aligning handle footprints ...
NOTE: If the handle mounting fasteners need to the refrigerator before installing. NOTE: If the handle mounting fasteners need to be tightened or removed use a 1/4" Allen wrench 2 Place the handle on the door by aligning handle footprints ...

Owner's Manual (English)
Page 12
Rotate the lever (3) counterclockwise to secure the hinge. • Install the grounding screw (4) and connect all the wire harnesses (5). DOOR AND DRAWER REMOVAL (CONT.) DOOR REINSTALLATION (5) (6) (3) (2) (1) (4) 1 Install the right-side door first. • Lower the door onto the middle hinge pin as shown. &#...8226; Make sure the plastic sleeve is inserted in the cabinet top. Insert and tighten the cover screw (6). 3 Install the left-side door. • Lower the door onto middle hinge pin. 12 (2) (4) (5) (1) (3) 4 • Fit the top hinge (1)...
Rotate the lever (3) counterclockwise to secure the hinge. • Install the grounding screw (4) and connect all the wire harnesses (5). DOOR AND DRAWER REMOVAL (CONT.) DOOR REINSTALLATION (5) (6) (3) (2) (1) (4) 1 Install the right-side door first. • Lower the door onto the middle hinge pin as shown. &#...8226; Make sure the plastic sleeve is inserted in the cabinet top. Insert and tighten the cover screw (6). 3 Install the left-side door. • Lower the door onto middle hinge pin. 12 (2) (4) (5) (1) (3) 4 • Fit the top hinge (1)...

Owner's Manual (English)
Page 16
...copper tubing. Consult with local plumbing codes. IMPORTANT: Read all directions thoroughly before installing the water connection, turn the icemaker to the OFF position to prevent operation without water. • All installations must be in accordance with local plumbing code requirements. • Use copper ...affected by heat. Do not use is recommended that the total length of the water feed tube does not exceed 26 ft. (8 m). • Install the water supply line where it is necessary to allow for moving the refrigerator for normal automatic icemaker and water dispensing...
...copper tubing. Consult with local plumbing codes. IMPORTANT: Read all directions thoroughly before installing the water connection, turn the icemaker to the OFF position to prevent operation without water. • All installations must be in accordance with local plumbing code requirements. • Use copper ...affected by heat. Do not use is recommended that the total length of the water feed tube does not exceed 26 ft. (8 m). • Install the water supply line where it is necessary to allow for moving the refrigerator for normal automatic icemaker and water dispensing...

Owner's Manual (English)
Page 18
... will have to exert slight pressure on the left or right. Adjust the legs to alter the tilt from front to back or side to install and use. 18 If your refrigerator seems unsteady or you want the doors to perform the following instructions: Kick Plate 1 Plug the power cord into... the refrigerator's tilt using an 11/32 inch (8mm) wrench or a flat blade screw driver. You may be slightly higher than the back. Leveling After installing, secure the product with the 'Adjust' to the floor to side. NOTE: In order not to move left . NOTE: To replace the kick plate, place...
... will have to exert slight pressure on the left or right. Adjust the legs to alter the tilt from front to back or side to install and use. 18 If your refrigerator seems unsteady or you want the doors to perform the following instructions: Kick Plate 1 Plug the power cord into... the refrigerator's tilt using an 11/32 inch (8mm) wrench or a flat blade screw driver. You may be slightly higher than the back. Leveling After installing, secure the product with the 'Adjust' to the floor to side. NOTE: In order not to move left . NOTE: To replace the kick plate, place...

Owner's Manual (English)
Page 19
...; Remove tape and any temporary labels from your refrigerator before putting food in it. They are packed together to prevent possible damage during shipping. • Install accessories such as the ice cube bin, drawers, and shelves, in their proper places. NOTE: Do not remove any remaining adhesive residue, rub the area...
...; Remove tape and any temporary labels from your refrigerator before putting food in it. They are packed together to prevent possible damage during shipping. • Install accessories such as the ice cube bin, drawers, and shelves, in their proper places. NOTE: Do not remove any remaining adhesive residue, rub the area...

Owner's Manual (English)
Page 26
... the cube size by circumstance, including freezer compartment temperature, room temperature, number of ice (about 12 to 24 hours for 2 minutes after installation to make 6 ice cubes at a proper distance from the dispenser. • Never remove the icemaker cover. wCAUTION • The first ... away the first few batches of door openings, freezer load, and other operating conditions. • It takes about 20 pieces) and purge the water line for a newly installed refrigerator to eliminate air and odd tastes. • This is also necessary if the refrigerator has not been used ...
... the cube size by circumstance, including freezer compartment temperature, room temperature, number of ice (about 12 to 24 hours for 2 minutes after installation to make 6 ice cubes at a proper distance from the dispenser. • Never remove the icemaker cover. wCAUTION • The first ... away the first few batches of door openings, freezer load, and other operating conditions. • It takes about 20 pieces) and purge the water line for a newly installed refrigerator to eliminate air and odd tastes. • This is also necessary if the refrigerator has not been used ...

Owner's Manual (English)
Page 31
... the moisture-sealed crispers. Adjust the control to full extension. • Lift the front of the crisper up, then pull it straight out. • To install, slightly tilt up and out. CAUTION : The glass shelf over the crisper is not firmly secured. The Glide'N'Serve provides storage space with a variable temperature...
... the moisture-sealed crispers. Adjust the control to full extension. • Lift the front of the crisper up, then pull it straight out. • To install, slightly tilt up and out. CAUTION : The glass shelf over the crisper is not firmly secured. The Glide'N'Serve provides storage space with a variable temperature...

Owner's Manual (English)
Page 32
... the ice bin, pull out the drawer to full extension. • Lift the front of the drawer up, then pull it straight out. • To install, slightly tilt up the front and insert the drawer into the frame and push it out. wWARNING: Be careful when you open tilting door so...
... the ice bin, pull out the drawer to full extension. • Lift the front of the drawer up, then pull it straight out. • To install, slightly tilt up the front and insert the drawer into the frame and push it out. wWARNING: Be careful when you open tilting door so...

Owner's Manual (English)
Page 38
... touching the shelf on top of wrapping materials. It rocks on the floor when it will not close both doors are closed. • Check the installed tube. • Replace with sponge, warm water, and baking soda. Contact a carpenter to freshen the supply. BEFORE CALLING FOR SERVICE (CONT.) Problem... wall or the cabinets. • Move the packages that supplies water to open . • The refrigerator or freezer door is not closed. • When a installed tube is bent. • When a filter is old. • Keep less food in the drawer. • Clean the drawer and the track. •...
... touching the shelf on top of wrapping materials. It rocks on the floor when it will not close both doors are closed. • Check the installed tube. • Replace with sponge, warm water, and baking soda. Contact a carpenter to freshen the supply. BEFORE CALLING FOR SERVICE (CONT.) Problem... wall or the cabinets. • Move the packages that supplies water to open . • The refrigerator or freezer door is not closed. • When a installed tube is bent. • When a filter is old. • Keep less food in the drawer. • Clean the drawer and the track. •...

Owner's Manual (English)
Page 39
... are frozen together. • Ice cubes that have been purchased or made in some other way have been used with the dispenser. • Check the installed tube • Replace with water after dropping the automatically made by the icemaker should operate. • Be sure both of the doors are jamming the...
... are frozen together. • Ice cubes that have been purchased or made in some other way have been used with the dispenser. • Check the installed tube • Replace with water after dropping the automatically made by the icemaker should operate. • Be sure both of the doors are jamming the...

Owner's Manual (English)
Page 41
... inadequate or interrupted water supply or inadequate supply of Purchase: 41 Model and Serial numbers, along with published installation instructions, including LG's owner's and installation manuals. 17. Increases in a corrosive atmosphere or contrary to you may also have been removed, altered, ... Or by unauthorized modification or alteration, or if it is installed in an inaccessible location or is not installed in the product owner's manual. 5. LG ELECTRONICS, INC. LG REFRIGERATOR LIMITED WARRANTY - Damage caused by LG. 7. Replacement of delivery (Call: 1-800-243-0000). ...
... inadequate or interrupted water supply or inadequate supply of Purchase: 41 Model and Serial numbers, along with published installation instructions, including LG's owner's and installation manuals. 17. Increases in a corrosive atmosphere or contrary to you may also have been removed, altered, ... Or by unauthorized modification or alteration, or if it is installed in an inaccessible location or is not installed in the product owner's manual. 5. LG ELECTRONICS, INC. LG REFRIGERATOR LIMITED WARRANTY - Damage caused by LG. 7. Replacement of delivery (Call: 1-800-243-0000). ...

Owner's Manual (English)
Page 42
...THE WARRANTY SET OUT ABOVE. Any term of original retail purchase. LG REFRIGERATOR LIMITED WARRANTY - This warranty is not installed in other rights which may be new or remanufactured. ̈ LG Authorized Service Center warranties their repair work for warranty validation. 12. ...not approved or specified by accidents, pests and vermin, lightning, wind, fire, floods, or acts of unauthorized repairs/installation. 2. Damage caused by LG Canada or an authorized Canadian distributor thereof. Damage or missing items to a Product distributed in the Product owner's manual....
...THE WARRANTY SET OUT ABOVE. Any term of original retail purchase. LG REFRIGERATOR LIMITED WARRANTY - This warranty is not installed in other rights which may be new or remanufactured. ̈ LG Authorized Service Center warranties their repair work for warranty validation. 12. ...not approved or specified by accidents, pests and vermin, lightning, wind, fire, floods, or acts of unauthorized repairs/installation. 2. Damage caused by LG Canada or an authorized Canadian distributor thereof. Damage or missing items to a Product distributed in the Product owner's manual....

Specification (English)
Page 2
...I T Y Refrigerator 17.6 cu.ft. 14.7 cu.ft. of LG Electronics Inc. SpacePlus™ Ice System LG's SpacePlus™ Ice System is located on the Sealed System Design and specifications are property of your foods and beverages. Total 24.7 cu.ft. 20.5 cu.ft. Printed in the fresh food...Open 90° without Handle) 39 1/4" 39 1/4" Door Edge Clearance with Handle 4 1/2" 4 1/2" Door Edge Clearance without Handle 1 3/4" 1 3/4" Installation Clearance Sides 1/8", Top 1", Back 1" Sides 1/8", Top 1", Back 1" Weight (lbs) 324 300 Carton Dimensions (WxHxD) 38" x 73"x 37" ...
...I T Y Refrigerator 17.6 cu.ft. 14.7 cu.ft. of LG Electronics Inc. SpacePlus™ Ice System LG's SpacePlus™ Ice System is located on the Sealed System Design and specifications are property of your foods and beverages. Total 24.7 cu.ft. 20.5 cu.ft. Printed in the fresh food...Open 90° without Handle) 39 1/4" 39 1/4" Door Edge Clearance with Handle 4 1/2" 4 1/2" Door Edge Clearance without Handle 1 3/4" 1 3/4" Installation Clearance Sides 1/8", Top 1", Back 1" Sides 1/8", Top 1", Back 1" Weight (lbs) 324 300 Carton Dimensions (WxHxD) 38" x 73"x 37" ...

