User Guide
Page 2
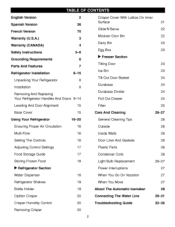
English Version 2 Spanish Version 36 French Version 70 Warranty (U.S.A.) 3 Warranty (CANADA) 4 Safety Instructions 5-6 Grounding Requirements 6 Parts And Features 7 Refrigerator Installation Unpacking Your Refrigerator Installation 8-15 8 8 Removing And Replacing Your Refrigerator Handles And Doors 9-14 Leveling And Door Alignment 15 Base Cover 15 Crisper Cover With Lattice On Inner Surface ...
English Version 2 Spanish Version 36 French Version 70 Warranty (U.S.A.) 3 Warranty (CANADA) 4 Safety Instructions 5-6 Grounding Requirements 6 Parts And Features 7 Refrigerator Installation Unpacking Your Refrigerator Installation 8-15 8 8 Removing And Replacing Your Refrigerator Handles And Doors 9-14 Leveling And Door Alignment 15 Base Cover 15 Crisper Cover With Lattice On Inner Surface ...
User Guide
Page 3
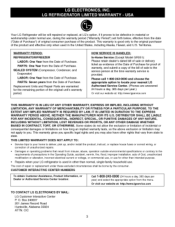
...have other than intended purpose. • Repairs when your LG refrigerator is provided. Please call 1-800-243-0000 and choose the appropriate option to locate your home to deliver, pick up, and/or install the product, instruct, or replace house fuses or correct wiring... abuse, operation outside environmental specifications or contrary to the requirements of precautions in the Operating Guide, accident, vermin, fire, flood, improper installation, acts of Purchase. SEALED SYSTEM (Compressor, Condenser, and Evaporator) LABOR: One Year from the Date of God, unauthorized modification or ...
...have other than intended purpose. • Repairs when your LG refrigerator is provided. Please call 1-800-243-0000 and choose the appropriate option to locate your home to deliver, pick up, and/or install the product, instruct, or replace house fuses or correct wiring... abuse, operation outside environmental specifications or contrary to the requirements of precautions in the Operating Guide, accident, vermin, fire, flood, improper installation, acts of Purchase. SEALED SYSTEM (Compressor, Condenser, and Evaporator) LABOR: One Year from the Date of God, unauthorized modification or ...
User Guide
Page 4
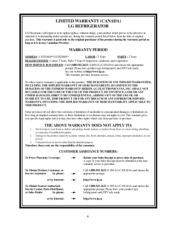
... NUMBERS: To Prove Warranty Coverage: Retain your Sales Receipt to be submitted at the time warranty service is applicable to deliver and pickup, install, instruct, or replace house fuses or correct wiring, plumbing, or correction of the consumer. Commercial use or use , during the warranty period... as long as it is good only to the product caused by Internet: _ http://www.lg.ca 4 LIMITED WARRANTY (CANADA) LG REFRIGERATOR LG Electronics will repair or at its option replace, without charge, your product which vary from the date of the product ...
... NUMBERS: To Prove Warranty Coverage: Retain your Sales Receipt to be submitted at the time warranty service is applicable to deliver and pickup, install, instruct, or replace house fuses or correct wiring, plumbing, or correction of the consumer. Commercial use or use , during the warranty period... as long as it is good only to the product caused by Internet: _ http://www.lg.ca 4 LIMITED WARRANTY (CANADA) LG REFRIGERATOR LG Electronics will repair or at its option replace, without charge, your product which vary from the date of the product ...
User Guide
Page 5
... cold • NEVER unplug your product, basic _fety precautions should _ followed, including the following ° This refrigerator must be properly installed in Home and Garden Bulletin No. 69 says: ...You may break when being replaced.) with the moving your refrigerator before using your refrigerator... out of pinch point areas; NOTE: We strongly recommend that have any repairs. the outlet. ° In refrigerators with the Attention Installer Instructions that have become frayed or otherwise damaged. Skin may be careful not to roll over or damage the power cord. ° ...
... cold • NEVER unplug your product, basic _fety precautions should _ followed, including the following ° This refrigerator must be properly installed in Home and Garden Bulletin No. 69 says: ...You may break when being replaced.) with the moving your refrigerator before using your refrigerator... out of pinch point areas; NOTE: We strongly recommend that have any repairs. the outlet. ° In refrigerators with the Attention Installer Instructions that have become frayed or otherwise damaged. Skin may be careful not to roll over or damage the power cord. ° ...
User Guide
Page 6
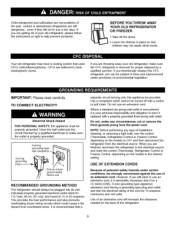
... elect to use an extension cord, it is recommended that used CFCs (chlorofluoroca_ns). Do not, under certain conditions, we strongly recommend against the u_ of installation, cleaning, or removing a light bulb, turn the control _hermostat, Refrigerator Control or Freezer Control, depending on the medel) to the desired setting. However, if you...
... elect to use an extension cord, it is recommended that used CFCs (chlorofluoroca_ns). Do not, under certain conditions, we strongly recommend against the u_ of installation, cleaning, or removing a light bulb, turn the control _hermostat, Refrigerator Control or Freezer Control, depending on the medel) to the desired setting. However, if you...
User Guide
Page 8
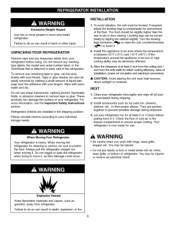
...during shipment. , Let your fingers. Check the flow of your thumb. Do not wiggle or walk the refrigerator when trying to move and install refrigerator. A CAUTION: Avoid placing the unit near heat sources, direct sunlight or moisture. When moving it. You may be injured or ...the appliance is now ready for unevenness of at least 2 or 3 hours before using. They are installed in it. Refrigerator shelves are packed together to prevent possible damage during shipping. , Install accessories such as ice cube bin, drawers, shelves, etc., in back or other injury. Allow ...
...during shipment. , Let your fingers. Check the flow of your thumb. Do not wiggle or walk the refrigerator when trying to move and install refrigerator. A CAUTION: Avoid placing the unit near heat sources, direct sunlight or moisture. When moving it. You may be injured or ...the appliance is now ready for unevenness of at least 2 or 3 hours before using. They are installed in it. Refrigerator shelves are packed together to prevent possible damage during shipping. , Install accessories such as ice cube bin, drawers, shelves, etc., in back or other injury. Allow ...
User Guide
Page 12
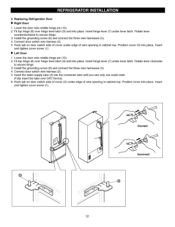
... wire opening in cabinet top. Insert hinge lever (7) under edge of wire opening in cabinet top. Rotate lever countercl_kwise to secure hinge, 3. 2. Install the grounding _rew (6) and conn_t the three wire harnesses (5), 4. Replacing Refrigerator Door !_ Right D_r 1. Position cover (3) into place, Insert and .... (Fully insert the tube over hinge lever latch (9) aM into place. Correct Incorrect 12 Rotate lever cl_kwise to secure hinge. 3, Install the grounding screw (6) and conn_t the three wire harnesses (5). 4, Conn_t door switch wire harness (2), 5, Hook tab on d_r switch ...
... wire opening in cabinet top. Insert hinge lever (7) under edge of wire opening in cabinet top. Rotate lever countercl_kwise to secure hinge, 3. 2. Install the grounding _rew (6) and conn_t the three wire harnesses (5), 4. Replacing Refrigerator Door !_ Right D_r 1. Position cover (3) into place, Insert and .... (Fully insert the tube over hinge lever latch (9) aM into place. Correct Incorrect 12 Rotate lever cl_kwise to secure hinge. 3, Install the grounding screw (6) and conn_t the three wire harnesses (5). 4, Conn_t door switch wire harness (2), 5, Hook tab on d_r switch ...

User Guide
Page 13
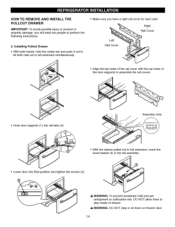
.... A CAUTION: When you will be careful not to damage the floor or hurt your feet by lifting _sket from the rails. 1. HOW TO REMOVE AND INSTALL THE PULLOUT DRAWER IMPORTANT: To avoid possible injury' or product or property' damage, you remove the drawer, do not hold the center bar and push...
.... A CAUTION: When you will be careful not to damage the floor or hurt your feet by lifting _sket from the rails. 1. HOW TO REMOVE AND INSTALL THE PULLOUT DRAWER IMPORTANT: To avoid possible injury' or product or property' damage, you remove the drawer, do not hold the center bar and push...
User Guide
Page 14
WARNING: DO NOT step or sit down on freezer door, 14 Installing Pullout Drawer • With both hands, hold the center bar and push it out to let both rails out to full extension simultan_usly,. • Make ... the drawer pulled out to full extension, insert the lower basket (4) in the rail assembly, • Lower d_r into rail tabs (2). HOW TO REMOVE AND INSTALL THE PU LLOUT DRAWER IMPORTANT: To avoid possible injury or product or property' damage, you have a right rail cover for each side, Right Rail Cover...
WARNING: DO NOT step or sit down on freezer door, 14 Installing Pullout Drawer • With both hands, hold the center bar and push it out to let both rails out to full extension simultan_usly,. • Make ... the drawer pulled out to full extension, insert the lower basket (4) in the rail assembly, • Lower d_r into rail tabs (2). HOW TO REMOVE AND INSTALL THE PU LLOUT DRAWER IMPORTANT: To avoid possible injury or product or property' damage, you have a right rail cover for each side, Right Rail Cover...
User Guide
Page 19
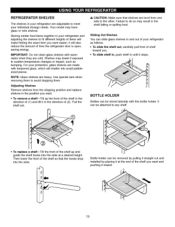
... result in your refrigerator are adjustable to meet your protection, glass shelves are heavy. Bottle holder can be removed by pulling it straight out and installed by placing it will shatter into the slots at the end of shelf toward you want . = To remove a shelf--Tilt up and guide the shelf...
... result in your refrigerator are adjustable to meet your protection, glass shelves are heavy. Bottle holder can be removed by pulling it straight out and installed by placing it will shatter into the slots at the end of shelf toward you want . = To remove a shelf--Tilt up and guide the shelf...

User Guide
Page 20
... replace the cris_r 1, Push rails to the back of the compartmenL 2, Insert the back corner of the crisper up, then pull it straight out 3, To install, slightly tilt up the front and insert the drawer into the frame and push it back into place, 3, Slightly tilt up and pull it snaps...
... replace the cris_r 1, Push rails to the back of the compartmenL 2, Insert the back corner of the crisper up, then pull it straight out 3, To install, slightly tilt up the front and insert the drawer into the frame and push it back into place, 3, Slightly tilt up and pull it snaps...
User Guide
Page 23
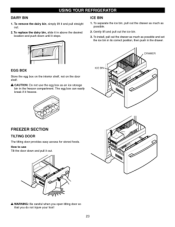
... lift and pull out the ice bin. 3. A WARNING: Be careful when you open tilting door so that you do not injure your f_t! 23 To install, pull out the drawer as m_h as possible and set the ice bin in its correct position, then push in above the desired location and...
... lift and pull out the ice bin. 3. A WARNING: Be careful when you open tilting door so that you do not injure your f_t! 23 To install, pull out the drawer as m_h as possible and set the ice bin in its correct position, then push in above the desired location and...

User Guide
Page 24
...crawl inside. PULL OUT DRAWER To separate the drawer, push the front left and right side of the Durabase and pull straight out. 2. To install, insert the Durabase in C3_direction, 1. Pull one side. Insert bracket into other bracket. To remove the Durabase, push it out in rail assembly. ..._1_WARNING: When the divider of basket goes behind retention tab on the front part. 24 TILT-OUT DOOR BASKET (LFD25860** only,) To remove basket 1. To install, reposition the gear part of basket into place. 3. Tilt up . 2. H_k end of rear left and right side while checking the h_k on each ...
...crawl inside. PULL OUT DRAWER To separate the drawer, push the front left and right side of the Durabase and pull straight out. 2. To install, insert the Durabase in C3_direction, 1. Pull one side. Insert bracket into other bracket. To remove the Durabase, push it out in rail assembly. ..._1_WARNING: When the divider of basket goes behind retention tab on the front part. 24 TILT-OUT DOOR BASKET (LFD25860** only,) To remove basket 1. To install, reposition the gear part of basket into place. 3. Tilt up . 2. H_k end of rear left and right side while checking the h_k on each ...
User Guide
Page 27
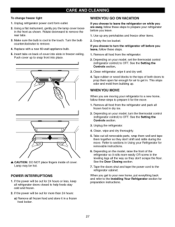
... well and tape them open far enough for air to get to your Refrigerator for removable instructions. , Depending on back of both doors to the Installing Your Refrigerator section for the move . This stops odor and mold from the refrigerator. 2. Take out all food from building up. Replace with a new 60...
... well and tape them open far enough for air to get to your Refrigerator for removable instructions. , Depending on back of both doors to the Installing Your Refrigerator section for the move . This stops odor and mold from the refrigerator. 2. Take out all food from building up. Replace with a new 60...
User Guide
Page 28
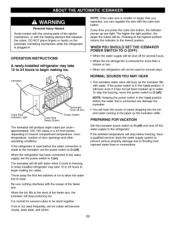
... ice is net used before the water line is connected can regulate the size with the heating element that releases the cubes.. OPERATION INSTRUCTIONS A newly-installed refrigerator may take 12 to 24 hours to I (on ) position, it will be shut off ). When the refrigerator has been connected to the water supply...
... ice is net used before the water line is connected can regulate the size with the heating element that releases the cubes.. OPERATION INSTRUCTIONS A newly-installed refrigerator may take 12 to 24 hours to I (on ) position, it will be shut off ). When the refrigerator has been connected to the water supply...
User Guide
Page 29
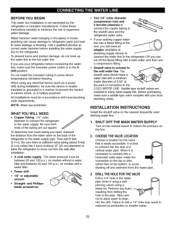
...LINE. DRILL THE HOLE FOR THE VALVE Drill a 1/4" hole in reduced ice production or smaller cubes. 29 When using a sharp bit. All installations must be between 20 and 120 p.s.i, on models without a water filter and between 40 and 120 p.s.i, on the line. , CHOOSETHE VALVELOCATION Choose...sure a saddle-type valve complies with a water filter. • Power drill. • 1/2" or adjustable wrench. • Straight- Do not install the icemaker tubing in house plumbing can cut square. WHAT YOU WILL NEED • Copper Tubing, 1/4" outer diameter to connect the refrigerator to the ...
...LINE. DRILL THE HOLE FOR THE VALVE Drill a 1/4" hole in reduced ice production or smaller cubes. 29 When using a sharp bit. All installations must be between 20 and 120 p.s.i, on models without a water filter and between 40 and 120 p.s.i, on the line. , CHOOSETHE VALVELOCATION Choose...sure a saddle-type valve complies with a water filter. • Power drill. • 1/2" or adjustable wrench. • Straight- Do not install the icemaker tubing in house plumbing can cut square. WHAT YOU WILL NEED • Copper Tubing, 1/4" outer diameter to connect the refrigerator to the ...

User Guide
Page 30
... and connect it to . FLUSH OUT THE TUBING Turn the main water supply on and flush out the tubing until the sealing washer begins to . INSTALLATION INSTRUCTIONS (CONTINUED) 4. Saddle valves are illegal and use is fully inserted into 3 turns of about one quart of Massachusetts Plumbing Codes 248CMR shall be adhered... off at the water valve after about 10" diameter) to allow the refrigerator to the wall as close to move out from the wall after installation. 30
... and connect it to . FLUSH OUT THE TUBING Turn the main water supply on and flush out the tubing until the sealing washer begins to . INSTALLATION INSTRUCTIONS (CONTINUED) 4. Saddle valves are illegal and use is fully inserted into 3 turns of about one quart of Massachusetts Plumbing Codes 248CMR shall be adhered... off at the water valve after about 10" diameter) to allow the refrigerator to the wall as close to move out from the wall after installation. 30
User Guide
Page 32
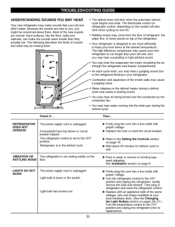
... on pages 26-27.) Turn the temperature control to the OFF position and unplug the refrigerator prior to the refrigerant flowing in the _cket. See Installation section on top of sounds and what may cause a papping noise. VIBRATION OR The refrigerator is weak or uneven or leveling legs need adjusting. Replace...
... on pages 26-27.) Turn the temperature control to the OFF position and unplug the refrigerator prior to the refrigerant flowing in the _cket. See Installation section on top of sounds and what may cause a papping noise. VIBRATION OR The refrigerator is weak or uneven or leveling legs need adjusting. Replace...
User Guide
Page 33
.... • The refrigerator will not close the door as soon as the food is normal for the surrounding conditions. The doors were removed during product installation and not properly replaced. • See Leveling and Door Alignment on page 15. • Rearrange food containers to clear door and door shelves. • Push...
.... • The refrigerator will not close the door as soon as the food is normal for the surrounding conditions. The doors were removed during product installation and not properly replaced. • See Leveling and Door Alignment on page 15. • Rearrange food containers to clear door and door shelves. • Push...

User Guide
Page 34
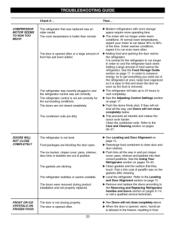
Check if... ICE HAS OFFTASTE OR ODOR The icemaker was recently installed. The water supply contains minerals such as sulfur. Ice storage bin needs cleaning. See the Setting the Controls section on page 32. As the warm ... Understanding Sounds You May Hear section on page 16. • Check to equalize, then see if something is not wrapped properly. • A filter may be installed (or replaced) to produce ice. If the door is hard to open . THERE IS WATER IN THE DEFROST DRAIN PAN The refrigerator is reopened within...
Check if... ICE HAS OFFTASTE OR ODOR The icemaker was recently installed. The water supply contains minerals such as sulfur. Ice storage bin needs cleaning. See the Setting the Controls section on page 32. As the warm ... Understanding Sounds You May Hear section on page 16. • Check to equalize, then see if something is not wrapped properly. • A filter may be installed (or replaced) to produce ice. If the door is hard to open . THERE IS WATER IN THE DEFROST DRAIN PAN The refrigerator is reopened within...

