Specification (English)
Page 2
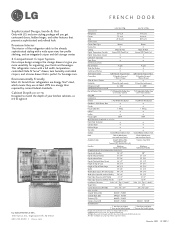
... a full width, temperaturecontrolled Glide N' Serve™ drawer, twin humidity-controlled crispers, and a bonus drawer that present a sophisticated and refined look. LG Design and Life's Good are subject to change without Handle 1 3/4" 1 3/4" Installation Clearance Sides 1/8", Top 1", Back 1" Sides 1/8", Top 1", ...Surface Coated Metal, Stainless Steel Coated Metal, Stainless Steel Back Flush & Metal cover Flush & Metal cover over mechanical parts over mechanical parts Available Colors Smooth White (SW), Smooth Black (SB), Titanium (TT), Stainless Steel (ST) Stainless Steel (ST...
... a full width, temperaturecontrolled Glide N' Serve™ drawer, twin humidity-controlled crispers, and a bonus drawer that present a sophisticated and refined look. LG Design and Life's Good are subject to change without Handle 1 3/4" 1 3/4" Installation Clearance Sides 1/8", Top 1", Back 1" Sides 1/8", Top 1", ...Surface Coated Metal, Stainless Steel Coated Metal, Stainless Steel Back Flush & Metal cover Flush & Metal cover over mechanical parts over mechanical parts Available Colors Smooth White (SW), Smooth Black (SB), Titanium (TT), Stainless Steel (ST) Stainless Steel (ST...

Owner's Manual
Page 2
...26 Pull out Drawer 26 CARE AND CLEANING General Cleaning Tips 27 Outside 27 Inside Walls 27 Door Liner And Gaskets 27 Plastic Parts 27 Condenser Coils 27 Light Bulb Replacement 27 Power Interruptions 28 When You Go On Vacation 28 When You Move 28 TROUBLESHOOTING ...By following the operating and care instructions in this manual, your purchase and welcome to the LG family. Congratulations on your refrigerator will provide you may hear 37 2 THANK YOU! Your new LG Bottom-Freezer Refrigerator combines the most advanced cooling technology with many years of reliable service.
...26 Pull out Drawer 26 CARE AND CLEANING General Cleaning Tips 27 Outside 27 Inside Walls 27 Door Liner And Gaskets 27 Plastic Parts 27 Condenser Coils 27 Light Bulb Replacement 27 Power Interruptions 28 When You Go On Vacation 28 When You Move 28 TROUBLESHOOTING ...By following the operating and care instructions in this manual, your purchase and welcome to the LG family. Congratulations on your refrigerator will provide you may hear 37 2 THANK YOU! Your new LG Bottom-Freezer Refrigerator combines the most advanced cooling technology with many years of reliable service.
Owner's Manual
Page 3
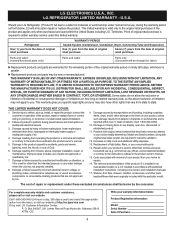
... household use of air. 4. Shelves, door bins, drawers, handles, accessories, and other damage to the product caused by LG. 7. Damage caused by transportation and handling, including scratches, dents, chips, and/or other parts besidesÄthose that are warranted for warranty validation. 12. Damage resulting from misuse, abuse, improper installation, repair, or...
... household use of air. 4. Shelves, door bins, drawers, handles, accessories, and other damage to the product caused by LG. 7. Damage caused by transportation and handling, including scratches, dents, chips, and/or other parts besidesÄthose that are warranted for warranty validation. 12. Damage resulting from misuse, abuse, improper installation, repair, or...
Owner's Manual
Page 4
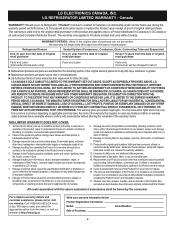
...on applicable provincial laws. Damage resulting from the date of original retail purchase Parts and Labor (internal/functional parts only) Parts and Labor Parts only (Consumer will be verified, the warranty will at http://www.lg.ca Write your home for other damage to deliver, pick up, or... be charged for labor) ̈ Replacement products and parts are required for the remaining portion of parts not approved or specified by LG Canada or an authorized Canadian distributor thereof. LG ELECTRONICS CANADA, INC. LG CANADA DOES NOT AUTHORIZE ANY PERSON TO CREATE OR ASSUME...
...on applicable provincial laws. Damage resulting from the date of original retail purchase Parts and Labor (internal/functional parts only) Parts and Labor Parts only (Consumer will be verified, the warranty will at http://www.lg.ca Write your home for other damage to deliver, pick up, or... be charged for labor) ̈ Replacement products and parts are required for the remaining portion of parts not approved or specified by LG Canada or an authorized Canadian distributor thereof. LG ELECTRONICS CANADA, INC. LG CANADA DOES NOT AUTHORIZE ANY PERSON TO CREATE OR ASSUME...
Owner's Manual
Page 8
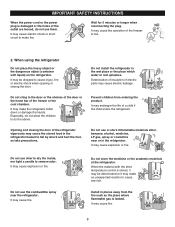
... to the door or the shelves of the door or the home bar of the freezer or the cool chamber. Deterioration of insulation of electric parts may endanger the life of a child if the child enters the refrigerator. Do not cling to make fire. It may cause electric leakage. Opening and...
... to the door or the shelves of the door or the home bar of the freezer or the cool chamber. Deterioration of insulation of electric parts may endanger the life of a child if the child enters the refrigerator. Do not cling to make fire. It may cause electric leakage. Opening and...
Owner's Manual
Page 9
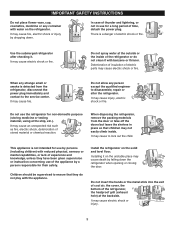
... or injury by falling down . Installing it . Use the submerged refrigerator after checking it on the unstable place may not easily climb inside of electric parts may cause injury, electric shock or fire. Do not allow any strange smell or smoke is detected from the door or take off the doors...
... or injury by falling down . Installing it . Use the submerged refrigerator after checking it on the unstable place may not easily climb inside of electric parts may cause injury, electric shock or fire. Do not allow any strange smell or smoke is detected from the door or take off the doors...
Owner's Manual
Page 11
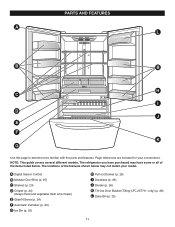
... and crisper) E Glide'N'Serve (p. 24) F Automatic Icemaker (p. 29) G Ice Bin (p. 25) H Pull out Drawer (p. 26) I D J E F K G Use this page to become more familiar with the parts and features. PARTS AND FEATURES A L B B H C I Durabase (p. 26) J Divider (p. 26) K Tilt-Out Door Basket (Tilting-LFC 25770** only) (p. 26) L Dairy Bin (p. 25) 11 The locations of the items...
... and crisper) E Glide'N'Serve (p. 24) F Automatic Icemaker (p. 29) G Ice Bin (p. 25) H Pull out Drawer (p. 26) I D J E F K G Use this page to become more familiar with the parts and features. PARTS AND FEATURES A L B B H C I Durabase (p. 26) J Divider (p. 26) K Tilt-Out Door Basket (Tilting-LFC 25770** only) (p. 26) L Dairy Bin (p. 25) 11 The locations of the items...
Owner's Manual
Page 16
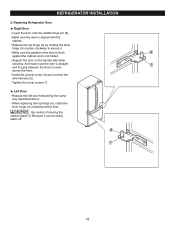
... door followed by rotating the lever hinge (4) counter clockwise to secure it can be easily taken off. 6 7 16 CAUTION : Be careful of missing the washer [part(7)].
... door followed by rotating the lever hinge (4) counter clockwise to secure it can be easily taken off. 6 7 16 CAUTION : Be careful of missing the washer [part(7)].
Owner's Manual
Page 26
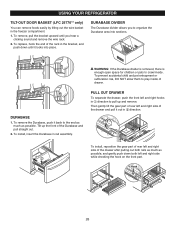
... pull up and remove. PULL OUT DRAWER To separate the drawer, push the front left and right side while checking the hook on the front part. DURABASE DIVIDER The Durabase divider allows you hear a clicking sound and remove the wire rack. 2. To install, insert the Durabase in the freezer compartment. 1. ... To remove the Durabase, push it out in ቤ direction. 1 32 12 To install, reposition the gear part of rear left and right side of drawer. Then gently lift the gear part of rear left and right side of the Durabase and pull straight out. 2. USING YOUR REFRIGERATOR TILT-OUT DOOR...
... pull up and remove. PULL OUT DRAWER To separate the drawer, push the front left and right side while checking the hook on the front part. DURABASE DIVIDER The Durabase divider allows you hear a clicking sound and remove the wire rack. 2. To install, insert the Durabase in the freezer compartment. 1. ... To remove the Durabase, push it out in ቤ direction. 1 32 12 To install, reposition the gear part of rear left and right side of drawer. Then gently lift the gear part of rear left and right side of the Durabase and pull straight out. 2. USING YOUR REFRIGERATOR TILT-OUT DOOR...
Owner's Manual
Page 27
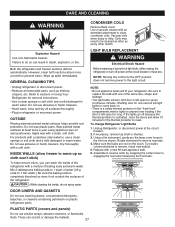
... with a stainless steel exterior, use a clean sponge or soft cloth and a mild detergent in warm water. NOTE: • Not all removable parts, such as shown. DOOR LINERS AND GASKETS Do not use abrasive or harsh cleaners. • Hand wash, rinse and dry all surfaces thoroughly. .... Refer to do not spray water. To change Refrigerator Light Bulbs 1. Make sure the bulbs are cool to clean condenser coils. PLASTIC PARTS (covers and panels) Do not use abrasive or harsh cleaners. Do not use cleaning waxes, concentrated detergents, bleaches, or cleaners containing petroleum...
... with a stainless steel exterior, use a clean sponge or soft cloth and a mild detergent in warm water. NOTE: • Not all removable parts, such as shown. DOOR LINERS AND GASKETS Do not use abrasive or harsh cleaners. • Hand wash, rinse and dry all surfaces thoroughly. .... Refer to do not spray water. To change Refrigerator Light Bulbs 1. Make sure the bulbs are cool to clean condenser coils. PLASTIC PARTS (covers and panels) Do not use abrasive or harsh cleaners. Do not use cleaning waxes, concentrated detergents, bleaches, or cleaners containing petroleum...
Owner's Manual
Page 28
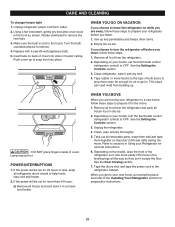
... the refrigerator. 4. Take out all the way so they don't shift and rattle during the move . 1. Refer to sections in the leveling legs all removable parts, wrap them well and tape them open far enough for the move . Turn the bulb counterclockwise to the touch. Tape rubber or wood blocks to...
... the refrigerator. 4. Take out all the way so they don't shift and rattle during the move . 1. Refer to sections in the leveling legs all removable parts, wrap them well and tape them open far enough for the move . Turn the bulb counterclockwise to the touch. Tape rubber or wood blocks to...
Owner's Manual
Page 30
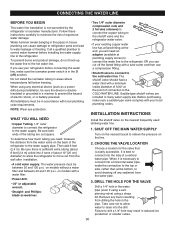
... 120 p.s.i. Before purchasing, make sure the icemaker power switch is necessary to the refrigerator. To determine how much tubing you can cause damage to refrigerator parts and lead to avoid drawing off any burrs resulting from the wall after installation. • A cold water supply. Install the shutoff valve on the line...
... 120 p.s.i. Before purchasing, make sure the icemaker power switch is necessary to the refrigerator. To determine how much tubing you can cause damage to refrigerator parts and lead to avoid drawing off any burrs resulting from the wall after installation. • A cold water supply. Install the shutoff valve on the line...


