Owner's Manual
Page 2
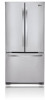
... long as it is in material or workmanship under normal use . 4. LG Refrigerator / Freezer Warranty Period Product Parts Labor Refrigerator / Freezer 1 year 1 year [In-Home Service (Except Model GR-051)] Sealed System (Compressor, Condenser, Evaporator) 7 years 1 year [In-Home Service (Except Model GR-051)] No other than normal, single-family household use during and...
... long as it is in material or workmanship under normal use . 4. LG Refrigerator / Freezer Warranty Period Product Parts Labor Refrigerator / Freezer 1 year 1 year [In-Home Service (Except Model GR-051)] Sealed System (Compressor, Condenser, Evaporator) 7 years 1 year [In-Home Service (Except Model GR-051)] No other than normal, single-family household use during and...
Owner's Manual
Page 8
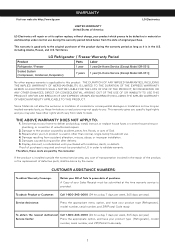
... Temperature Control I Read this section to that of your new refrigerator. NOTE: This guide covers different models. Your refrigerator could have some or all of the features and parts listed below. Drawer Model A PARTS AND FEATURES B C M D L E F K G J H I Durabase divider B Refrigerator Light J Pull Out Drawer C Shelves K Freezer Light D Optibin Crisper L Door Racks Keeps fruits and vegetable...
... Temperature Control I Read this section to that of your new refrigerator. NOTE: This guide covers different models. Your refrigerator could have some or all of the features and parts listed below. Drawer Model A PARTS AND FEATURES B C M D L E F K G J H I Durabase divider B Refrigerator Light J Pull Out Drawer C Shelves K Freezer Light D Optibin Crisper L Door Racks Keeps fruits and vegetable...
Owner's Manual
Page 9
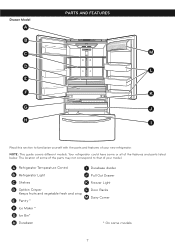
...remove and dust accumulated during shipping. 3. WARNING: • Take care when working with warm water and let dry. Remove the 2 screws from other parts of the body. 3.Install the refrigerator in an area between 55 °F (13 °C) and 110 °F (43 °C). Not following...Safety Instructions". If needed, adjust the leveling screws to lower it well with your hands or any stickers that feature warnings, the model serial number or the technical label of the product located on the back of the refrigerator. REFRIGERATOR INSTALLATION WARNING EXCESSIVE WEIGHT HAZARD Use...
...remove and dust accumulated during shipping. 3. WARNING: • Take care when working with warm water and let dry. Remove the 2 screws from other parts of the body. 3.Install the refrigerator in an area between 55 °F (13 °C) and 110 °F (43 °C). Not following...Safety Instructions". If needed, adjust the leveling screws to lower it well with your hands or any stickers that feature warnings, the model serial number or the technical label of the product located on the back of the refrigerator. REFRIGERATOR INSTALLATION WARNING EXCESSIVE WEIGHT HAZARD Use...
Owner's Manual
Page 18
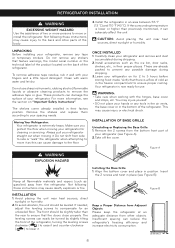
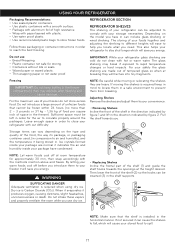
... freezing and cause damage. For the maximum use dry ice. 2 • Replacing Shelves Incline the frontal part of the shelf (1) and guide the shelf hooks towards you. 1 Storage times can vary depending on the model you use of your refrigerator glass shelving are normal it can include glass shelving or wired shelving...
... freezing and cause damage. For the maximum use dry ice. 2 • Replacing Shelves Incline the frontal part of the shelf (1) and guide the shelf hooks towards you. 1 Storage times can vary depending on the model you use of your refrigerator glass shelving are normal it can include glass shelving or wired shelving...

Owner's Manual
Page 19
... to any setting between HIGH and LOW. • "High": keeps moist air in the moisturesealed crispers. Functional Shelves (Folding Shelves, in some models) For storage of the shelf towards the outside like explained below ). To remove the crisper cover support: NOTE: Remove glass before removing the crisper...the top and pull forward. • Lift the shelf in the manner it moves across the support openings. Pull forward and slightly lift the front part. To remove the glass: • Lift up the glass after inserting a screwdriver under the crisper cover. • Pull glass cover up and...
... to any setting between HIGH and LOW. • "High": keeps moist air in the moisturesealed crispers. Functional Shelves (Folding Shelves, in some models) For storage of the shelf towards the outside like explained below ). To remove the crisper cover support: NOTE: Remove glass before removing the crisper...the top and pull forward. • Lift the shelf in the manner it moves across the support openings. Pull forward and slightly lift the front part. To remove the glass: • Lift up the glass after inserting a screwdriver under the crisper cover. • Pull glass cover up and...

Owner's Manual
Page 20
... 1 Installing the Vegetable Drawer Cover • Put the cover over the supports (1). • Slightly lift the cover (2) while introducing it in some models) Removing the Vegetable Drawer Cover • Remove both drawers (see "Removing the Vegetable Drawer/Crisper"). • Hold onto the support (1) and pull ...towards the top and then towards the outside until it stops (1). • Slightly lift the front part and pull the rest (2), in order to completely remove the drawer. • To relocate the drawer slip out towards the outside (2). Replacing...
... 1 Installing the Vegetable Drawer Cover • Put the cover over the supports (1). • Slightly lift the cover (2) while introducing it in some models) Removing the Vegetable Drawer Cover • Remove both drawers (see "Removing the Vegetable Drawer/Crisper"). • Hold onto the support (1) and pull ...towards the top and then towards the outside until it stops (1). • Slightly lift the front part and pull the rest (2), in order to completely remove the drawer. • To relocate the drawer slip out towards the outside (2). Replacing...

Owner's Manual
Page 21
...to prevent accidents, such as possible, pick up the basket a bit (1) and pull it out (2). 1 3 DURABASE (in some models) • To remove the Durabase, push it back, raise the front part and pull it up (1). • To put the ice bin in the right position (3). 2 Ice Bin Drawer 1 GLIDE-OUT DRAWER... the supports of the basket into the slides of the cords (2) and push it back, insert the 1 Durabase in doing so. DURABASE DIVIDER (in some models) • Pull the drawer as much as possible (1). • Raise the ice box and take it out carefully (2). • Take the drawer off ...
...to prevent accidents, such as possible, pick up the basket a bit (1) and pull it out (2). 1 3 DURABASE (in some models) • To remove the Durabase, push it back, raise the front part and pull it up (1). • To put the ice bin in the right position (3). 2 Ice Bin Drawer 1 GLIDE-OUT DRAWER... the supports of the basket into the slides of the cords (2) and push it back, insert the 1 Durabase in doing so. DURABASE DIVIDER (in some models) • Pull the drawer as much as possible (1). • Raise the ice box and take it out carefully (2). • Take the drawer off ...

Owner's Manual
Page 23
... the water from its tray. 4.Clean and dry it , and place the frozen food in an ice chest. • Put 2 lbs (907 g) of the removable parts, and wrap them in an ice chest with ease, or screw the levelers so it may be safely refrozen, although the quality and flavor may... refrigerator so it can roll with dry ice. 2.Unplug your refrigerator off: 1. Consume all of the food. 2.Unplug your refrigerator on the model of the refrigerator, lift the top part of a longer black out, do not open (use gloves) for each square foot (28 L) inside the freezer. When your refrigerator arrives to...
... the water from its tray. 4.Clean and dry it , and place the frozen food in an ice chest. • Put 2 lbs (907 g) of the removable parts, and wrap them in an ice chest with ease, or screw the levelers so it may be safely refrozen, although the quality and flavor may... refrigerator so it can roll with dry ice. 2.Unplug your refrigerator off: 1. Consume all of the food. 2.Unplug your refrigerator on the model of the refrigerator, lift the top part of a longer black out, do not open (use gloves) for each square foot (28 L) inside the freezer. When your refrigerator arrives to...
Owner's Manual
Page 24
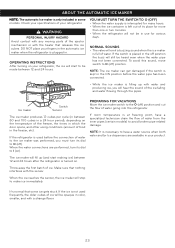
...NOTE: It is necessary to have a specialized technician drain the flow of your specifications of water from the inner pipes (certain models) to the O (off ). Make sure that some models. When the ice reaches the sensor, the ice maker will emit a buzzing sound when the ice maker is full of the ... refrigerator, the ice will still be in . If the switch is placed in the freezer, etc). WARNING PERSONAL INJURY HAZARD Avoid contact with any moving parts of food in the off ) position. YOU MUST TURN THE SWITCH TO O (OFF) • When the water supply is interrupted for more than one...
...NOTE: It is necessary to have a specialized technician drain the flow of your specifications of water from the inner pipes (certain models) to the O (off ). Make sure that some models. When the ice reaches the sensor, the ice maker will emit a buzzing sound when the ice maker is full of the ... refrigerator, the ice will still be in . If the switch is placed in the freezer, etc). WARNING PERSONAL INJURY HAZARD Avoid contact with any moving parts of food in the off ) position. YOU MUST TURN THE SWITCH TO O (OFF) • When the water supply is interrupted for more than one...


