Owner's Manual
Page 2
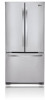
LG Refrigerator / Freezer Warranty Period Product Parts Labor Refrigerator / Freezer 1 year 1 year [In-Home Service (Except Model GR-051)] Sealed System (Compressor, Condenser, Evaporator) 7 years 1 year [In-Home Service (Except Model GR-051)] No other rights which proves to prove date of God...., misuse, abuse, or improper installation. 5. Service Assistance: Press the appropriate menu option, and have your product type (Refrigerator), model number, serial number, and ZIP/Postal Code ready. 1 Damage resulting from the date of original purchase. Display, discount, or ...
LG Refrigerator / Freezer Warranty Period Product Parts Labor Refrigerator / Freezer 1 year 1 year [In-Home Service (Except Model GR-051)] Sealed System (Compressor, Condenser, Evaporator) 7 years 1 year [In-Home Service (Except Model GR-051)] No other rights which proves to prove date of God...., misuse, abuse, or improper installation. 5. Service Assistance: Press the appropriate menu option, and have your product type (Refrigerator), model number, serial number, and ZIP/Postal Code ready. 1 Damage resulting from the date of original purchase. Display, discount, or ...
Owner's Manual
Page 8
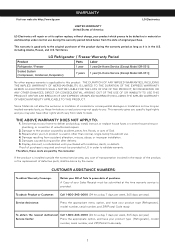
... Temperature Control I Read this section to that of your new refrigerator. Drawer Model A PARTS AND FEATURES B C M D L E F K G J H I Durabase divider B Refrigerator Light J Pull Out Drawer C Shelves K Freezer Light D Optibin Crisper L Door Racks Keeps fruits and vegetable fresh and ...Pantry * F Ice Maker * G Ice Bin* H Durabase * On some of the parts may not correspond to familiarize yourself with the parts and features of your model. NOTE: This guide covers different models. Your refrigerator could have some or all of the features and parts listed below.
... Temperature Control I Read this section to that of your new refrigerator. Drawer Model A PARTS AND FEATURES B C M D L E F K G J H I Durabase divider B Refrigerator Light J Pull Out Drawer C Shelves K Freezer Light D Optibin Crisper L Door Racks Keeps fruits and vegetable fresh and ...Pantry * F Ice Maker * G Ice Bin* H Durabase * On some of the parts may not correspond to familiarize yourself with the parts and features of your model. NOTE: This guide covers different models. Your refrigerator could have some or all of the features and parts listed below.
Owner's Manual
Page 9
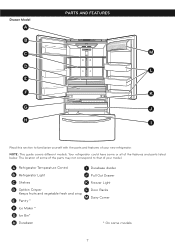
.... Make sure you protect the floor when moving it. Verify that there is lower or higher than the rear to ensure that feature warnings, the model serial number or the technical label of the product located on "Important Safety Instructions". Remove the 2 screws from the refrigerator. If needed, adjust the leveling...
.... Make sure you protect the floor when moving it. Verify that there is lower or higher than the rear to ensure that feature warnings, the model serial number or the technical label of the product located on "Important Safety Instructions". Remove the 2 screws from the refrigerator. If needed, adjust the leveling...
Owner's Manual
Page 18
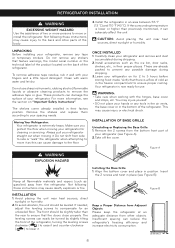
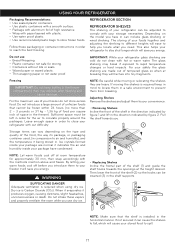
... (no more than 2 - 3 pounds or ,91 kg - 1,36 kg of food per square inch of the shelf (2) so the hooks can vary depending on the model you introduce them from breaking. For your foods together and adjusting the shelving to rapid temperature changes or hard impacts. Sufficient space must be inserted...
... (no more than 2 - 3 pounds or ,91 kg - 1,36 kg of food per square inch of the shelf (2) so the hooks can vary depending on the model you introduce them from breaking. For your foods together and adjusting the shelving to rapid temperature changes or hard impacts. Sufficient space must be inserted...

Owner's Manual
Page 19
... from COLD to remove a shelf from a metal frame • Pull the shelf until it could loose. USING YOUR REFRIGERATOR Sliding Shelves (in some models) You can slide some of the shelves in your refrigerator towards inside : Push until it stops. • Incline the front of the shelf towards... shelf towards the inside or outside : Pull towards the top and pull forward. • Lift the shelf in the manner it back in some models) You can store tall articles like explained below ). To remove the crisper cover support: NOTE: Remove glass before removing the crisper cover support. &#...
... from COLD to remove a shelf from a metal frame • Pull the shelf until it could loose. USING YOUR REFRIGERATOR Sliding Shelves (in some models) You can slide some of the shelves in your refrigerator towards inside : Push until it stops. • Incline the front of the shelf towards... shelf towards the inside or outside : Pull towards the top and pull forward. • Lift the shelf in the manner it back in some models) You can store tall articles like explained below ). To remove the crisper cover support: NOTE: Remove glass before removing the crisper cover support. &#...

Owner's Manual
Page 20
... you to the support (3). • Put the inferior piece of the drawer cover out to take them off (2). 1 CRISPER COVER WITH INTERIOR LATTICE (in some models) Removing the Vegetable Drawer Cover • Remove both drawers (see "Removing the Vegetable Drawer/Crisper"). • Hold onto the support (1) and pull towards the top...
... you to the support (3). • Put the inferior piece of the drawer cover out to take them off (2). 1 CRISPER COVER WITH INTERIOR LATTICE (in some models) Removing the Vegetable Drawer Cover • Remove both drawers (see "Removing the Vegetable Drawer/Crisper"). • Hold onto the support (1) and pull towards the top...

Owner's Manual
Page 21
... back, insert the 1 Durabase in the rail assembly (2). 2 • To install, pull the cords to their fullest (1). DURABASE DIVIDER (in some models) • To remove the dairy compartment, simply lift it and pull straight out (1). • To replace the dairy compartment, slide it in above ...the desired location and push down until it out. REFRIGERATOR CARE AND CLEANING DAIRY COMPARTMENT(in some models) Allows organizing the Durabase area in 2 sections. CAUTION: Do not use : Incline the door downwards and pull it stops (2). Lock the...
... back, insert the 1 Durabase in the rail assembly (2). 2 • To install, pull the cords to their fullest (1). DURABASE DIVIDER (in some models) • To remove the dairy compartment, simply lift it and pull straight out (1). • To replace the dairy compartment, slide it in above ...the desired location and push down until it out. REFRIGERATOR CARE AND CLEANING DAIRY COMPARTMENT(in some models) Allows organizing the Durabase area in 2 sections. CAUTION: Do not use : Incline the door downwards and pull it stops (2). Lock the...

Owner's Manual
Page 23
... possible. Consult to prevent bad odors and fungi from it can roll with an adhesive tape. If you have to leave your refrigerator on the model of the refrigerator, lift the top part of a 24 hour or less black out, do not possess neither ice chest or dry ice, consume your...
... possible. Consult to prevent bad odors and fungi from it can roll with an adhesive tape. If you have to leave your refrigerator on the model of the refrigerator, lift the top part of a 24 hour or less black out, do not possess neither ice chest or dry ice, consume your...
Owner's Manual
Page 24
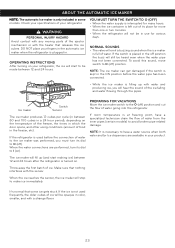
.... PREPARING FOR VACATIONS Move the ice maker switch to avoid broken pipe related damage. Make sure that nothing interferes with the heater that some models. ABOUT THE AUTOMATIC ICE MAKER NOTE: The automatic Ice maker is only included in use for more than one or two minutes. •...has been connected. • While the ice maker is necessary to have a specialized technician drain the flow of water from the inner pipes (certain models) to the O (off position the buzz will start making ice) between 12 and 24 hours. OPERATING INSTRUCTIONS After turning on the temperature of ...
.... PREPARING FOR VACATIONS Move the ice maker switch to avoid broken pipe related damage. Make sure that nothing interferes with the heater that some models. ABOUT THE AUTOMATIC ICE MAKER NOTE: The automatic Ice maker is only included in use for more than one or two minutes. •...has been connected. • While the ice maker is necessary to have a specialized technician drain the flow of water from the inner pipes (certain models) to the O (off position the buzz will start making ice) between 12 and 24 hours. OPERATING INSTRUCTIONS After turning on the temperature of ...
Owner's Manual
Page 25
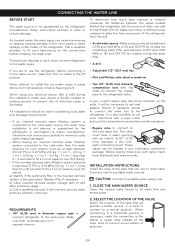
... the inner pipes or water spillage in the inside the water pipes can be between 0,138 and 0,82 MPa or 20 and 120 PSI for models containing water filter. • A drill. REQUIREMENTS • 1/4" (6,35 mm) in diameter copper pipe to connect refrigerator to prevent accumulation of capacity cup [0,2 ... pipe. When connecting to a horizontal pipeline is needed, measures the distances between 0,276 and 0,82 MPa or 40 and 120 PSI for models not containing water filter and between the valves located behind the refrigerator and the source of the refrigerator from the wall • A cold ...
... the inner pipes or water spillage in the inside the water pipes can be between 0,138 and 0,82 MPa or 20 and 120 PSI for models containing water filter. • A drill. REQUIREMENTS • 1/4" (6,35 mm) in diameter copper pipe to connect refrigerator to prevent accumulation of capacity cup [0,2 ... pipe. When connecting to a horizontal pipeline is needed, measures the distances between 0,276 and 0,82 MPa or 40 and 120 PSI for models not containing water filter and between the valves located behind the refrigerator and the source of the refrigerator from the wall • A cold ...

Owner's Manual
Page 29
... and any other container or bin in frost. IT LOOKS LIKE THE COMPRESSOR MOTOR STAYS ON TOO LONG • The replaced refrigerator was an older model. • The room temperature is hotter than usual. • The door is being opened , warm, humid air is unleveled or weak. THERE´S ICE ON...
... and any other container or bin in frost. IT LOOKS LIKE THE COMPRESSOR MOTOR STAYS ON TOO LONG • The replaced refrigerator was an older model. • The room temperature is hotter than usual. • The door is being opened , warm, humid air is unleveled or weak. THERE´S ICE ON...


