Owner's Manual
Page 2
... on inner surface Design-A-Door Dairy Bin Can Dispenser Egg Box Freezer Section Ice Bin Wire Durabase Tilting Door Guide-out drawer basket Filter Care and Cleaning General cleaning tips Outside Inside walls Door liner and gaskets Plastic parts Condenser coils Light bulb replacement Power interruptions When ...you go on vacation About the Custom Cube Ice Maker Connecting the Water Line Troubleshooting Guide 2 36 3 - 4 5 - 6 6 7 8 - 16 8 8 8 9 - 13 14 16 17 - 25 17 17 17 17 - 18 17 19 19 20 20 21 ...
... on inner surface Design-A-Door Dairy Bin Can Dispenser Egg Box Freezer Section Ice Bin Wire Durabase Tilting Door Guide-out drawer basket Filter Care and Cleaning General cleaning tips Outside Inside walls Door liner and gaskets Plastic parts Condenser coils Light bulb replacement Power interruptions When ...you go on vacation About the Custom Cube Ice Maker Connecting the Water Line Troubleshooting Guide 2 36 3 - 4 5 - 6 6 7 8 - 16 8 8 8 9 - 13 14 16 17 - 25 17 17 17 17 - 18 17 19 19 20 20 21 ...
Owner's Manual
Page 18
...re-check NOTE: If you regulate the temperature in the freezer and refrigerator compartments. • Initially set correctly for 3 seconds. • Filter Reset : It displays in the Freezer compartment to make it is connected to wait at a lower number, the freezer compartment becomes colder. ...Then adjust the compartment temperature as a guide. If you need to adjust temperatures in the previous section should be initialized with water dispener) IMPORTANT: Wipe out moisture before using the display button as operation of airstream REFRIGERATOR section to Cold Controls not set ...
...re-check NOTE: If you regulate the temperature in the freezer and refrigerator compartments. • Initially set correctly for 3 seconds. • Filter Reset : It displays in the Freezer compartment to make it is connected to wait at a lower number, the freezer compartment becomes colder. ...Then adjust the compartment temperature as a guide. If you need to adjust temperatures in the previous section should be initialized with water dispener) IMPORTANT: Wipe out moisture before using the display button as operation of airstream REFRIGERATOR section to Cold Controls not set ...
Owner's Manual
Page 24
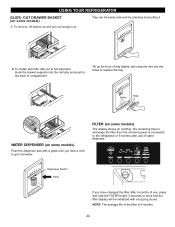
...to the back of tray slightly and snap the ribs into the holes to replace the tray. Holes Ribs WATER DISPENSER (on some models) Push the dispenser pad with a buzzing sound. FILTER (on some models) The display shows (in months), the remaining time to the refrigerator or 6 months ...after 6 months of use of water dispenser. To remove, lift basket up the front of compartment. NOTE: The average life of the filter is connected to exchange the filter from the moment power is 6 months. 24 Dispenser Switch Push If you hear...
...to the back of tray slightly and snap the ribs into the holes to replace the tray. Holes Ribs WATER DISPENSER (on some models) Push the dispenser pad with a buzzing sound. FILTER (on some models) The display shows (in months), the remaining time to the refrigerator or 6 months ...after 6 months of use of water dispenser. To remove, lift basket up the front of compartment. NOTE: The average life of the filter is connected to exchange the filter from the moment power is 6 months. 24 Dispenser Switch Push If you hear...

Owner's Manual
Page 25
...Steps 1,2,5 & 6 only for 3 seconds. How to empty the tubing (approximately for 3 minutes).* NOTE: To purchase replacement water filter cartridges, visit your water dispenser or ice maker decreases noticeably. Using its packaging and remove protective cover from the system until it stops. USING YOUR ...of cover. You may occur through the hole at rear bottom side of place. Flush water out from the o-rings. After changing the water filter cartridge, reset the water filter status display and indicator light by pressing and holding the BUTTON for models with a new...
...Steps 1,2,5 & 6 only for 3 seconds. How to empty the tubing (approximately for 3 minutes).* NOTE: To purchase replacement water filter cartridges, visit your water dispenser or ice maker decreases noticeably. Using its packaging and remove protective cover from the system until it stops. USING YOUR ...of cover. You may occur through the hole at rear bottom side of place. Flush water out from the o-rings. After changing the water filter cartridge, reset the water filter status display and indicator light by pressing and holding the BUTTON for models with a new...

Owner's Manual
Page 29
... accordance with local plumbing code requirements. BEFORE YOU BEGIN This water line installation is easily accessible. SHUT OFF THE MAIN WATER SUPPLY Turn on models without a water filter and between 20 and 120 p.s.i. Remove any burrs resulting from the water pipe. 3. CONNECTING THE WATER LINE NOTE: Water line installation is needed when the Automatic Ice Maker and...
... accordance with local plumbing code requirements. BEFORE YOU BEGIN This water line installation is easily accessible. SHUT OFF THE MAIN WATER SUPPLY Turn on models without a water filter and between 20 and 120 p.s.i. Remove any burrs resulting from the water pipe. 3. CONNECTING THE WATER LINE NOTE: Water line installation is needed when the Automatic Ice Maker and...

Owner's Manual
Page 31
...Push the refrigerator back to the back of the refrigerator's water valve. Place the compression nut and ferrule (sleeve) onto the end of 15°F (-9°C) or below. If your refrigerator does not have a water filter, we recommend installing one. Remove the plastic flexible cap from... the refrigerator connection. 11. Reattach the compressor compartment access cover. 31 TURN THE WATER ON AT THE SHUTOFF VALVE Tighten any connections that could ...
...Push the refrigerator back to the back of the refrigerator's water valve. Place the compression nut and ferrule (sleeve) onto the end of 15°F (-9°C) or below. If your refrigerator does not have a water filter, we recommend installing one. Remove the plastic flexible cap from... the refrigerator connection. 11. Reattach the compressor compartment access cover. 31 TURN THE WATER ON AT THE SHUTOFF VALVE Tighten any connections that could ...

Owner's Manual
Page 34
The icemaker was recently installed. The ice has been stored for ice production. A filter may be normal for water to produce ice. THERE IS WATER IN THE DEFROST DRAIN PAN Check if... This is normal when it can create a vacuum. The freezer temperature is reopened within a short time ... into the defrost pan. Rub a thin coat of appliance polish or kitchen wax on the gaskets after having been opened. Then... Then... The water will take longer to eliminate taste and odor problems. The interior of ice to the Understanding Sounds You May Hear section. It is not wrapped...
The icemaker was recently installed. The ice has been stored for ice production. A filter may be normal for water to produce ice. THERE IS WATER IN THE DEFROST DRAIN PAN Check if... This is normal when it can create a vacuum. The freezer temperature is reopened within a short time ... into the defrost pan. Rub a thin coat of appliance polish or kitchen wax on the gaskets after having been opened. Then... Then... The water will take longer to eliminate taste and odor problems. The interior of ice to the Understanding Sounds You May Hear section. It is not wrapped...


