
Owners Manual
Page 1
... REVIEWED CHECKED APPROVED I T L 18.01.25 18.01.25 18.01.25 E PDF ILLUSTRATOR DR COMPLETED 18.01.25 MANUAL,OWNER'S DISHWASHER 1/1 LG Electronics Inc. MFL69261722 1 RELEASING THIS DRAWING WITHOUT PERMISSION LG Electronics SHOULD BE ACCUSED ACCORDING TO THE LAWS AND COMPANY RULES. NO. MFL69261722 WORK BRAND MODEL 22 P/NO. TRIG. DWG. No.
... REVIEWED CHECKED APPROVED I T L 18.01.25 18.01.25 18.01.25 E PDF ILLUSTRATOR DR COMPLETED 18.01.25 MANUAL,OWNER'S DISHWASHER 1/1 LG Electronics Inc. MFL69261722 1 RELEASING THIS DRAWING WITHOUT PERMISSION LG Electronics SHOULD BE ACCUSED ACCORDING TO THE LAWS AND COMPANY RULES. NO. MFL69261722 WORK BRAND MODEL 22 P/NO. TRIG. DWG. No.

Owners Manual
Page 2
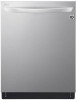
All Rights Reserved. ENGLISH ESPAÑOL FRANÇAIS OWNER'S MANUAL DISHWASHER Read this owner's manual thoroughly before operating the appliance and keep it handy for reference at all times. LDP681*** LDT780#** LDP770*** LDT680*** LDP680*** LDPS684*** LDP780*** MFL69261722 Rev.13_031120 www.lg.com Copyright © 2018-2020 LG Electronics Inc.
All Rights Reserved. ENGLISH ESPAÑOL FRANÇAIS OWNER'S MANUAL DISHWASHER Read this owner's manual thoroughly before operating the appliance and keep it handy for reference at all times. LDP681*** LDT780#** LDP770*** LDT680*** LDP680*** LDPS684*** LDP780*** MFL69261722 Rev.13_031120 www.lg.com Copyright © 2018-2020 LG Electronics Inc.

Owners Manual
Page 3
...Opening 26 Final Installation Check 27 OPERATION 27 Using the Appliance 28 Control Panel 30 Cycles 31 Options 32 Cycle/Option Guide 33 Loading the Dishwasher 33 Loading the Lower Rack 35 Loading the Silverware Basket 36 Loading the Upper Rack 39 Loading the Cutlery Rack (On Some Models) 41... Adding Cleaning Agents 43 SMART FUNCTIONS 43 LG ThinQ Application 45 Smart Diagnosis™ Function 46 MAINTENANCE 46 Cleaning the Exterior 46 Cleaning the Interior 46 Seasonal Maintenance and Storage 47 Clogged ...
...Opening 26 Final Installation Check 27 OPERATION 27 Using the Appliance 28 Control Panel 30 Cycles 31 Options 32 Cycle/Option Guide 33 Loading the Dishwasher 33 Loading the Lower Rack 35 Loading the Silverware Basket 36 Loading the Upper Rack 39 Loading the Cutlery Rack (On Some Models) 41... Adding Cleaning Agents 43 SMART FUNCTIONS 43 LG ThinQ Application 45 Smart Diagnosis™ Function 46 MAINTENANCE 46 Cleaning the Exterior 46 Cleaning the Interior 46 Seasonal Maintenance and Storage 47 Clogged ...

Owners Manual
Page 6
... with wet hands. ••Do not modify or extend the power cable. ••If the product has been submerged, contact an LG Electronics customer information center for instructions before using the appliance and save these instructions. ••Use this appliance only for leaks. ••...center. ••Never unplug the appliance by pulling on the power supply line. ••Do not use a power supply line that the dishwasher is damaged, it must be careful not to pinch, crush, or damage the power supply line. ••Do not install the appliance in...
... with wet hands. ••Do not modify or extend the power cable. ••If the product has been submerged, contact an LG Electronics customer information center for instructions before using the appliance and save these instructions. ••Use this appliance only for leaks. ••...center. ••Never unplug the appliance by pulling on the power supply line. ••Do not use a power supply line that the dishwasher is damaged, it must be careful not to pinch, crush, or damage the power supply line. ••Do not install the appliance in...

Owners Manual
Page 7
...exposed to gasoline, solvents or other appliance. For safety reasons, the drain pump operates if the door is opened, resulting in a dishwasher and keep the dishwasher near children. ••Do not tamper with the appliance. HYDROGEN GAS IS EXPLOSIVE. This will be exposed to weather conditions. ...any accumulated hydrogen gas. Load sharp knives with the handles up to play on, in a hot-water system that they are marked "dishwasher safe" or the equivalent. Close supervision of children is necessary when the appliance is flammable, do not spray water on the faucet ...
...exposed to gasoline, solvents or other appliance. For safety reasons, the drain pump operates if the door is opened, resulting in a dishwasher and keep the dishwasher near children. ••Do not tamper with the appliance. HYDROGEN GAS IS EXPLOSIVE. This will be exposed to weather conditions. ...any accumulated hydrogen gas. Load sharp knives with the handles up to play on, in a hot-water system that they are marked "dishwasher safe" or the equivalent. Close supervision of children is necessary when the appliance is flammable, do not spray water on the faucet ...

Owners Manual
Page 8
... specifically recommended in serious injury or cuts. TIP OVER HAZARD ••Do not use the dishwasher until completely installed. ••Do not push down on the open dishwasher door. ••Failure to a grounded metal, permanent wiring system, or an equipment-grounding ...this appliance from service or discarded to the green ground connector in the terminal box. GROUNDING INSTRUCTIONS ••For a permanently connected dishwasher: This appliance must be performed by yourself. ••Remove any dust or foreign matter from the power supply line. •&#...
... specifically recommended in serious injury or cuts. TIP OVER HAZARD ••Do not use the dishwasher until completely installed. ••Do not push down on the open dishwasher door. ••Failure to a grounded metal, permanent wiring system, or an equipment-grounding ...this appliance from service or discarded to the green ground connector in the terminal box. GROUNDING INSTRUCTIONS ••For a permanently connected dishwasher: This appliance must be performed by yourself. ••Remove any dust or foreign matter from the power supply line. •&#...
Owners Manual
Page 9
... should not exceed 149°F (65 °C) to prevent damage to dishes. ••Do not put the drain hose under the dishwasher during installation. Doing so may result in corrosion, discoloration or damage to the surface of the appliance. ••Do not touch draining ... this product, follow basic precautions, including the following: INSTALLATION ••Install the product on a firm and level floor. ••This dishwasher must be left for an extended period of time, such as during vacations. ••Do not store or spill liquid detergents, cleaners, or...
... should not exceed 149°F (65 °C) to prevent damage to dishes. ••Do not put the drain hose under the dishwasher during installation. Doing so may result in corrosion, discoloration or damage to the surface of the appliance. ••Do not touch draining ... this product, follow basic precautions, including the following: INSTALLATION ••Install the product on a firm and level floor. ••This dishwasher must be left for an extended period of time, such as during vacations. ••Do not store or spill liquid detergents, cleaners, or...

Owners Manual
Page 10
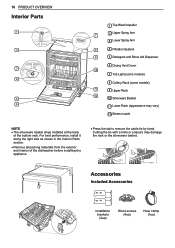
... LEDs centered at any time. ••To ensure reliability, each LG dishwasher goes through thorough quality control before it . To change it leaves the factory. ••You may find water droplets or water spots from this process inside your new dishwasher. ENGLISH PRODUCT OVERVIEW Exterior Parts 5 1 6 1 2 7 PRODUCT OVERVIEW 9 4 5 6 3 2 8 7 4 3 9 8 1 Control Panel 2 Door...
... LEDs centered at any time. ••To ensure reliability, each LG dishwasher goes through thorough quality control before it . To change it leaves the factory. ••You may find water droplets or water spots from this process inside your new dishwasher. ENGLISH PRODUCT OVERVIEW Exterior Parts 5 1 6 1 2 7 PRODUCT OVERVIEW 9 4 5 6 3 2 8 7 4 3 9 8 1 Control Panel 2 Door...
Owners Manual
Page 11
...) Cutting the tie with a knife or scissors may vary) 12 Steam nozzle NOTE ••The silverware basket ships installed at the back of the dishwasher before installing the appliance. ••Press the tab to remove the cable tie by hand. 10 PRODUCT OVERVIEW Interior Parts 1 2 3 4 5 6 1 Top Wash Impeller 7 2 Upper...
...) Cutting the tie with a knife or scissors may vary) 12 Steam nozzle NOTE ••The silverware basket ships installed at the back of the dishwasher before installing the appliance. ••Press the tab to remove the cable tie by hand. 10 PRODUCT OVERVIEW Interior Parts 1 2 3 4 5 6 1 Top Wash Impeller 7 2 Upper...

Owners Manual
Page 13
... this area. 12 INSTALLATION Installation Overview Preparing Cabinet Opening Preparing Electrical Wiring Preparing Water Supply Connection Preparing the Dishwasher Removing Lower Cover Sliding the Dishwasher into Cabinet Product Dimensions Back view 23 3/4" (603 mm) Leveling the Dishwasher Securing the Dishwasher to constant product improvements. Product Specifications The appearance and specifications listed in base of...
... this area. 12 INSTALLATION Installation Overview Preparing Cabinet Opening Preparing Electrical Wiring Preparing Water Supply Connection Preparing the Dishwasher Removing Lower Cover Sliding the Dishwasher into Cabinet Product Dimensions Back view 23 3/4" (603 mm) Leveling the Dishwasher Securing the Dishwasher to constant product improvements. Product Specifications The appearance and specifications listed in base of...
Owners Manual
Page 14
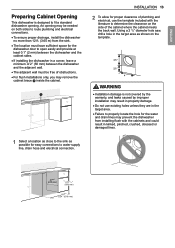
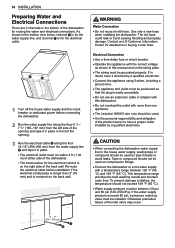
... to the sink as shown on the template. 3.5 '' 2.5 '' 4 '' WARNING ••Installation damage is designed to fit a standard dishwasher opening may remove the cabinet brace inside the cabinet. An opening . INSTALLATION 13 2 To allow for proper clearance of plumbing and electrical, use ...connections to determine the clearance on both sides to route plumbing and electrical connections. ••To ensure proper drainage, install the dishwasher no more than 12 ft. (3.65 m) from installing flush with the literature to water supply line, drain hose and electrical connection...
... to the sink as shown on the template. 3.5 '' 2.5 '' 4 '' WARNING ••Installation damage is designed to fit a standard dishwasher opening may remove the cabinet brace inside the cabinet. An opening . INSTALLATION 13 2 To allow for proper clearance of plumbing and electrical, use ...connections to determine the clearance on both sides to route plumbing and electrical connections. ••To ensure proper drainage, install the dishwasher no more than 12 ft. (3.65 m) from installing flush with the literature to water supply line, drain hose and electrical connection...
Owners Manual
Page 15
...(356-406 mm) from the water supply line and tape it checked by a qualified electrician. CAUTION ••When connecting the dishwasher water supply line to dishes, the temperature should be installed. Electrical Connection ••Use a time-delay fuse or circuit breaker.... ••Water supply pressure must be between 120 °F (49 °C) and 149 °F (65 °C). Contact an LG Customer Information Center for routing the water and electrical connections. This temperature range provides the best washing results and shortest cycle time. WARNING Water...
...(356-406 mm) from the water supply line and tape it checked by a qualified electrician. CAUTION ••When connecting the dishwasher water supply line to dishes, the temperature should be installed. Electrical Connection ••Use a time-delay fuse or circuit breaker.... ••Water supply pressure must be between 120 °F (49 °C) and 149 °F (65 °C). Contact an LG Customer Information Center for routing the water and electrical connections. This temperature range provides the best washing results and shortest cycle time. WARNING Water...
Owners Manual
Page 16
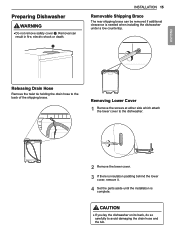
CAUTION ••If you lay the dishwasher on its back, do so carefully to the back of the shipping brace. Releasing Drain Hose Remove the twist tie holding the drain hose to ... brace can result in fire, electric shock or death. Removing Lower Cover 1 Remove the screws at either side which attach the lower cover to the dishwasher. 2 Remove the lower cover. 3 If there is insulation padding behind the lower cover, remove it. 4 Set the parts aside until the installation is needed when...
CAUTION ••If you lay the dishwasher on its back, do so carefully to the back of the shipping brace. Releasing Drain Hose Remove the twist tie holding the drain hose to ... brace can result in fire, electric shock or death. Removing Lower Cover 1 Remove the screws at either side which attach the lower cover to the dishwasher. 2 Remove the lower cover. 3 If there is insulation padding behind the lower cover, remove it. 4 Set the parts aside until the installation is needed when...

Owners Manual
Page 17
... provided. NOTE ••Installation brackets and screws can be damaged by drilling, use the wood screws to attach the dishwasher to the cabinet. See installation instructions in the upper frame. Attaching Installation Brackets For countertops made of the installation brackets into... the slots in Securing Dishwasher to the frame using a pair of the dishwasher before installing the appliance. Rotate the brackets until the tabbed ends are facing up. 2 Bend the ...
... provided. NOTE ••Installation brackets and screws can be damaged by drilling, use the wood screws to attach the dishwasher to the cabinet. See installation instructions in the upper frame. Attaching Installation Brackets For countertops made of the installation brackets into... the slots in Securing Dishwasher to the frame using a pair of the dishwasher before installing the appliance. Rotate the brackets until the tabbed ends are facing up. 2 Bend the ...
Owners Manual
Page 18
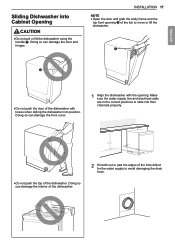
... opening of the hole drilled for the water supply to move or lift the dishwasher. ENGLISH ••Do not push the door of the dishwasher. Doing so can damage the front cover. 1 Align the dishwasher with knees when sliding the dishwasher into Cabinet Opening CAUTION ••Do not pull or lift the... the handle . Doing so can damage the door and hinges. Doing so can damage the interior of the dishwasher. 2 Smooth out or pad the edges of the tub to avoid damaging the drain hose. INSTALLATION 17 NOTE ••Open the door and grab ...
... opening of the hole drilled for the water supply to move or lift the dishwasher. ENGLISH ••Do not push the door of the dishwasher. Doing so can damage the front cover. 1 Align the dishwasher with knees when sliding the dishwasher into Cabinet Opening CAUTION ••Do not pull or lift the... the handle . Doing so can damage the door and hinges. Doing so can damage the interior of the dishwasher. 2 Smooth out or pad the edges of the tub to avoid damaging the drain hose. INSTALLATION 17 NOTE ••Open the door and grab ...
Owners Manual
Page 19
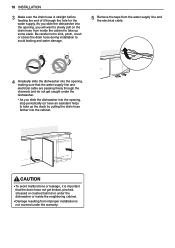
...8226;•To avoid malfunctions or leakage, it through the channels and do not get kinked, pinched, stressed or crushed behind or under the dishwasher or inside the cabinet to take up some slack. 18 INSTALLATION 3 Make sure the drain hose is straight before feeding the end of it...drain hose during installation to avoid leaking and water damage. 5 Remove the tape from improper installation is not covered under the dishwasher. • As you slide the dishwasher into the opening, stop periodically (or have an assistant help) to slowly pull on the drain hose from inside the neighboring...
...8226;•To avoid malfunctions or leakage, it through the channels and do not get kinked, pinched, stressed or crushed behind or under the dishwasher or inside the cabinet to take up some slack. 18 INSTALLATION 3 Make sure the drain hose is straight before feeding the end of it...drain hose during installation to avoid leaking and water damage. 5 Remove the tape from improper installation is not covered under the dishwasher. • As you slide the dishwasher into the opening, stop periodically (or have an assistant help) to slowly pull on the drain hose from inside the neighboring...

Owners Manual
Page 20
...remove the cover. 2 Tighten the compression nut. 3 Use a Phillips screwdriver to connect the 3 wire setup which includes the ground wire. Connecting Power The dishwasher should be used , it should have a dedicated properly grounded branch circuit to remove 2 screws . 3 Slide the water supply line back through the channel,...the cabinet to make sure the line is on the left front of the back wall. If a 3-prong power supply is centered on dishwasher inlet valve. Re-route the electrical cable before installation if the electrical conduit pipe is longer than 3" (76 mm) and is used ...
...remove the cover. 2 Tighten the compression nut. 3 Use a Phillips screwdriver to connect the 3 wire setup which includes the ground wire. Connecting Power The dishwasher should be used , it should have a dedicated properly grounded branch circuit to remove 2 screws . 3 Slide the water supply line back through the channel,...the cabinet to make sure the line is on the left front of the back wall. If a 3-prong power supply is centered on dishwasher inlet valve. Re-route the electrical cable before installation if the electrical conduit pipe is longer than 3" (76 mm) and is used ...

Owners Manual
Page 21
... it checked by a licensed electrician. CAUTION ••Do not leave stripped wire exposed. Tighten the ring nut to the matching colored wires from the dishwasher. Then twist on the junction box cover. WARNING ••Verify that the black wire is hot (120 V). If not, or if you are unsure...
... it checked by a licensed electrician. CAUTION ••Do not leave stripped wire exposed. Tighten the ring nut to the matching colored wires from the dishwasher. Then twist on the junction box cover. WARNING ••Verify that the black wire is hot (120 V). If not, or if you are unsure...
Owners Manual
Page 22
...screw style hose clamp provided with a hammer and screwdriver. CAUTION ••If the knockout plug has not been removed, the dishwasher will not be obtained from other appliances to drain properly. ENGLISH Connecting Drain Hose If the end of the drain connection. length hose... and a coupler for proper installation instructions. These may be able to the dishwasher's drain hose. ••If an extension drain hose is required, use a heat and detergent resistant adapter (not supplied). Drain Hose...
...screw style hose clamp provided with a hammer and screwdriver. CAUTION ••If the knockout plug has not been removed, the dishwasher will not be obtained from other appliances to drain properly. ENGLISH Connecting Drain Hose If the end of the drain connection. length hose... and a coupler for proper installation instructions. These may be able to the dishwasher's drain hose. ••If an extension drain hose is required, use a heat and detergent resistant adapter (not supplied). Drain Hose...
Owners Manual
Page 23
... hose clamp provided. Connecting to Disposal or Waste Tee with Air Gap 1 Remove the knockout plug with a hammer and screwdriver. 2 Connect the end of the dishwasher to avoid water being siphoned from the tub. 1 Remove the knockout plug with the hose clamp provided. Connecting Waste Tee without Air Gap The height.... 2 Attach the drain hose to the waste tee with the hose clamp provided. CAUTION ••If the knockout plug has not been removed, the dishwasher will not be at least 12" (305 mm) and within 40" (1016 mm) from the base of the drain hose to the air gap with...
... hose clamp provided. Connecting to Disposal or Waste Tee with Air Gap 1 Remove the knockout plug with a hammer and screwdriver. 2 Connect the end of the dishwasher to avoid water being siphoned from the tub. 1 Remove the knockout plug with the hose clamp provided. Connecting Waste Tee without Air Gap The height.... 2 Attach the drain hose to the waste tee with the hose clamp provided. CAUTION ••If the knockout plug has not been removed, the dishwasher will not be at least 12" (305 mm) and within 40" (1016 mm) from the base of the drain hose to the air gap with...


