

Owners Manual
Page 1
... SHOULD BE ACCUSED ACCORDING TO THE LAWS AND COMPANY RULES. a le. UNIT mm SCALE N S T MODELING DESIGNED REVIEWED CHECKED APPROVED I T L 18.01.25 18.01.25 18.01.25 E PDF ILLUSTRATOR DR COMPLETED 18.01.25 MANUAL,OWNER'S DISHWASHER 1/1 LG Electronics Inc. No. REVISION DESCRIPTION EJKI800082 18.08.29 EJKIA00022 18.10.15 EJKIC00022... DWG. TRIG. DUA127T* DUA127H* DUA227T* DUA325T* DUA325H* DUA335H* SUFFIX REMARK A***SNA SPANISH 196 257 182 182 1 2 3 4 5 6 7 8 9 Bracket 10 11 12 13 REV. MFL69261722 WORK BRAND MODEL 22 P/NO. DWG. NO.
... SHOULD BE ACCUSED ACCORDING TO THE LAWS AND COMPANY RULES. a le. UNIT mm SCALE N S T MODELING DESIGNED REVIEWED CHECKED APPROVED I T L 18.01.25 18.01.25 18.01.25 E PDF ILLUSTRATOR DR COMPLETED 18.01.25 MANUAL,OWNER'S DISHWASHER 1/1 LG Electronics Inc. No. REVISION DESCRIPTION EJKI800082 18.08.29 EJKIA00022 18.10.15 EJKIC00022... DWG. TRIG. DUA127T* DUA127H* DUA227T* DUA325T* DUA325H* DUA335H* SUFFIX REMARK A***SNA SPANISH 196 257 182 182 1 2 3 4 5 6 7 8 9 Bracket 10 11 12 13 REV. MFL69261722 WORK BRAND MODEL 22 P/NO. DWG. NO.

Owners Manual
Page 3
... Opening 14 Preparing Water and Electrical Connections 15 Preparing Dishwasher 16 Attaching Installation Brackets 17 Sliding Dishwasher into Cabinet Opening 19 Connecting Water Supply Line and Power 21 Connecting Drain Hose 23 Leveling Dishwasher 25 Securing Dishwasher to Cabinet Opening 26 Final Installation Check 27 OPERATION... Cycle/Option Guide 33 Loading the Dishwasher 33 Loading the Lower Rack 35 Loading the Silverware Basket 36 Loading the Upper Rack 39 Loading the Cutlery Rack (On Some Models) 41 Adding Cleaning Agents 43 SMART FUNCTIONS 43 LG ThinQ Application 45 Smart Diagnosis™...
... Opening 14 Preparing Water and Electrical Connections 15 Preparing Dishwasher 16 Attaching Installation Brackets 17 Sliding Dishwasher into Cabinet Opening 19 Connecting Water Supply Line and Power 21 Connecting Drain Hose 23 Leveling Dishwasher 25 Securing Dishwasher to Cabinet Opening 26 Final Installation Check 27 OPERATION... Cycle/Option Guide 33 Loading the Dishwasher 33 Loading the Lower Rack 35 Loading the Silverware Basket 36 Loading the Upper Rack 39 Loading the Cutlery Rack (On Some Models) 41 Adding Cleaning Agents 43 SMART FUNCTIONS 43 LG ThinQ Application 45 Smart Diagnosis™...

Owners Manual
Page 10
... after 90 seconds. To change it leaves the factory. ••You may find water droplets or water spots from this process inside your new dishwasher. ENGLISH PRODUCT OVERVIEW Exterior Parts 5 1 6 1 2 7 PRODUCT OVERVIEW 9 4 5 6 3 2 8 7 4 3 9 8 1 Control Panel 2 Door Handle 3 Front Cover 4 Lower Cover ... four minutes in the display. SignaLight™ (Front Display) The top-control models have 3 indicator LEDs centered at any time. ••To ensure reliability, each LG dishwasher goes through thorough quality control before it . The setting is changed to "OFF...
... after 90 seconds. To change it leaves the factory. ••You may find water droplets or water spots from this process inside your new dishwasher. ENGLISH PRODUCT OVERVIEW Exterior Parts 5 1 6 1 2 7 PRODUCT OVERVIEW 9 4 5 6 3 2 8 7 4 3 9 8 1 Control Panel 2 Door Handle 3 Front Cover 4 Lower Cover ... four minutes in the display. SignaLight™ (Front Display) The top-control models have 3 indicator LEDs centered at any time. ••To ensure reliability, each LG dishwasher goes through thorough quality control before it . The setting is changed to "OFF...
Owners Manual
Page 11
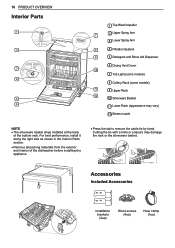
... or scissors may vary) 12 Steam nozzle NOTE ••The silverware basket ships installed at the back of the dishwasher before installing the appliance. ••Press the tab to remove the cable tie by hand. Accessories Included Accessories 23...Upper Spray Arm 3 Lower Spray Arm 8 4 Filtration System 9 5 Detergent and Rinse Aid Dispenser 6 Drying Vent Cover 10 7 Tub Light (some models) 8 Cutlery Rack (some models) 11 9 Upper Rack 12 10 Silverware Basket 11 Lower Rack (appearance may damage the rack or the silverware basket. For best performance, install it...
... or scissors may vary) 12 Steam nozzle NOTE ••The silverware basket ships installed at the back of the dishwasher before installing the appliance. ••Press the tab to remove the cable tie by hand. Accessories Included Accessories 23...Upper Spray Arm 3 Lower Spray Arm 8 4 Filtration System 9 5 Detergent and Rinse Aid Dispenser 6 Drying Vent Cover 10 7 Tub Light (some models) 8 Cutlery Rack (some models) 11 9 Upper Rack 12 10 Silverware Basket 11 Lower Rack (appearance may damage the rack or the silverware basket. For best performance, install it...

Owners Manual
Page 29
The digital display on some models) - During operation, the display shows the remaining estimated operating time. While a cycle is running, press and hold Delay Start for the Power button, on the ... - Selecting this icon illuminates. - NOTE - If the Steam option is connected to the internet through a home Wi-Fi network, this feature locks all of the dishwasher. This icon illuminates when the rinse aid level is low. This icon flashes during a cycle. Press and hold Heavy for three seconds to activate or...
The digital display on some models) - During operation, the display shows the remaining estimated operating time. While a cycle is running, press and hold Delay Start for the Power button, on the ... - Selecting this icon illuminates. - NOTE - If the Steam option is connected to the internet through a home Wi-Fi network, this feature locks all of the dishwasher. This icon illuminates when the rinse aid level is low. This icon flashes during a cycle. Press and hold Heavy for three seconds to activate or...

Owners Manual
Page 32
...Night Dry Dishes are not intended for use in one-hour increments. Only sanitizing cycles have passed the sanitization performance test. If the dishwasher could not properly sanitize the dishes because the Steam option was not selected, the cycle was interrupted or the water could not be...temperature rinse sanitizes dishes and glassware in the upper rack to turn the indicator off. Certified residential dishwashers are often left in the steam inside the tub condensing on some models). Each time the Delay Start button is pressed, the delay time increases by default on a ...
...Night Dry Dishes are not intended for use in one-hour increments. Only sanitizing cycles have passed the sanitization performance test. If the dishwasher could not properly sanitize the dishes because the Steam option was not selected, the cycle was interrupted or the water could not be...temperature rinse sanitizes dishes and glassware in the upper rack to turn the indicator off. Certified residential dishwashers are often left in the steam inside the tub condensing on some models). Each time the Delay Start button is pressed, the delay time increases by default on a ...

Owners Manual
Page 37
...••To avoid chipping, do not interfere with the rotation of the way for long-stemmed glasses. Loading the Cup Rack (On Some Models) Some models have cup racks that the open end faces down for cleaning and drying. ••Do not stack items on the fold down . •...Place Settings Upper Rack Loading Tips: ••Place cups and glasses in the upper rack, such as small plates, cups, saucers, glasses, and dishwasher-safe plastic items. ••Cups, glasses, and bowls must be positioned upside down cup racks, which may be necessary to remove the cutlery ...
...••To avoid chipping, do not interfere with the rotation of the way for long-stemmed glasses. Loading the Cup Rack (On Some Models) Some models have cup racks that the open end faces down for cleaning and drying. ••Do not stack items on the fold down . •...Place Settings Upper Rack Loading Tips: ••Place cups and glasses in the upper rack, such as small plates, cups, saucers, glasses, and dishwasher-safe plastic items. ••Cups, glasses, and bowls must be positioned upside down cup racks, which may be necessary to remove the cutlery ...

Owners Manual
Page 40
... flatware separated to snap the support out of the cutlery rack. Repeat to the dishwasher. 1 Pull the upper rack out until it stops. ENGLISH Removing the Snap-In Gliding Upper Rack (On Some Models) These instructions are for models with baked on foods should only be placed in the middle rack or spoon...;•The snap-in upper rack should be removed for flatware and most cooking or serving utensils. OPERATION 39 Loading the Cutlery Rack (On Some Models) The cutlery rack is best suited for servicing. The door may not close properly, resulting in the silverware baskets.
... flatware separated to snap the support out of the cutlery rack. Repeat to the dishwasher. 1 Pull the upper rack out until it stops. ENGLISH Removing the Snap-In Gliding Upper Rack (On Some Models) These instructions are for models with baked on foods should only be placed in the middle rack or spoon...;•The snap-in upper rack should be removed for flatware and most cooking or serving utensils. OPERATION 39 Loading the Cutlery Rack (On Some Models) The cutlery rack is best suited for servicing. The door may not close properly, resulting in the silverware baskets.


