
Owner's Manual (English)
Page 3
...door seal; Always read and follow basic precautions, including the following: • This manual contains very important information regarding the installation, use by failure to property. English IMPORTANT SAFETY INSTRUCTIONS READ ALL INSTRUCTIONS BEFORE USE Your safety and the safety of others is...injury or damage to follow these safety and caution instructions. • Read all instructions carefully before using this appliance, follow all dishwasher detergents and additives out of the reach of children. • This appliance is flammable, do not allow children to the wash...
...door seal; Always read and follow basic precautions, including the following: • This manual contains very important information regarding the installation, use by failure to property. English IMPORTANT SAFETY INSTRUCTIONS READ ALL INSTRUCTIONS BEFORE USE Your safety and the safety of others is...injury or damage to follow these safety and caution instructions. • Read all instructions carefully before using this appliance, follow all dishwasher detergents and additives out of the reach of children. • This appliance is flammable, do not allow children to the wash...

Owner's Manual (English)
Page 4
... with a qualified technician. • Do not install or store the dishwasher where it to tip over. ELECTRICAL SAFETY WARNING Electrical Shock Hazard Failure to follow basic precautions, including the following: For a permanently connected dishwasher: This appliance must be connected to a grounded ...Hazard Do not put excessive downward force on the open dishwasher door prior to installation, as this precaution may result in electrical shock. • Disassembly or repair must be used with the Installation Instructions. Failure to provide adequate grounding of this appliance,...
... with a qualified technician. • Do not install or store the dishwasher where it to tip over. ELECTRICAL SAFETY WARNING Electrical Shock Hazard Failure to follow basic precautions, including the following: For a permanently connected dishwasher: This appliance must be connected to a grounded ...Hazard Do not put excessive downward force on the open dishwasher door prior to installation, as this precaution may result in electrical shock. • Disassembly or repair must be used with the Installation Instructions. Failure to provide adequate grounding of this appliance,...

Owner's Manual (English)
Page 20
.... Connect the power supply or cord properly. TROUBLESHOOTING BEFORE CALLING FOR SERVICE Problem Possible Causes Solutions Dishwasher does not operate Dishwasher operates too long Odor Water remains in tub after completion of detergent. Unit is not completely closed... and latched. Make sure the door is not connected. Replace fuse or reset circuit breaker. Insufficient detergent. Use the recommended amount of cycle Spots and filming on installing...
.... Connect the power supply or cord properly. TROUBLESHOOTING BEFORE CALLING FOR SERVICE Problem Possible Causes Solutions Dishwasher does not operate Dishwasher operates too long Odor Water remains in tub after completion of detergent. Unit is not completely closed... and latched. Make sure the door is not connected. Replace fuse or reset circuit breaker. Insufficient detergent. Use the recommended amount of cycle Spots and filming on installing...

Owner's Manual (English)
Page 22
... this full one-year warranty, LGE will replace the defective part(s). Box 240007 201 James Record Road Huntsville, Alabama 35813 ATTN: CIC 22 9. Ten years from the date of original consumer purchase of the product, LG Electronics will also provide, free of the Dishwasher which...or plumbing, or to a defect in materials or workmanship. Replacement units and repair parts are warranted for delivery or pick-up, installation, instruction, replacement of house fuses, connection of the original part. NEITHER THE MANUFACTURER NOR ITS U.S. Failure of product to the instructions...
... this full one-year warranty, LGE will replace the defective part(s). Box 240007 201 James Record Road Huntsville, Alabama 35813 ATTN: CIC 22 9. Ten years from the date of original consumer purchase of the product, LG Electronics will also provide, free of the Dishwasher which...or plumbing, or to a defect in materials or workmanship. Replacement units and repair parts are warranted for delivery or pick-up, installation, instruction, replacement of house fuses, connection of the original part. NEITHER THE MANUFACTURER NOR ITS U.S. Failure of product to the instructions...

Owner's Manual (English)
Page 23
...installed in materials or workmanship and is reported within one (1) week of delivery. 10.Damage or missing items to any display, open box, discounted, or refurbished Product. 11.Products with original serial numbers that are parts besides those that negates or varies any consumable parts. 14.Repairs when your LG Dishwasher...and reinstallation of the Product if it conflicts with published installation instructions, including the Product owner's and installation manuals. 17.Accessories to deliver, pick up, or install the product; LG CANADA'S SOLE LIABILITY IS LIMITED TO THE WARRANTY SET ...
...installed in materials or workmanship and is reported within one (1) week of delivery. 10.Damage or missing items to any display, open box, discounted, or refurbished Product. 11.Products with original serial numbers that are parts besides those that negates or varies any consumable parts. 14.Repairs when your LG Dishwasher...and reinstallation of the Product if it conflicts with published installation instructions, including the Product owner's and installation manuals. 17.Accessories to deliver, pick up, or install the product; LG CANADA'S SOLE LIABILITY IS LIMITED TO THE WARRANTY SET ...
Service Manual
Page 2
CAUTION...4 2. TROUBLE DIAGNOSES AND REPAIR BY SYMPTOM 23 9. REPLACEMENT PART LIST 41 -3- PARTS NAME ...11 6. HOW TO DISASSEMBLE 13 8. TROUBLE SHOOTING ACCORDING TO DISPLAYED ERROR MESSAGE...........21 B. CONTENTS 1. TROUBLE SHOOTING METHODS 21 A. SPECIFICATIONS ...5 3. FEATURES & TECHNICAL EXPLANATION 7 5. EXPLODED VIEW ...34 11. WIRING DIAGRAM...6 4. PROGRAM CHART ...12 7. INSTALLATION INSTRUCTION 27 10.
CAUTION...4 2. TROUBLE DIAGNOSES AND REPAIR BY SYMPTOM 23 9. REPLACEMENT PART LIST 41 -3- PARTS NAME ...11 6. HOW TO DISASSEMBLE 13 8. TROUBLE SHOOTING ACCORDING TO DISPLAYED ERROR MESSAGE...........21 B. CONTENTS 1. TROUBLE SHOOTING METHODS 21 A. SPECIFICATIONS ...5 3. FEATURES & TECHNICAL EXPLANATION 7 5. EXPLODED VIEW ...34 11. WIRING DIAGRAM...6 4. PROGRAM CHART ...12 7. INSTALLATION INSTRUCTION 27 10.
Service Manual
Page 4
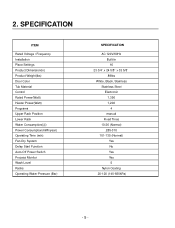
SPECIFICATION ITEM Rated Voltage / Frequency Installation Place Settings Product Dimension(in) Product Weight(lbs) Door Color Tub Material Control Rated Power(Watt) Heater Power(Watt) Programs Upper Rack Position Lower Rack ...
SPECIFICATION ITEM Rated Voltage / Frequency Installation Place Settings Product Dimension(in) Product Weight(lbs) Door Color Tub Material Control Rated Power(Watt) Heater Power(Watt) Programs Upper Rack Position Lower Rack ...
Service Manual
Page 10
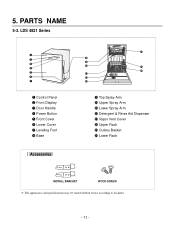
PARTS NAME 5-3. LDS 4821 Series � Control Panel � Front Display � Door Handle � Power Button � Front Cover � Lower Cover � Leveling Foot � Base � Top Spray Arm � Upper Spray Arm � Lower Spray Arm � Detergent & Rinse Aid Dispenser � Vapor Vent Cover � Upper Rack � Cutlery Basket � Lower Rack INSTALL BRACKET WOOD SCREW ※ The appearance and specifications may be varied without notice according to localities. - 11 - 5.
PARTS NAME 5-3. LDS 4821 Series � Control Panel � Front Display � Door Handle � Power Button � Front Cover � Lower Cover � Leveling Foot � Base � Top Spray Arm � Upper Spray Arm � Lower Spray Arm � Detergent & Rinse Aid Dispenser � Vapor Vent Cover � Upper Rack � Cutlery Basket � Lower Rack INSTALL BRACKET WOOD SCREW ※ The appearance and specifications may be varied without notice according to localities. - 11 - 5.
Service Manual
Page 20
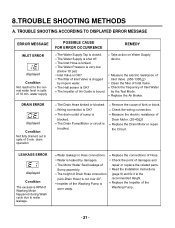
... ACCORDING TO DISPLAYED ERROR MESSAGE ERROR MESSAGE INLET ERROR displayed Condition Not reached to the recommended Height. Remove the cause of 10 min. Read the Installation Instructions (page 9) and fix it to the normal water level in Hose connections.
... ACCORDING TO DISPLAYED ERROR MESSAGE ERROR MESSAGE INLET ERROR displayed Condition Not reached to the recommended Height. Remove the cause of 10 min. Read the Installation Instructions (page 9) and fix it to the normal water level in Hose connections.

Service Manual
Page 26
... sink, it will sit directly on either side. The dishwasher should be installed in a corner, a minimum of the room to fit a standard dishwasher opening as the rest of 2 in the cabinet under the dishwasher is required between the dishwasher and an adjacent a wall. If there is a floor... in . (50mm) is at the same level as shown below. 2. Select a location as close to sink as possible for proper drainage. 4. INSTALLATION INSTRUCTION Step 1: PREPARE CUPBOARD OPENING...
... sink, it will sit directly on either side. The dishwasher should be installed in a corner, a minimum of the room to fit a standard dishwasher opening as the rest of 2 in the cabinet under the dishwasher is required between the dishwasher and an adjacent a wall. If there is a floor... in . (50mm) is at the same level as shown below. 2. Select a location as close to sink as possible for proper drainage. 4. INSTALLATION INSTRUCTION Step 1: PREPARE CUPBOARD OPENING...
Service Manual
Page 27
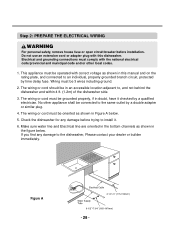
...delay fuse. The wiring or cord must be oriented as shown in this dishwasher. The wiring or cord must be grounded properly, if in doubt, have it . 6. Check the dishwasher for any damage to the dishwasher, Please contact your dealer or builder immediately. Wiring must be in the figure...be operated with correct voltage as shown in an accessible location adjacent to, and not behind the dishwasher and within 4 ft. (1.2m) of the dishwasher side. 3. If you find any damage before installation. This appliance must be connected to the same outlet by a double adapter or similar plug....
...delay fuse. The wiring or cord must be oriented as shown in this dishwasher. The wiring or cord must be grounded properly, if in doubt, have it . 6. Check the dishwasher for any damage to the dishwasher, Please contact your dealer or builder immediately. Wiring must be in the figure...be operated with correct voltage as shown in an accessible location adjacent to, and not behind the dishwasher and within 4 ft. (1.2m) of the dishwasher side. 3. If you find any damage before installation. This appliance must be connected to the same outlet by a double adapter or similar plug....
Service Manual
Page 28
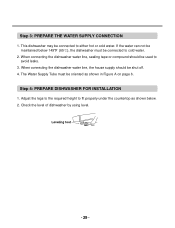
...DISHWASHER FOR INSTALLATION 1. Step 3: PREPARE THE WATER SUPPLY CONNECTION 1. When connecting the dishwasher water line, the house supply should be connected to avoid leaks. 3. If the water can not be oriented as shown below 149℉ (65℃), the dishwasher must be maintained below . 2. Check the level of dishwasher... legs to the required height to either hot or cold water. This dishwasher may be shut off. 4. The Water Supply Tube must be used to cold water. 2. When connecting the dishwasher water line, sealing tape or compound should be connected to fit properly ...
...DISHWASHER FOR INSTALLATION 1. Step 3: PREPARE THE WATER SUPPLY CONNECTION 1. When connecting the dishwasher water line, the house supply should be connected to avoid leaks. 3. If the water can not be oriented as shown below 149℉ (65℃), the dishwasher must be maintained below . 2. Check the level of dishwasher... legs to the required height to either hot or cold water. This dishwasher may be shut off. 4. The Water Supply Tube must be used to cold water. 2. When connecting the dishwasher water line, sealing tape or compound should be connected to fit properly ...

Service Manual
Page 29
Remove the Lower Cover and orient dishwasher as in Figure B. - 30 - Make sure that the drain hose inside the cabinet is not kinked. 4. Follow the instruction as shown below. 2. Before sliding the dishwasher into the cabinet opening , make all necessary height adjustments using the legs. 3. Step 5: INSTALL THE DISHWASHER IN CUPBOARD 1. Slide the dishwasher into the cupboard opening carefully.
Remove the Lower Cover and orient dishwasher as in Figure B. - 30 - Make sure that the drain hose inside the cabinet is not kinked. 4. Follow the instruction as shown below. 2. Before sliding the dishwasher into the cabinet opening , make all necessary height adjustments using the legs. 3. Step 5: INSTALL THE DISHWASHER IN CUPBOARD 1. Slide the dishwasher into the cupboard opening carefully.

Service Manual
Page 31
... be used to white Tighten the nut and make sure that the line is not kinked or sharply bent. Remove the Junction Cover and then Install the Strain Relief. 3. Replace the Junction Cover. Wire Connector Junction Case Strain Relief - 32 - Inlet Valve Elbow Water Supply Tube 4. Before connecting, turn off the...
... be used to white Tighten the nut and make sure that the line is not kinked or sharply bent. Remove the Junction Cover and then Install the Strain Relief. 3. Replace the Junction Cover. Wire Connector Junction Case Strain Relief - 32 - Inlet Valve Elbow Water Supply Tube 4. Before connecting, turn off the...


