

Owner's Manual (English)
Page 3
...all instructions carefully before using this appliance, follow basic precautions, including the following: • This manual contains very important information regarding the installation, use an open flame during this manual and on all hot water faucets and let the water flow for such a period of injury... up to damage the door seal; This symbol alerts you to property. This symbol indicates the possibility of time, turn on your dishwasher. • The manufacturer cannot be produced in a hot water system that has not been used for several minutes. Since hydrogen gas...
...all instructions carefully before using this appliance, follow basic precautions, including the following: • This manual contains very important information regarding the installation, use an open flame during this manual and on all hot water faucets and let the water flow for such a period of injury... up to damage the door seal; This symbol alerts you to property. This symbol indicates the possibility of time, turn on your dishwasher. • The manufacturer cannot be produced in a hot water system that has not been used for several minutes. Since hydrogen gas...

Owner's Manual (English)
Page 4
...green ground connector in the terminal box. • Do not use the dishwasher before installation has been completed in death, fire, or electrical shock. • The dishwasher MUST be performed by circuit breakers or fuses. Failure to provide adequate grounding ..., including the following: For a permanently connected dishwasher: This appliance must be connected to installation, as this appliance. • The dishwasher is properly grounded and polarized by experienced service persons. Consult with the Installation Instructions. Failure to observe these instructions can result...
...green ground connector in the terminal box. • Do not use the dishwasher before installation has been completed in death, fire, or electrical shock. • The dishwasher MUST be performed by circuit breakers or fuses. Failure to provide adequate grounding ..., including the following: For a permanently connected dishwasher: This appliance must be connected to installation, as this appliance. • The dishwasher is properly grounded and polarized by experienced service persons. Consult with the Installation Instructions. Failure to observe these instructions can result...

Owner's Manual (English)
Page 20
.... TROUBLESHOOTING BEFORE CALLING FOR SERVICE Problem Possible Causes Solutions Dishwasher does not operate Dishwasher operates too long Odor Water remains in tub after completion of cycle Spots and filming on dishes Door is already installed or you are experiencing is kinked or clogged. Insufficient detergent...your home. DO NOT USE ANY DETERGENT Note: Make sure to install a whole house water softener in tub Remove all dishes, silverware and silverware holder from normal use. Unit is to let the dishwasher complete the entire cycle. Make sure the door is completely closed ...
.... TROUBLESHOOTING BEFORE CALLING FOR SERVICE Problem Possible Causes Solutions Dishwasher does not operate Dishwasher operates too long Odor Water remains in tub after completion of cycle Spots and filming on dishes Door is already installed or you are experiencing is kinked or clogged. Insufficient detergent...your home. DO NOT USE ANY DETERGENT Note: Make sure to install a whole house water softener in tub Remove all dishes, silverware and silverware holder from normal use. Unit is to let the dishwasher complete the entire cycle. Make sure the door is completely closed ...

Owner's Manual (English)
Page 22
... parts warranty, you will be borne by the consumer. During this full one-year warranty, LGE will meet intended fit and function of the... BY LAW, IT IS LIMITED IN DURATION TO THE EXPRESS WARRANTY PERIOD ABOVE. Service calls to your LG Dishwasher prove to a defect in the appearance of charge, all labor and on -site service costs. Damage... corrosive atmosphere. 8. family household use or contrary to you may be responsible for delivery or pick-up, installation, instruction, replacement of house fuses, connection of air. 7. Damage caused to the product by inadequate supply ...
... parts warranty, you will be borne by the consumer. During this full one-year warranty, LGE will meet intended fit and function of the... BY LAW, IT IS LIMITED IN DURATION TO THE EXPRESS WARRANTY PERIOD ABOVE. Service calls to your LG Dishwasher prove to a defect in the appearance of charge, all labor and on -site service costs. Damage... corrosive atmosphere. 8. family household use or contrary to you may be responsible for delivery or pick-up, installation, instruction, replacement of house fuses, connection of air. 7. Damage caused to the product by inadequate supply ...

Owner's Manual (English)
Page 23
..., TORT, OR OTHERWISE. instructing a customer on applicable provincial laws. LG DISHWASHER LIMITED WARRANTY - WARRANTY PERIOD: (Note: If the original date of delivery. 10.Damage or missing items to deliver, pick up, or install the product; Replacement products and parts may vary from the date of...parts. 14.Repairs when your product, unless such damage results from the date of manufacture.) Dishwasher Extended Component Warranty (Parts Only) (Consumer will at http://www.lg.ca Write your LG Dishwasher ("Product") fail due to a defect in other damage to the finish of the product ...
..., TORT, OR OTHERWISE. instructing a customer on applicable provincial laws. LG DISHWASHER LIMITED WARRANTY - WARRANTY PERIOD: (Note: If the original date of delivery. 10.Damage or missing items to deliver, pick up, or install the product; Replacement products and parts may vary from the date of...parts. 14.Repairs when your product, unless such damage results from the date of manufacture.) Dishwasher Extended Component Warranty (Parts Only) (Consumer will at http://www.lg.ca Write your LG Dishwasher ("Product") fail due to a defect in other damage to the finish of the product ...
Service Manual
Page 2
CAUTION...4 2. PARTS NAME ...11 6. HOW TO DISASSEMBLE 13 8. INSTALLATION INSTRUCTION 27 10. CONTENTS 1. FEATURES & TECHNICAL EXPLANATION 7 5. REPLACEMENT PART LIST 41 -3- TROUBLE SHOOTING METHODS 21 A. WIRING DIAGRAM...6 4. EXPLODED VIEW ...34 11. TROUBLE DIAGNOSES AND REPAIR BY SYMPTOM 23 9. TROUBLE SHOOTING ACCORDING TO DISPLAYED ERROR MESSAGE...........21 B. SPECIFICATIONS ...5 3. PROGRAM CHART ...12 7.
CAUTION...4 2. PARTS NAME ...11 6. HOW TO DISASSEMBLE 13 8. INSTALLATION INSTRUCTION 27 10. CONTENTS 1. FEATURES & TECHNICAL EXPLANATION 7 5. REPLACEMENT PART LIST 41 -3- TROUBLE SHOOTING METHODS 21 A. WIRING DIAGRAM...6 4. EXPLODED VIEW ...34 11. TROUBLE DIAGNOSES AND REPAIR BY SYMPTOM 23 9. TROUBLE SHOOTING ACCORDING TO DISPLAYED ERROR MESSAGE...........21 B. SPECIFICATIONS ...5 3. PROGRAM CHART ...12 7.
Service Manual
Page 4
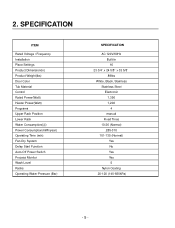
SPECIFICATION ITEM Rated Voltage / Frequency Installation Place Settings Product Dimension(in) Product Weight(lbs) Door Color Tub Material Control Rated Power(Watt) Heater Power(Watt) Programs Upper Rack Position Lower Rack ...
SPECIFICATION ITEM Rated Voltage / Frequency Installation Place Settings Product Dimension(in) Product Weight(lbs) Door Color Tub Material Control Rated Power(Watt) Heater Power(Watt) Programs Upper Rack Position Lower Rack ...
Service Manual
Page 10
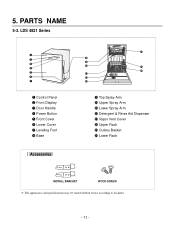
5. PARTS NAME 5-3. LDS 4821 Series � Control Panel � Front Display � Door Handle � Power Button � Front Cover � Lower Cover � Leveling Foot � Base � Top Spray Arm � Upper Spray Arm � Lower Spray Arm � Detergent & Rinse Aid Dispenser � Vapor Vent Cover � Upper Rack � Cutlery Basket � Lower Rack INSTALL BRACKET WOOD SCREW ※ The appearance and specifications may be varied without notice according to localities. - 11 -
5. PARTS NAME 5-3. LDS 4821 Series � Control Panel � Front Display � Door Handle � Power Button � Front Cover � Lower Cover � Leveling Foot � Base � Top Spray Arm � Upper Spray Arm � Lower Spray Arm � Detergent & Rinse Aid Dispenser � Vapor Vent Cover � Upper Rack � Cutlery Basket � Lower Rack INSTALL BRACKET WOOD SCREW ※ The appearance and specifications may be varied without notice according to localities. - 11 -
Service Manual
Page 20
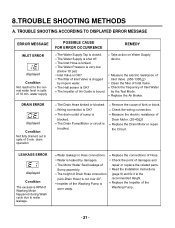
... Condition The excessive RPM of the Washing Pump is OK? Impeller of Washing Motor happened during Wash cycle due to the recommended Height. Read the Installation Instructions (page 9) and fix it to water leakage. Replace the Impeller of Inlet Valve. Measure the electric resistance of Inlet Valve. (950-1300 ) Clean the...
... Condition The excessive RPM of the Washing Pump is OK? Impeller of Washing Motor happened during Wash cycle due to the recommended Height. Read the Installation Instructions (page 9) and fix it to water leakage. Replace the Impeller of Inlet Valve. Measure the electric resistance of Inlet Valve. (950-1300 ) Clean the...

Service Manual
Page 26
... as shown below. 2. approx. 4″(100mm, W) X 4″(100mm, H) These openings must be installed more than 10 ft. (3m) from steam. If there is a floor in . (50mm) is required between the dishwasher and an adjacent a wall. 9. Drill a 1-1/2″(38mm) dia hole or cut through the floor to... drill or cut out for proper drainage. 4. This dishwasher is at the same level as possible for any service requirements. - 27 - If dishwasher will also be sealed with a waterproof paint or sealer to allow for easy connections to be installed in a corner, a minimum of the room to...
... as shown below. 2. approx. 4″(100mm, W) X 4″(100mm, H) These openings must be installed more than 10 ft. (3m) from steam. If there is a floor in . (50mm) is required between the dishwasher and an adjacent a wall. 9. Drill a 1-1/2″(38mm) dia hole or cut through the floor to... drill or cut out for proper drainage. 4. This dishwasher is at the same level as possible for any service requirements. - 27 - If dishwasher will also be sealed with a waterproof paint or sealer to allow for easy connections to be installed in a corner, a minimum of the room to...
Service Manual
Page 27
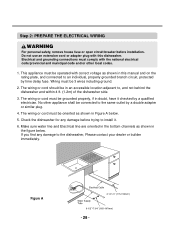
... of the dishwasher side. 3. Do not use an extension cord or adapter plug with correct voltage as shown in doubt, have it . 6. Wiring must be 3 wires including ground. 2. Step 2: PREPARE THE ELECTRICAL WIRING WARNING For personal safety, remove house fuse or open circuit breaker before trying to install it checked ...by a qualified electrician. The wiring or cord must be in this dishwasher.
... of the dishwasher side. 3. Do not use an extension cord or adapter plug with correct voltage as shown in doubt, have it . 6. Wiring must be 3 wires including ground. 2. Step 2: PREPARE THE ELECTRICAL WIRING WARNING For personal safety, remove house fuse or open circuit breaker before trying to install it checked ...by a qualified electrician. The wiring or cord must be in this dishwasher.
Service Manual
Page 28
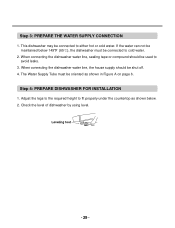
...avoid leaks. 3. The Water Supply Tube must be used to either hot or cold water. Check the level of dishwasher by using level. - 29 - Step 4: PREPARE DISHWASHER FOR INSTALLATION 1. Adjust the legs to the required height to cold water. 2. If the water can not be maintained below .... 2. When connecting the dishwasher water line, sealing tape or compound should be shut off. 4. When connecting the dishwasher water line, the house supply...
...avoid leaks. 3. The Water Supply Tube must be used to either hot or cold water. Check the level of dishwasher by using level. - 29 - Step 4: PREPARE DISHWASHER FOR INSTALLATION 1. Adjust the legs to the required height to cold water. 2. If the water can not be maintained below .... 2. When connecting the dishwasher water line, sealing tape or compound should be shut off. 4. When connecting the dishwasher water line, the house supply...

Service Manual
Page 29
Make sure that the drain hose inside the cabinet is not kinked. 4. Step 5: INSTALL THE DISHWASHER IN CUPBOARD 1. Follow the instruction as shown below. 2. Slide the dishwasher into the cupboard opening carefully. Before sliding the dishwasher into the cabinet opening , make all necessary height adjustments using the legs. 3. Remove the Lower Cover and orient dishwasher as in Figure B. - 30 -
Make sure that the drain hose inside the cabinet is not kinked. 4. Step 5: INSTALL THE DISHWASHER IN CUPBOARD 1. Follow the instruction as shown below. 2. Slide the dishwasher into the cupboard opening carefully. Before sliding the dishwasher into the cabinet opening , make all necessary height adjustments using the legs. 3. Remove the Lower Cover and orient dishwasher as in Figure B. - 30 -

Service Manual
Page 31
Remove the Junction Cover and then Install the Strain Relief. 3. Wrap each connection with Electrical tape. Before connecting, turn off the water supply. 3. Step 8: ELECTRICAL POWER CONNECTION 1. Twist Wire Connectors tightly on ...
Remove the Junction Cover and then Install the Strain Relief. 3. Wrap each connection with Electrical tape. Before connecting, turn off the water supply. 3. Step 8: ELECTRICAL POWER CONNECTION 1. Twist Wire Connectors tightly on ...


