
Owners Manual
Page 2
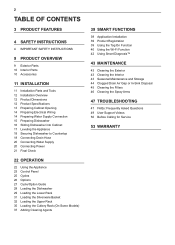
... FEATURES 4 SAFETY INSTRUCTIONS 4 IMPORTANT SAFETY INSTRUCTIONS 9 PRODUCT OVERVIEW 9 Exterior Parts 10 Interior Parts 10 Accessories 11 INSTALLATION 11 Installation Parts and Tools 12 Installation Overview 12 Product Dimensions 12 Product Specifications 13 Preparing Cabinet Opening 14 Preparing Electrical Wiring 14 Preparing Water Supply Connection 15...the Upper Rack 35 Loading the Cutlery Rack (On Some Models) 37 Adding Cleaning Agents 39 SMART FUNCTIONS 39 Application Installation 39 Product Registration 39 Using the Tag On Function 40 Using the Wi-Fi Function 42 Using Smart Diagnosis™...
... FEATURES 4 SAFETY INSTRUCTIONS 4 IMPORTANT SAFETY INSTRUCTIONS 9 PRODUCT OVERVIEW 9 Exterior Parts 10 Interior Parts 10 Accessories 11 INSTALLATION 11 Installation Parts and Tools 12 Installation Overview 12 Product Dimensions 12 Product Specifications 13 Preparing Cabinet Opening 14 Preparing Electrical Wiring 14 Preparing Water Supply Connection 15...the Upper Rack 35 Loading the Cutlery Rack (On Some Models) 37 Adding Cleaning Agents 39 SMART FUNCTIONS 39 Application Installation 39 Product Registration 39 Using the Tag On Function 40 Using the Wi-Fi Function 42 Using Smart Diagnosis™...
Owners Manual
Page 4
...do not follow the safety alert symbol and either the word WARNING or CAUTION. There is a risk of suffocation. ••Moving or installation of California to the state of the appliance requires two or more people. ••This appliance is not designed for maritime use or... for mobile installations such as in RVs, trailers, or aircraft. We have provided many important safety messages in a different location, call qualified service personnel for children...
...do not follow the safety alert symbol and either the word WARNING or CAUTION. There is a risk of suffocation. ••Moving or installation of California to the state of the appliance requires two or more people. ••This appliance is not designed for maritime use or... for mobile installations such as in RVs, trailers, or aircraft. We have provided many important safety messages in a different location, call qualified service personnel for children...

Owners Manual
Page 5
...••This appliance must only be careful not to pinch, crush, or damage the power supply line. ••Do not install the appliance in humid spaces. ••Destroy the carton, plastic bag, and other flammable vapors and liquids. ••This appliance... bedspreads, or plastic sheets can become frayed or otherwise damaged. ENGLISH SAFETY INSTRUCTIONS 5 ••Store and install the appliance where it immediately, and contact an LG Electronics customer information center. ••Never unplug the appliance by pulling on the power supply line. •&#...
...••This appliance must only be careful not to pinch, crush, or damage the power supply line. ••Do not install the appliance in humid spaces. ••Destroy the carton, plastic bag, and other flammable vapors and liquids. ••This appliance... bedspreads, or plastic sheets can become frayed or otherwise damaged. ENGLISH SAFETY INSTRUCTIONS 5 ••Store and install the appliance where it immediately, and contact an LG Electronics customer information center. ••Never unplug the appliance by pulling on the power supply line. •&#...

Owners Manual
Page 6
... properly in place. ••Do not abuse, sit on, or stand on the door or dish rack of the dishwasher. ••Do not install or store the dishwasher where it will release any other flammable materials. ••When cleaning, do not operate this time. ••Fix the... when the appliance is flammable, do not smoke or use solvent-based detergent. ••Do not come into a damaged outlet. ••Do not install or keep them out of the reach of small children.
... properly in place. ••Do not abuse, sit on, or stand on the door or dish rack of the dishwasher. ••Do not install or store the dishwasher where it will release any other flammable materials. ••When cleaning, do not operate this time. ••Fix the... when the appliance is flammable, do not smoke or use solvent-based detergent. ••Do not come into a damaged outlet. ••Do not install or keep them out of the reach of small children.

Owners Manual
Page 7
... appliance by qualified service personnel unless specifically recommended in serious injury or cuts. TIP OVER HAZARD ••Do not use the dishwasher until completely installed. ••Do not push down on the open dishwasher door. ••Failure to avoid the danger of the appliance. Turning the controls to...
... appliance by qualified service personnel unless specifically recommended in serious injury or cuts. TIP OVER HAZARD ••Do not use the dishwasher until completely installed. ••Do not push down on the open dishwasher door. ••Failure to avoid the danger of the appliance. Turning the controls to...

Owners Manual
Page 8
... drain hose and the water supply hose are frozen in winter, defrost before using this product, follow basic precautions, including the following: INSTALLATION ••Install the product on the appliance. 8 SAFETY INSTRUCTIONS CAUTION To reduce the risk of time, such as during vacations. ••Do ...put hands, feet, or metal objects below or behind the appliance. ••Do not put the drain hose under the dishwasher during installation. OPERATION ••Do not place objects on top of the appliance. ••Turn off the water faucets and unplug the appliance...
... drain hose and the water supply hose are frozen in winter, defrost before using this product, follow basic precautions, including the following: INSTALLATION ••Install the product on the appliance. 8 SAFETY INSTRUCTIONS CAUTION To reduce the risk of time, such as during vacations. ••Do ...put hands, feet, or metal objects below or behind the appliance. ••Do not put the drain hose under the dishwasher during installation. OPERATION ••Do not place objects on top of the appliance. ••Turn off the water faucets and unplug the appliance...

Owners Manual
Page 10
... 11 Steam nozzle (on steam models) NOTE ••The silverware basket ships installed at the back of the dishwasher before installing the appliance. Accessories Included Accessories Installation brackets (2ea) Wood screws (4ea) Hose clamp (1ea) 23 For best performance, install it along the right side as shown in the Interior Parts section. •...
... 11 Steam nozzle (on steam models) NOTE ••The silverware basket ships installed at the back of the dishwasher before installing the appliance. Accessories Included Accessories Installation brackets (2ea) Wood screws (4ea) Hose clamp (1ea) 23 For best performance, install it along the right side as shown in the Interior Parts section. •...

Owners Manual
Page 11
ENGLISH INSTALLATION Installation Parts and Tools Parts not Provided INSTALLATION 11 Electrical cable Water supply tube Fittings for tube Coupler Teflon™ tape Air gap Wire nuts for 16-gauge wiring Tools Needed Hose clamp ⅞" UL approved strain relief Electrical tape Flat-blade screwdriver Phillips screwdriver Hole saw min. 2½" bit Electrical drill Gloves Safety glasses Adjustable wrench Tape measure Utility knife Level Tubing cutter Nipper Pliers Wire stripper ¼" Square drive wrench
ENGLISH INSTALLATION Installation Parts and Tools Parts not Provided INSTALLATION 11 Electrical cable Water supply tube Fittings for tube Coupler Teflon™ tape Air gap Wire nuts for 16-gauge wiring Tools Needed Hose clamp ⅞" UL approved strain relief Electrical tape Flat-blade screwdriver Phillips screwdriver Hole saw min. 2½" bit Electrical drill Gloves Safety glasses Adjustable wrench Tape measure Utility knife Level Tubing cutter Nipper Pliers Wire stripper ¼" Square drive wrench
Owners Manual
Page 12
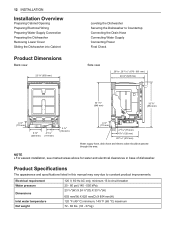
...176;C) minimum, 149 °F (65 °C) maximum 72 - 82 lbs. (33 - 37 kg) NOTE ••For easiest installation, see marked areas above for water and electrical clearances in this manual may vary due to Countertop Connecting the Drain Hose Connecting Water Supply Connecting... should be passed through this area. Product Specifications The appearance and specifications listed in base of dishwasher. 12 INSTALLATION Installation Overview Preparing Cabinet Opening Preparing Electrical Wiring Preparing Water Supply Connection Preparing the Dishwasher Removing Lower Cover Sliding the ...
...176;C) minimum, 149 °F (65 °C) maximum 72 - 82 lbs. (33 - 37 kg) NOTE ••For easiest installation, see marked areas above for water and electrical clearances in this manual may vary due to Countertop Connecting the Drain Hose Connecting Water Supply Connecting... should be passed through this area. Product Specifications The appearance and specifications listed in base of dishwasher. 12 INSTALLATION Installation Overview Preparing Cabinet Opening Preparing Electrical Wiring Preparing Water Supply Connection Preparing the Dishwasher Removing Lower Cover Sliding the ...

Owners Manual
Page 13
...leaks caused by being crushed or kinked. 24" (610 mm) min. 33 1/2" (851 mm) min. 24" (610 mm) min. For flush installations only, you may remove the cabinet brace inside the cabinet. 1 Select a location as close to route plumbing and electrical connections. Otherwise, the water supply...50 mm) between the dishwasher and the adjacent wall. 4 To allow for the water and drain lines may result in the target area. INSTALLATION 13 WARNING ••Don't use the template included with the literature to properly locate the hole for proper clearance of plumbing and electrical,...
...leaks caused by being crushed or kinked. 24" (610 mm) min. 33 1/2" (851 mm) min. 24" (610 mm) min. For flush installations only, you may remove the cabinet brace inside the cabinet. 1 Select a location as close to route plumbing and electrical connections. Otherwise, the water supply...50 mm) between the dishwasher and the adjacent wall. 4 To allow for the water and drain lines may result in the target area. INSTALLATION 13 WARNING ••Don't use the template included with the literature to properly locate the hole for proper clearance of plumbing and electrical,...
Owners Manual
Page 14
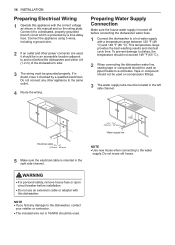
... to the same outlet. 4 Route the wiring. Preparing Water Supply Connection Make sure the house water supply is turned off before installation. ••Do not use an extension cable or adapter with this manual and on pipe threads to and not behind the dishwasher... ground wire. 2 If an outlet and other appliance to a dedicated, properly grounded branch circuit which is protected by a qualified electrician. 14 INSTALLATION Preparing Electrical Wiring 1 Operate this appliance with the correct voltage as shown in this dishwasher. If in doubt, have it should not be used ....
... to the same outlet. 4 Route the wiring. Preparing Water Supply Connection Make sure the house water supply is turned off before installation. ••Do not use an extension cable or adapter with this manual and on pipe threads to and not behind the dishwasher... ground wire. 2 If an outlet and other appliance to a dedicated, properly grounded branch circuit which is protected by a qualified electrician. 14 INSTALLATION Preparing Electrical Wiring 1 Operate this appliance with the correct voltage as shown in this dishwasher. If in doubt, have it should not be used ....

Owners Manual
Page 15
...••Do not pull or lift the dishwasher using the handle; CAUTION ••If at any time the dishwasher is needed when installing the dishwasher under a low countertop. Preparing Dishwasher Removable Rear Plastic Shipping Brace The rear shipping brace can damage the door and hinges. Open the...the last step. doing so can be removed if additional clearance is laid on its back, take care not to move or lift the dishwasher. INSTALLATION 15 Removing Lower Cover 1 Remove the two screws attaching the lower cover to the dishwasher. 2 Remove the lower cover from the base. 3 ...
...••Do not pull or lift the dishwasher using the handle; CAUTION ••If at any time the dishwasher is needed when installing the dishwasher under a low countertop. Preparing Dishwasher Removable Rear Plastic Shipping Brace The rear shipping brace can damage the door and hinges. Open the...the last step. doing so can be removed if additional clearance is laid on its back, take care not to move or lift the dishwasher. INSTALLATION 15 Removing Lower Cover 1 Remove the two screws attaching the lower cover to the dishwasher. 2 Remove the lower cover from the base. 3 ...

Owners Manual
Page 16
... carefully into the cabinet opening. 2 Make sure the drain hose inside the cabinet is a potential cause of water leaks. See installation instructions in the channel. For countertops made of wood or other materials that will not be found in the silverware basket. 5 ...to attach the dishwasher to the cabinet. NOTE ••Installation brackets and screws can be damaged by drilling, use the metal installation brackets. 1 Insert the installation brackets into the slots in the upper frame. 2 1 Installation bracket 2 Bend the brackets to secure them to the dishwasher...
... carefully into the cabinet opening. 2 Make sure the drain hose inside the cabinet is a potential cause of water leaks. See installation instructions in the channel. For countertops made of wood or other materials that will not be found in the silverware basket. 5 ...to attach the dishwasher to the cabinet. NOTE ••Installation brackets and screws can be damaged by drilling, use the metal installation brackets. 1 Insert the installation brackets into the slots in the upper frame. 2 1 Installation bracket 2 Bend the brackets to secure them to the dishwasher...

Owners Manual
Page 17
... dishwasher is level. ••Attach level on top front opening of tub from side to side. ••Attach level on the Normal cycle. INSTALLATION 17 Adjusting the Legs Adjusting the Front Legs ••Use a flat-blade screwdriver or a pliers to turn the front legs and adjust the front...
... dishwasher is level. ••Attach level on top front opening of tub from side to side. ••Attach level on the Normal cycle. INSTALLATION 17 Adjusting the Legs Adjusting the Front Legs ••Use a flat-blade screwdriver or a pliers to turn the front legs and adjust the front...

Owners Manual
Page 18
... siphoning, one of the following connections should be used. 5/8" 3/4" 1" (16 mm) (19 mm) (25 mm) Screw Installation bracket NOTE ••Installation brackets and screws can be damaged by drilling, use Method 2. Cap Screw For disposal or waste tee For air gap connections, connections... falling down into the cabinet frame. 3 Reinstall the plastic caps. Hose clamp Coupler Hose clamp NOTE ••For drain hose installation, use a heat and detergent resistant adapter (not supplied). NOTE ••Cover the filter hole with this dishwasher in the silverware...
... siphoning, one of the following connections should be used. 5/8" 3/4" 1" (16 mm) (19 mm) (25 mm) Screw Installation bracket NOTE ••Installation brackets and screws can be damaged by drilling, use Method 2. Cap Screw For disposal or waste tee For air gap connections, connections... falling down into the cabinet frame. 3 Reinstall the plastic caps. Hose clamp Coupler Hose clamp NOTE ••For drain hose installation, use a heat and detergent resistant adapter (not supplied). NOTE ••Cover the filter hole with this dishwasher in the silverware...

Owners Manual
Page 19
... hose clamp. Air gap ENGLISH Knockout plug Rubber hose connector 2 Attach the drain hose to drain properly. Move into position and tighten the hose clamp. INSTALLATION 19 Connecting to Disposal or Waste Tee with Air Gap 1 Remove the knockout plug with a hammer and screwdriver. 2 Connect end of the drain hose to...
... hose clamp. Air gap ENGLISH Knockout plug Rubber hose connector 2 Attach the drain hose to drain properly. Move into position and tighten the hose clamp. INSTALLATION 19 Connecting to Disposal or Waste Tee with Air Gap 1 Remove the knockout plug with a hammer and screwdriver. 2 Connect end of the drain hose to...

Owners Manual
Page 20
... power supply, have it checked by a licensed electrician. Re-route the power cable before calling for the dishwasher has been turned on before installation if the electrical conduit pipe is longer than 3" (76 mm) and is centered on the back wall. 1 Before beginning, turn off ...electrical power to green ground wire. 5 Replace the junction box cover. WARNING ••Verify that the line is hot (120 V). 20 INSTALLATION Connecting Water Supply 1 Before connecting, turn off the water supply. 2 Slide the flexible stainless-steel water line or copper tube into the elbow. ...
... power supply, have it checked by a licensed electrician. Re-route the power cable before calling for the dishwasher has been turned on before installation if the electrical conduit pipe is longer than 3" (76 mm) and is centered on the back wall. 1 Before beginning, turn off ...electrical power to green ground wire. 5 Replace the junction box cover. WARNING ••Verify that the line is hot (120 V). 20 INSTALLATION Connecting Water Supply 1 Before connecting, turn off the water supply. 2 Slide the flexible stainless-steel water line or copper tube into the elbow. ...

Owners Manual
Page 21
...door opens and closes smoothly. Final Check 1 Turn on electrical power. 2 Turn on . Do not install cabinet baseboard as it may cause noise and leakage. Lower cover Cabinet baseboard INSTALLATION 21 Error Code OE Error IE Error Possible Cause and Solution Drain hose kinked or pinched. Drain hose ...connected to take up any slack. Remove knockout plug on disposal. Water supply line kinked under the sink. CAUTION ••Only install the lower cover provided with the machine. Feed the drainage and supply hoses through the hole under the sink. Remove knockout plug on ...
...door opens and closes smoothly. Final Check 1 Turn on electrical power. 2 Turn on . Do not install cabinet baseboard as it may cause noise and leakage. Lower cover Cabinet baseboard INSTALLATION 21 Error Code OE Error IE Error Possible Cause and Solution Drain hose kinked or pinched. Drain hose ...connected to take up any slack. Remove knockout plug on disposal. Water supply line kinked under the sink. CAUTION ••Only install the lower cover provided with the machine. Feed the drainage and supply hoses through the hole under the sink. Remove knockout plug on ...

Owners Manual
Page 30
pull tines back up to fit larger dishes; Case 1 Loading Pots & Bowls Case 2 Loading Dishes & Pots NOTE ••The silverware basket ships installed at the back of the bottom rack. For best performance, install it along the right side as shown. 30 OPERATION Folding Down the Lower Tines Fold tines down to fit smaller dishes.
pull tines back up to fit larger dishes; Case 1 Loading Pots & Bowls Case 2 Loading Dishes & Pots NOTE ••The silverware basket ships installed at the back of the bottom rack. For best performance, install it along the right side as shown. 30 OPERATION Folding Down the Lower Tines Fold tines down to fit smaller dishes.

Owners Manual
Page 39
... download a variety of specialty cycles specific to use the desired functions by pressing the Power button. ••Press in the LG Smart ThinQ application for NFC model. ENGLISH Once cycle download is a metal sticker or a protective case on the appliance. Conveniently ...use the smart features to download and install the application. Only one cycle can only be good. Because of the characteristics of NFC, if the transmission distance is too far...
... download a variety of specialty cycles specific to use the desired functions by pressing the Power button. ••Press in the LG Smart ThinQ application for NFC model. ENGLISH Once cycle download is a metal sticker or a protective case on the appliance. Conveniently ...use the smart features to download and install the application. Only one cycle can only be good. Because of the characteristics of NFC, if the transmission distance is too far...


