Owners Manual
Page 2
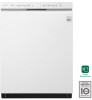
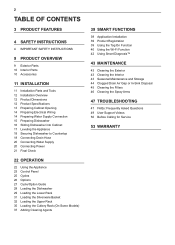
2 TABLE OF CONTENTS 3 PRODUCT FEATURES 4 SAFETY INSTRUCTIONS 4 IMPORTANT SAFETY INSTRUCTIONS 9 PRODUCT OVERVIEW 9 Exterior Parts 10 Interior Parts 10 Accessories 11 INSTALLATION 11 Installation Parts and Tools 12 Installation Overview 12 Product Dimensions 12 Product Specifications 13 Preparing Cabinet Opening 14 Preparing Electrical Wiring 14 Preparing Water Supply Connection 15 ...
2 TABLE OF CONTENTS 3 PRODUCT FEATURES 4 SAFETY INSTRUCTIONS 4 IMPORTANT SAFETY INSTRUCTIONS 9 PRODUCT OVERVIEW 9 Exterior Parts 10 Interior Parts 10 Accessories 11 INSTALLATION 11 Installation Parts and Tools 12 Installation Overview 12 Product Dimensions 12 Product Specifications 13 Preparing Cabinet Opening 14 Preparing Electrical Wiring 14 Preparing Water Supply Connection 15 ...

Owners Manual
Page 5
... chambers. ••Never attempt to operate this appliance if it is damaged, malfunctioning, partially disassembled, or has missing or broken parts, including a damaged power supply line. ••Adhere to all industry recommended safety procedures including the use of long sleeved gloves ... ••Do not, under any circumstances, cut or remove the ground from the appliance, unplug it immediately, and contact an LG Electronics customer information center. ••Never unplug the appliance by pulling on the power supply line of combustible materials (lint, paper,...
... chambers. ••Never attempt to operate this appliance if it is damaged, malfunctioning, partially disassembled, or has missing or broken parts, including a damaged power supply line. ••Adhere to all industry recommended safety procedures including the use of long sleeved gloves ... ••Do not, under any circumstances, cut or remove the ground from the appliance, unplug it immediately, and contact an LG Electronics customer information center. ••Never unplug the appliance by pulling on the power supply line of combustible materials (lint, paper,...

Owners Manual
Page 6
... your hand when closing the door of the product. ••Do not plug the dishwasher into contact with the steam outlet. ••Small parts, such as an awl or pin. ••Do not use in a dishwasher and keep them out of the reach of water supply hose before...
... your hand when closing the door of the product. ••Do not plug the dishwasher into contact with the steam outlet. ••Small parts, such as an awl or pin. ••Do not use in a dishwasher and keep them out of the reach of water supply hose before...

Owners Manual
Page 7
...on the open dishwasher door. ••Failure to the OFF position does not disconnect this Owner's Manual. Use only authorized factory parts. ••Do not disassemble or repair the appliance by qualified service personnel unless specifically recommended in this appliance from the power ... to avoid the danger of children or small animals getting trapped inside. ••Unplug the appliance before cleaning and attempting any part of electric shock. ••Before discarding the appliance, cut off the power supply line and destroy the appliance's control panel....
...on the open dishwasher door. ••Failure to the OFF position does not disconnect this Owner's Manual. Use only authorized factory parts. ••Do not disassemble or repair the appliance by qualified service personnel unless specifically recommended in this appliance from the power ... to avoid the danger of children or small animals getting trapped inside. ••Unplug the appliance before cleaning and attempting any part of electric shock. ••Before discarding the appliance, cut off the power supply line and destroy the appliance's control panel....

Owners Manual
Page 9
..., the machine turns off.) ••Green: Cycle finished normally. The green light stays on the control panel for 90 seconds. ENGLISH PRODUCT OVERVIEW Exterior Parts 4 1 5 1 6 2 PRODUCT OVERVIEW 9 5 6 7 2 3 7 8 3 4 8 9 1 Control Panel & Door Handle 2 Front Cover 3 Lower Cover 4 Shipping Brace 5 Safety Cover 6 Signal Light (some models) 7 Base 8 Leveling Feet 1 Control Panel 2 Door Handle...
..., the machine turns off.) ••Green: Cycle finished normally. The green light stays on the control panel for 90 seconds. ENGLISH PRODUCT OVERVIEW Exterior Parts 4 1 5 1 6 2 PRODUCT OVERVIEW 9 5 6 7 2 3 7 8 3 4 8 9 1 Control Panel & Door Handle 2 Front Cover 3 Lower Cover 4 Shipping Brace 5 Safety Cover 6 Signal Light (some models) 7 Base 8 Leveling Feet 1 Control Panel 2 Door Handle...

Owners Manual
Page 10
10 PRODUCT OVERVIEW Interior Parts 1 2 3 4 5 6 1 Top Wash Impeller 2 Upper Spray Arm 3 Lower Spray Arm 7 4 Filtration System 8 5 Detergent and Rinse Aid Dispenser 9 6 Drying Vent Cover 7 Cutlery Rack (some models) 10 8 Upper ... installed at the back of the dishwasher before installing the appliance. For best performance, install it along the right side as shown in the Interior Parts section. ••Remove all packing materials from the exterior and interior of the bottom rack. Accessories Included Accessories Installation brackets (2ea) Wood screws (4ea...
10 PRODUCT OVERVIEW Interior Parts 1 2 3 4 5 6 1 Top Wash Impeller 2 Upper Spray Arm 3 Lower Spray Arm 7 4 Filtration System 8 5 Detergent and Rinse Aid Dispenser 9 6 Drying Vent Cover 7 Cutlery Rack (some models) 10 8 Upper ... installed at the back of the dishwasher before installing the appliance. For best performance, install it along the right side as shown in the Interior Parts section. ••Remove all packing materials from the exterior and interior of the bottom rack. Accessories Included Accessories Installation brackets (2ea) Wood screws (4ea...

Owners Manual
Page 11
ENGLISH INSTALLATION Installation Parts and Tools Parts not Provided INSTALLATION 11 Electrical cable Water supply tube Fittings for tube Coupler Teflon™ tape Air gap Wire nuts for 16-gauge wiring Tools Needed Hose clamp ⅞" UL approved strain relief Electrical tape Flat-blade screwdriver Phillips screwdriver Hole saw min. 2½" bit Electrical drill Gloves Safety glasses Adjustable wrench Tape measure Utility knife Level Tubing cutter Nipper Pliers Wire stripper ¼" Square drive wrench
ENGLISH INSTALLATION Installation Parts and Tools Parts not Provided INSTALLATION 11 Electrical cable Water supply tube Fittings for tube Coupler Teflon™ tape Air gap Wire nuts for 16-gauge wiring Tools Needed Hose clamp ⅞" UL approved strain relief Electrical tape Flat-blade screwdriver Phillips screwdriver Hole saw min. 2½" bit Electrical drill Gloves Safety glasses Adjustable wrench Tape measure Utility knife Level Tubing cutter Nipper Pliers Wire stripper ¼" Square drive wrench

Owners Manual
Page 34
... 14" tall in the upper rack. There are free to rotate. ••With the lower position of the upper rack, check if the bottom part of the rack individually until the rack locks into place. Pushing the buttons when raising the rack will prevent the rack from locking into position...
... 14" tall in the upper rack. There are free to rotate. ••With the lower position of the upper rack, check if the bottom part of the rack individually until the rack locks into place. Pushing the buttons when raising the rack will prevent the rack from locking into position...

Owners Manual
Page 41
... equipment has been tested and found to comply with the limits for compliance could void the user's authority to Part 15 of the FCC Rules. This equipment should be installed and operated with part 15 of the FCC Rules. This equipment generates, uses, and can be co-located or operating in this...
... equipment has been tested and found to comply with the limits for compliance could void the user's authority to Part 15 of the FCC Rules. This equipment should be installed and operated with part 15 of the FCC Rules. This equipment generates, uses, and can be co-located or operating in this...

Owners Manual
Page 44
... repair of the external drain air gap and disposal. NOTE ••The drain air gap and disposal are external plumbing devices that are not part of the dishwasher. ••The warranty provided with the dishwasher does not cover service costs directly associated with a toothpick or brush. 4 Replace the plastic...
... repair of the external drain air gap and disposal. NOTE ••The drain air gap and disposal are external plumbing devices that are not part of the dishwasher. ••The warranty provided with the dishwasher does not cover service costs directly associated with a toothpick or brush. 4 Replace the plastic...

Owners Manual
Page 48
... unit has cooled down, the chiming will be necessary to adjust the water valve to help the air cool down faster. instead, it happens (what part of the noise and when it relies on a heating element for three seconds until the cycle stops. A: To drain standing water, press and hold Start...
... unit has cooled down, the chiming will be necessary to adjust the water valve to help the air cool down faster. instead, it happens (what part of the noise and when it relies on a heating element for three seconds until the cycle stops. A: To drain standing water, press and hold Start...

Owners Manual
Page 53
...original retail purchase Ten (10) years from date of original retail purchase Limited Lifetime Scope of Warranty Labor / Parts Electronics / Racks Direct Drive Motor Tub HOW SERVICE IS HANDLED LG will be new or remanufactured. TO THE EXTENT ANY IMPLIED WARRANTY IS REQUIRED BY LAW, IT IS LIMITED IN...repairs/installation. ••Failure of the product to perform during the warranty period set forth below, LG will be responsible for any labor or in-home service to replace defective parts. Customer will also provide, free of charge, all labor and on-site service to replace the ...
...original retail purchase Ten (10) years from date of original retail purchase Limited Lifetime Scope of Warranty Labor / Parts Electronics / Racks Direct Drive Motor Tub HOW SERVICE IS HANDLED LG will be new or remanufactured. TO THE EXTENT ANY IMPLIED WARRANTY IS REQUIRED BY LAW, IT IS LIMITED IN...repairs/installation. ••Failure of the product to perform during the warranty period set forth below, LG will be responsible for any labor or in-home service to replace defective parts. Customer will also provide, free of charge, all labor and on-site service to replace the ...

