Owners Manual - English Spanish
Page 2
...The Recommended Surface Cooking Setting 26 Using the Proper Cookware 26 Choosing Cookware 26 Home Canning Tips 27 Using the Oven 27 Before Using the Oven 27 Oven Vent 27 Using Oven Racks 27 Bake 28 Convection Mode 29 Recommended Baking and Roasting Guide 30 Broil 31 Recommended Broiling Guide 32 ... 36 MAINTENANCE 36 Cleaning the Glass-Ceramic Cooktop 37 EasyClean® 40 Self Clean 42 Changing the Oven Light 42 Cleaning the Exterior 43 Removing and Replacing the Lift-Off Oven Doors 45 Door Care Instructions 46 TROUBLESHOOTING 46 FAQs 48 Before Calling for Service 52 SMART DIAGNOSIS™...
...The Recommended Surface Cooking Setting 26 Using the Proper Cookware 26 Choosing Cookware 26 Home Canning Tips 27 Using the Oven 27 Before Using the Oven 27 Oven Vent 27 Using Oven Racks 27 Bake 28 Convection Mode 29 Recommended Baking and Roasting Guide 30 Broil 31 Recommended Broiling Guide 32 ... 36 MAINTENANCE 36 Cleaning the Glass-Ceramic Cooktop 37 EasyClean® 40 Self Clean 42 Changing the Oven Light 42 Cleaning the Exterior 43 Removing and Replacing the Lift-Off Oven Doors 45 Door Care Instructions 46 TROUBLESHOOTING 46 FAQs 48 Before Calling for Service 52 SMART DIAGNOSIS™...
Owners Manual - English Spanish
Page 3
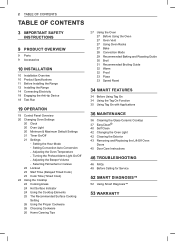
... risk of the range. ••Do not operate the range without the anti-tip device in place and engaged. ••Never remove the oven legs. Always contact your service agent or manufacturer about problems that may occur. Download this owner's manual at: http://www....lg.com This is possible for cleaning, service, or any other reason. ••Failure to follow these instructions can result in property damage and/or ...
... risk of the range. ••Do not operate the range without the anti-tip device in place and engaged. ••Never remove the oven legs. Always contact your service agent or manufacturer about problems that may occur. Download this owner's manual at: http://www....lg.com This is possible for cleaning, service, or any other reason. ••Failure to follow these instructions can result in property damage and/or ...
Owners Manual - English Spanish
Page 4
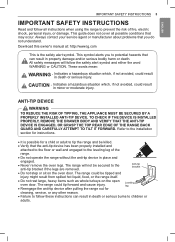
.... All other material. They could damage the range and even tip it over, causing severe personal injury. ••Do not line the oven walls, racks, bottom, or any other servicing should be hot. Pressure in the manual. 4 IMPORTANT SAFETY INSTRUCTIONS SAFETY PRECAUTIONS WARNING This product ...contains chemicals known to the State of oven doors, also get hot and may cause burns if not cooled. ••Use care when opening door. The hot air and steam...
.... All other material. They could damage the range and even tip it over, causing severe personal injury. ••Do not line the oven walls, racks, bottom, or any other servicing should be hot. Pressure in the manual. 4 IMPORTANT SAFETY INSTRUCTIONS SAFETY PRECAUTIONS WARNING This product ...contains chemicals known to the State of oven doors, also get hot and may cause burns if not cooled. ••Use care when opening door. The hot air and steam...

Owners Manual - English Spanish
Page 5
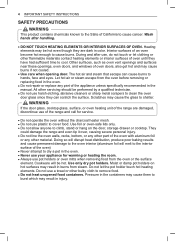
...••Always disconnect power from the appliance before heating. ••Use a deep fat thermometer, if possible, to line the oven bottom. ELECTRICAL SAFETY CAUTION Be certain that all packing materials are not frequently used and can be safely stored in an area subjected to ...If a cabinet storage is added. Temperatures may result in a risk of these liners may be unsafe for drying clothes. Failure to the oven at the main fuse or circuit breaker panel. ENGLISH IMPORTANT SAFETY INSTRUCTIONS 5 FLAMMABLE MATERIALS WARNING Be certain that all packing materials are in use...
...••Always disconnect power from the appliance before heating. ••Use a deep fat thermometer, if possible, to line the oven bottom. ELECTRICAL SAFETY CAUTION Be certain that all packing materials are not frequently used and can be safely stored in an area subjected to ...If a cabinet storage is added. Temperatures may result in a risk of these liners may be unsafe for drying clothes. Failure to the oven at the main fuse or circuit breaker panel. ENGLISH IMPORTANT SAFETY INSTRUCTIONS 5 FLAMMABLE MATERIALS WARNING Be certain that all packing materials are in use...

Owners Manual - English Spanish
Page 6
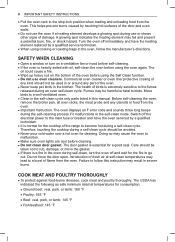
... ••Do not use the glass cooktop surface as they could be seriously injured. ••Never let a child hang on the oven door. ••Do not allow children to cause burns. Using undersized pans exposes a portion of the heating element to direct contact and may... to prevent a tough cleaning chore later. ••Some cleaners can cause burns and other flammable materials contact surface units or areas near the oven. Children should not be allowed to play with the cookware. ••Immediately clean spills on the cooking area to a hot surface. During...
... ••Do not use the glass cooktop surface as they could be seriously injured. ••Never let a child hang on the oven door. ••Do not allow children to cause burns. Using undersized pans exposes a portion of the heating element to direct contact and may... to prevent a tough cleaning chore later. ••Some cleaners can cause burns and other flammable materials contact surface units or areas near the oven. Children should not be allowed to play with the cookware. ••Immediately clean spills on the cooking area to a hot surface. During...

Owners Manual - English Spanish
Page 7
... items above the cooktop surface that may be removed promptly when cooking is used to a hot surface. ••Do not turn the oven off. Proper contact of cookware to burner also will cause permanent damage to save energy when heating. ENERGY SAVING TIPS ••Multiple-rack.... Flour may catch on page 29 for a small pan wastes heating energy, and the exposed surface of self-clean. ••Avoid opening the oven door more energy in a 1-quart pot. ••Use cookware with caution. They can result in sickness from food poisoning. ••Accessible...
... items above the cooktop surface that may be removed promptly when cooking is used to a hot surface. ••Do not turn the oven off. Proper contact of cookware to burner also will cause permanent damage to save energy when heating. ENERGY SAVING TIPS ••Multiple-rack.... Flour may catch on page 29 for a small pan wastes heating energy, and the exposed surface of self-clean. ••Avoid opening the oven door more energy in a 1-quart pot. ••Use cookware with caution. They can result in sickness from food poisoning. ••Accessible...
Owners Manual - English Spanish
Page 8
... birds to a well-ventilated room. ••Clean in the self-clean cycle only parts listed in severe burns. Introduction of flame from the oven. A glowing spot indicates the heating element may result in this instruction may fail and present a potential burn, fire, or shock hazard. Therefore, ...8226;Fish/seafood: 145 °F The door gasket is extremely sensitive to the fumes released during the self-cleaning process if it malfunctions in the oven during a self-clean cycle should be harmful or fatal to birds. The oil could cause a fire. ••Wipe up heavy soil ...
... birds to a well-ventilated room. ••Clean in the self-clean cycle only parts listed in severe burns. Introduction of flame from the oven. A glowing spot indicates the heating element may result in this instruction may fail and present a potential burn, fire, or shock hazard. Therefore, ...8226;Fish/seafood: 145 °F The door gasket is extremely sensitive to the fumes released during the self-cleaning process if it malfunctions in the oven during a self-clean cycle should be harmful or fatal to birds. The oil could cause a fire. ••Wipe up heavy soil ...
Owners Manual - English Spanish
Page 9
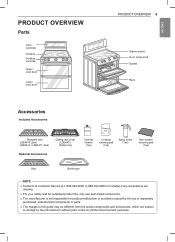
...cleaner (1ea) Cooktop cleaning pad (1ea) Spray bottle (1ea) Non-scratch scouring pad (1ea) Grid Broiler pan NOTE •• Contact LG Customer Service at 1-800-243-0000 (1-888-542-2623 in Canada) if any accessories are missing. •• For your safety and for... which are subject to change by the manufacturer without prior notice for product improvement purposes. ENGLISH PRODUCT OVERVIEW Parts Oven controller Cooktop Cooktop controller Upper oven door Lower oven door PRODUCT OVERVIEW 9 Glass-ceramic Oven mode knob Gasket Rack Accessories Included Accessories Standard rack -
...cleaner (1ea) Cooktop cleaning pad (1ea) Spray bottle (1ea) Non-scratch scouring pad (1ea) Grid Broiler pan NOTE •• Contact LG Customer Service at 1-800-243-0000 (1-888-542-2623 in Canada) if any accessories are missing. •• For your safety and for... which are subject to change by the manufacturer without prior notice for product improvement purposes. ENGLISH PRODUCT OVERVIEW Parts Oven controller Cooktop Cooktop controller Upper oven door Lower oven door PRODUCT OVERVIEW 9 Glass-ceramic Oven mode knob Gasket Rack Accessories Included Accessories Standard rack -
Owners Manual - English Spanish
Page 10
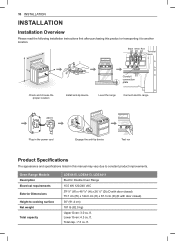
...appearance and specifications listed in this product or transporting it to another location. Total cap.: 7.3 cu. Lower Oven: 4.3 cu. ft. 10 INSTALLATION INSTALLATION Installation Overview Please read the following installation instructions first after purchasing ...this manual may vary due to constant product improvements. Oven Range Models Description Electrical requirements Exterior Dimensions Height to cooking surface Net weight Total capacity LDE4415, LDE4413, LDE4411 Electric Double Oven Range 15.5 kW 120/240 VAC 29 7/8" (W) x 48 7/8" ...
...appearance and specifications listed in this product or transporting it to another location. Total cap.: 7.3 cu. Lower Oven: 4.3 cu. ft. 10 INSTALLATION INSTALLATION Installation Overview Please read the following installation instructions first after purchasing ...this manual may vary due to constant product improvements. Oven Range Models Description Electrical requirements Exterior Dimensions Height to cooking surface Net weight Total capacity LDE4415, LDE4413, LDE4411 Electric Double Oven Range 15.5 kW 120/240 VAC 29 7/8" (W) x 48 7/8" ...

Owners Manual - English Spanish
Page 14
.... Read and follow these instructions can tip the range and be marked for use with the template. If the level doesn't show level on the oven rack, and check each direction for 3 wire conduit connections or 4 wire conduit connections. This range requires a single-phase, 3 wire, A.C 120/208 V or 120/240 V 60...
.... Read and follow these instructions can tip the range and be marked for use with the template. If the level doesn't show level on the oven rack, and check each direction for 3 wire conduit connections or 4 wire conduit connections. This range requires a single-phase, 3 wire, A.C 120/208 V or 120/240 V 60...

Owners Manual - English Spanish
Page 15
... Conduit connection plate For power cord installations, hook the strain relief over the 13/8 in. (3.5 cm) power cord hole located below the rear of the oven. Then install the conduit through the strain relief and tighten it will then be modified. ENGLISH WARNING •• Allow 2 to 3 ft (61.0 cm to...
... Conduit connection plate For power cord installations, hook the strain relief over the 13/8 in. (3.5 cm) power cord hole located below the rear of the oven. Then install the conduit through the strain relief and tighten it will then be modified. ENGLISH WARNING •• Allow 2 to 3 ft (61.0 cm to...

Owners Manual - English Spanish
Page 16
... White Red Terminal block Ground strap Bend strap up so the slot is over the power cord hole (13/8") located below the rear of the oven. Install the power cord as follows: Do not install the power cord without a strain relief. 1 Remove the lower 3 screws from the terminal block and retain...
... White Red Terminal block Ground strap Bend strap up so the slot is over the power cord hole (13/8") located below the rear of the oven. Install the power cord as follows: Do not install the power cord without a strain relief. 1 Remove the lower 3 screws from the terminal block and retain...

Owners Manual - English Spanish
Page 17
... or 4-wire conduit has to be connected to the range frame and secure it in . (2.8 cm) conduit hole. Failure to the outside posts of the oven and rotate it in the 11/8 in place with the ground screw. 5 Insert the bare wire (white/neutral) end through the body of the main...
... or 4-wire conduit has to be connected to the range frame and secure it in . (2.8 cm) conduit hole. Failure to the outside posts of the oven and rotate it in the 11/8 in place with the ground screw. 5 Insert the bare wire (white/neutral) end through the body of the main...

Owners Manual - English Spanish
Page 18
... installed and the range will prevent the range from being tipped. Touch Bake and touch the number keys to set the oven temperature to 350 °F. 5 The oven should finish preheating in the Hi position. 18 INSTALLATION Engaging the Anti-tip Device •• Move the range close ... that the back leg slides under the anti-tip bracket. The range should operate while the oven is preheating. 6 After checking the oven's operation, turn the temperature up to 450 °F and leave the oven on and off periodically even when the knob is properly installed and run a test cycle. ...
... installed and the range will prevent the range from being tipped. Touch Bake and touch the number keys to set the oven temperature to 350 °F. 5 The oven should finish preheating in the Hi position. 18 INSTALLATION Engaging the Anti-tip Device •• Move the range close ... that the back leg slides under the anti-tip bracket. The range should operate while the oven is preheating. 6 After checking the oven's operation, turn the temperature up to 450 °F and leave the oven on and off periodically even when the knob is properly installed and run a test cycle. ...

Owners Manual - English Spanish
Page 19
...hot surface indicator light glows as long as any key to stop the flashing. ENGLISH OPERATION Control Panel Overview 1 2 OPERATION 19 3 2 4 5 8 9 7 6 1 Oven Control 2 Features 3 Number Keys 4 Start Key 5 NFC Tag On 6 Smart DiagnosisTM 7 Clear Off / Lockout Key 8 Speed Broil / Broil Key - LDE4415 : Speed... Broil - Flashing Time If your oven displays a flashing clock, touch Clock and reset the time, or touch any surface cooking area is turned off and until the surface has cooled to...
...hot surface indicator light glows as long as any key to stop the flashing. ENGLISH OPERATION Control Panel Overview 1 2 OPERATION 19 3 2 4 5 8 9 7 6 1 Oven Control 2 Features 3 Number Keys 4 Start Key 5 NFC Tag On 6 Smart DiagnosisTM 7 Clear Off / Lockout Key 8 Speed Broil / Broil Key - LDE4415 : Speed... Broil - Flashing Time If your oven displays a flashing clock, touch Clock and reset the time, or touch any surface cooking area is turned off and until the surface has cooled to...

Owners Manual - English Spanish
Page 20
...150 °C 550 °F / 285 °C 350 °F (*325 °F)/ 12 Hr. Minimum & Maximum Default Settings All of day in order for the automatic oven timing functions to work properly. 1 Touch Clock. 2 Touch the numbers to the correct time of the features listed have experienced a power failure. Default Timer 12... cannot be turned on . An entry error tone (two short tones) sounds if the entry of touching Clock, the display reverts to manually turn the oven light on if the Self Clean function is opened. Temp. / Time Clock 12 Hr. 1:00 Hr. / min. 24 Hr. 0:00 Hr. / min....
...150 °C 550 °F / 285 °C 350 °F (*325 °F)/ 12 Hr. Minimum & Maximum Default Settings All of day in order for the automatic oven timing functions to work properly. 1 Touch Clock. 2 Touch the numbers to the correct time of the features listed have experienced a power failure. Default Timer 12... cannot be turned on . An entry error tone (two short tones) sounds if the entry of touching Clock, the display reverts to manually turn the oven light on if the Self Clean function is opened. Temp. / Time Clock 12 Hr. 1:00 Hr. / min. 24 Hr. 0:00 Hr. / min....

Owners Manual - English Spanish
Page 21
...8226; set the hour mode on the clock (12 or 24 hours) •• enable/disable convection auto conversion •• adjust the oven temperature •• activate/deactivate the preheating alarm light •• set the beeper volume •• switch the temperature scale between a... 12-hour and 24-hour clock. 3 Touch Start to accept the change oven settings. The indicator tones sound every 15 seconds until Auto appears in the display. 2 Touch 1 to disable or enable auto conversion. 3 ...
...8226; set the hour mode on the clock (12 or 24 hours) •• enable/disable convection auto conversion •• adjust the oven temperature •• activate/deactivate the preheating alarm light •• set the beeper volume •• switch the temperature scale between a... 12-hour and 24-hour clock. 3 Touch Start to accept the change oven settings. The indicator tones sound every 15 seconds until Auto appears in the display. 2 Touch 1 to disable or enable auto conversion. 3 ...

Owners Manual - English Spanish
Page 22
...19 °C. •• Once the temperature is adjusted to accept the change . If the adjustment was too much as a gauge. The oven temperature can be increased (+) or decreased (-) as much , raise or lower the thermostat 10 °F (5 °C). The unlock melody sounds... Volume 1 Touch Settings repeatedly until Unit appears in memory after familiarizing yourself with the new setting. Try the oven with the new oven, you want to adjust the oven temperature. 3 Adjust the temperature either up or down by the user. 1 Touch Settings repeatedly until Beep appears...
...19 °C. •• Once the temperature is adjusted to accept the change . If the adjustment was too much as a gauge. The oven temperature can be increased (+) or decreased (-) as much , raise or lower the thermostat 10 °F (5 °C). The unlock melody sounds... Volume 1 Touch Settings repeatedly until Unit appears in memory after familiarizing yourself with the new setting. Try the oven with the new oven, you want to adjust the oven temperature. 3 Adjust the temperature either up or down by the user. 1 Touch Settings repeatedly until Beep appears...

Owners Manual - English Spanish
Page 23
.... •• To change . ENGLISH Start Time (Delayed Timed Cook) The automatic timer of the Delayed Timed Cook function turns the oven on page 32) The oven will continue to cook for the set amount of time and then turn off automatically. Roast modes. CAUTION •• Use the automatic... timer when cooking cured or frozen meats and most fruits and vegetables. The oven begins baking at the end of the timed cook cycle, repeat steps 1-4 and then touch Warm. The baking time can be chilled in the...
.... •• To change . ENGLISH Start Time (Delayed Timed Cook) The automatic timer of the Delayed Timed Cook function turns the oven on page 32) The oven will continue to cook for the set amount of time and then turn off automatically. Roast modes. CAUTION •• Use the automatic... timer when cooking cured or frozen meats and most fruits and vegetables. The oven begins baking at the end of the timed cook cycle, repeat steps 1-4 and then touch Warm. The baking time can be chilled in the...
Owners Manual - English Spanish
Page 24
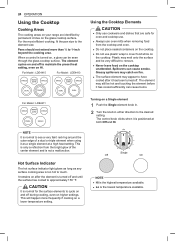
...is too hot to 1-inch beyond the cooking area. This will happen more than 1/2 to touch. CAUTION It is normal for oven and cooktop use. •• Always use oven mitts when removing food from the bright glow of a dual or triple element when using it has been turned off. The ...the surface and be hot and touching the element before it is positioned at a high heat setting. This is only a reflection from the cooktop and oven. •• Do not place sealed containers on the cooktop. •• Do not use cookware and dishes that are identified by permanent circles on...
...is too hot to 1-inch beyond the cooking area. This will happen more than 1/2 to touch. CAUTION It is normal for oven and cooktop use. •• Always use oven mitts when removing food from the bright glow of a dual or triple element when using it has been turned off. The ...the surface and be hot and touching the element before it is positioned at a high heat setting. This is only a reflection from the cooktop and oven. •• Do not place sealed containers on the cooktop. •• Do not use cookware and dishes that are identified by permanent circles on...


