Specification (English)
Page 1
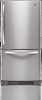
... • IcePlus™ Accelerated Freezing Function • CustomCube™ Ice Maker • LoDecibel™ Quiet Operation ENERGYSTAR® qualified models use at least 15% less energy than required by current federal standards. LG's Energy Star refrigerators allow consumers to save money, energy and protect the environment. L D C 2272 0 Smooth White Stainless Steel Titanium...
... • IcePlus™ Accelerated Freezing Function • CustomCube™ Ice Maker • LoDecibel™ Quiet Operation ENERGYSTAR® qualified models use at least 15% less energy than required by current federal standards. LG's Energy Star refrigerators allow consumers to save money, energy and protect the environment. L D C 2272 0 Smooth White Stainless Steel Titanium...
Owner's Manual
Page 2
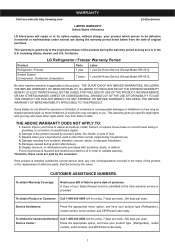
... per year) Service Center: Press the appropriate option, and have your product type (Refrigerator), model number, serial number, and ZIP/Postal Code ready. 1 LG Refrigerator / Freezer Warranty Period Product Parts Labor Refrigerator / Freezer 1 year 1 year [In-Home Service (Except Model GR-051)] Sealed System (Compressor, Condenser, Evaporator) 7 years 1 year [In-Home Service (Except...
... per year) Service Center: Press the appropriate option, and have your product type (Refrigerator), model number, serial number, and ZIP/Postal Code ready. 1 LG Refrigerator / Freezer Warranty Period Product Parts Labor Refrigerator / Freezer 1 year 1 year [In-Home Service (Except Model GR-051)] Sealed System (Compressor, Condenser, Evaporator) 7 years 1 year [In-Home Service (Except...

Owner's Manual
Page 4
...5 Parts and Features 6-7 Refrigerator Installation Unpacking Installation Installation of Base Grille Refrigerator Doors: How to remove and reverse For Models with Pull-out Drawer For Models with Swinging Door How to remove and Install Pull-Out Drawer Closing and Aligning the doors 8-17 8 8 8 9-16... Door Racks Dairy Compartment Egg Compartment Freezer Section Ice Bin DuraBase Durabase Divider Glide Out Drawer Tilting Door Wired Durabase (Swing Models) Freezer Shelf Refrigerator Care and Cleaning Refrigerator Cleaning Outside Inside Walls Door Lining & Gaskets Plastic Parts (Covers and Panel)...
...5 Parts and Features 6-7 Refrigerator Installation Unpacking Installation Installation of Base Grille Refrigerator Doors: How to remove and reverse For Models with Pull-out Drawer For Models with Swinging Door How to remove and Install Pull-Out Drawer Closing and Aligning the doors 8-17 8 8 8 9-16... Door Racks Dairy Compartment Egg Compartment Freezer Section Ice Bin DuraBase Durabase Divider Glide Out Drawer Tilting Door Wired Durabase (Swing Models) Freezer Shelf Refrigerator Care and Cleaning Refrigerator Cleaning Outside Inside Walls Door Lining & Gaskets Plastic Parts (Covers and Panel)...

Owner's Manual
Page 7
The location of some models 6 A Digital Sensor Control B Refrigerator Light C Shelves D Frozen Meat Compartment (Chef Fresh/Snack Pan) * E Optibin Crisper Keeps fruits and vegetable fresh and crisp F Ice Bin G Ice ... of your new refrigerator. Your refrigerator could have some or all of the features and parts listed below. NOTE: This guide covers different models. PARTS AND FEATURES Drawer Model A A J BB C K D E L F M G N H O I Divider J Dairy Compartment K Door Racks L Fixed Refrigerator Rack M Freezer Light N Pull Out Drawer O Ice maker * * On some of the parts may not...
The location of some models 6 A Digital Sensor Control B Refrigerator Light C Shelves D Frozen Meat Compartment (Chef Fresh/Snack Pan) * E Optibin Crisper Keeps fruits and vegetable fresh and crisp F Ice Bin G Ice ... of your new refrigerator. Your refrigerator could have some or all of the features and parts listed below. NOTE: This guide covers different models. PARTS AND FEATURES Drawer Model A A J BB C K D E L F M G N H O I Divider J Dairy Compartment K Door Racks L Fixed Refrigerator Rack M Freezer Light N Pull Out Drawer O Ice maker * * On some of the parts may not...

Owner's Manual
Page 8
... parts listed below. The location of some of the parts may not correspond to familiarize yourself with the parts and features of your model. A Digital Sensor Control B Refrigerator Light C Shelves D Frozen Meat Compartment (Chef Fresh/Snack Pan)* E Optibin Crisper Keeps fruits ...H Wired Durabase I B C J D E K F L G M H N Read this section to that of your new refrigerator. NOTE: This guide covers different models. Swing Model PARTS AND FEATURES A I Dairy Compartment J Door Racks K Freezer Light L Fixed Refrigerator Rack M Wire Freezer Shelf N Freezer Door Rack * On some...
... parts listed below. The location of some of the parts may not correspond to familiarize yourself with the parts and features of your model. A Digital Sensor Control B Refrigerator Light C Shelves D Frozen Meat Compartment (Chef Fresh/Snack Pan)* E Optibin Crisper Keeps fruits ...H Wired Durabase I B C J D E K F L G M H N Read this section to that of your new refrigerator. NOTE: This guide covers different models. Swing Model PARTS AND FEATURES A I Dairy Compartment J Door Racks K Freezer Light L Fixed Refrigerator Rack M Wire Freezer Shelf N Freezer Door Rack * On some...

Owner's Manual
Page 9
... Your Refrigerator: Your refrigerator is a flow of cold air in their proper places. Leave your fingers and a little liquid detergent. Verify that feature warnings, the model serial number or the technical label of the product located on the back of your refrigerator (see Figure A). 2.Take off the cover. INSTALLATION OF BASE...
... Your Refrigerator: Your refrigerator is a flow of cold air in their proper places. Leave your fingers and a little liquid detergent. Verify that feature warnings, the model serial number or the technical label of the product located on the back of your refrigerator (see Figure A). 2.Take off the cover. INSTALLATION OF BASE...

Owner's Manual
Page 10
... facing the unit. HOW TO REVERSE DOOR SWING (when converting from the refrigerator doors. REFRIGERATOR INSTALLATION REFRIGERATOR DOORS: HOW TO REMOVE AND REVERSE (Optional) For models with a flat head screwdriver and remove it (1). • Using 10 mm socket wrench, remove the three bolts and lift off the top hinge. TOOLS YOU...
... facing the unit. HOW TO REVERSE DOOR SWING (when converting from the refrigerator doors. REFRIGERATOR INSTALLATION REFRIGERATOR DOORS: HOW TO REMOVE AND REVERSE (Optional) For models with a flat head screwdriver and remove it (1). • Using 10 mm socket wrench, remove the three bolts and lift off the top hinge. TOOLS YOU...

Owner's Manual
Page 14
... the refrigerator doors. Remove all food and any adjustable racks from the left ) 1. REFRIGERATOR INSTALLATION REFRIGERATOR DOORS: HOW TO REMOVE AND REVERSE (Optional) For Swing models You may require some force). • The keyhole slots (2) on the front of the door. • Press the handle against the front of the door...
... the refrigerator doors. Remove all food and any adjustable racks from the left ) 1. REFRIGERATOR INSTALLATION REFRIGERATOR DOORS: HOW TO REMOVE AND REVERSE (Optional) For Swing models You may require some force). • The keyhole slots (2) on the front of the door. • Press the handle against the front of the door...

Owner's Manual
Page 15
...) and the pivot (13). 10 1 13 4 12 11 2 3 8 7 9 6 5 • Take off , remove the screws (6), the bolt (7) and the pivot (8) located below this type of your model. REFRIGERATOR INSTALLATION 2. Handle Type 2 3. Handle Type 1 2 1 3 4 5 Handle Type 2 It is not necessary to remove this and remove the hinge (9). • Install the hinge (10) on...
...) and the pivot (13). 10 1 13 4 12 11 2 3 8 7 9 6 5 • Take off , remove the screws (6), the bolt (7) and the pivot (8) located below this type of your model. REFRIGERATOR INSTALLATION 2. Handle Type 2 3. Handle Type 1 2 1 3 4 5 Handle Type 2 It is not necessary to remove this and remove the hinge (9). • Install the hinge (10) on...
Owner's Manual
Page 21
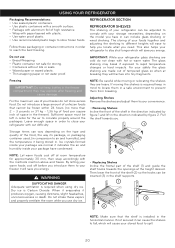
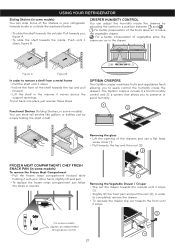
... ice. 2 • Replacing Shelves Incline the frontal part of the food, the way its package, or packaging container used, (in can vary depending on the model you energy. The glass shelving may explode after freezing and cause damage. Adjusting Shelves Remove the shelves and adjust them to spill. 20 Ice crystals...
... ice. 2 • Replacing Shelves Incline the frontal part of the food, the way its package, or packaging container used, (in can vary depending on the model you energy. The glass shelving may explode after freezing and cause damage. Adjusting Shelves Remove the shelves and adjust them to spill. 20 Ice crystals...
Owner's Manual
Page 22
...8226; Incline the front of the shelf towards the top and pull forward. • Lift the shelf in the manner it stops. 2 On some models applies an independent temperature control 1 21 The Optibin crispers include 1) a front humidity control and 2) a system that allows you to preserve or avoid ... inside the drawers. For a better conservation of vegetables allow air to leave the vegetable drawer. Functional Shelves (Folding Shelves, in some models) You can store tall articles like explained below. • To slide the shelf towards the outside: Pull towards you to easily control...
...8226; Incline the front of the shelf towards the top and pull forward. • Lift the shelf in the manner it stops. 2 On some models applies an independent temperature control 1 21 The Optibin crispers include 1) a front humidity control and 2) a system that allows you to preserve or avoid ... inside the drawers. For a better conservation of vegetables allow air to leave the vegetable drawer. Functional Shelves (Folding Shelves, in some models) You can store tall articles like explained below. • To slide the shelf towards the outside: Pull towards you to easily control...
Owner's Manual
Page 23
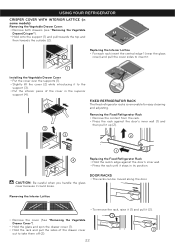
... and pull the sides of the cover in the superior support (4). CAUTION: Be careful when you handle the glass cover because it stays in some models) Removing the Vegetable Drawer Cover: • Remove both drawers (see "Removing the Vegetable Drawer/Crisper"). • Hold onto the support (1) and pull towards the top...
... and pull the sides of the cover in the superior support (4). CAUTION: Be careful when you handle the glass cover because it stays in some models) Removing the Vegetable Drawer Cover: • Remove both drawers (see "Removing the Vegetable Drawer/Crisper"). • Hold onto the support (1) and pull towards the top...
Owner's Manual
Page 24
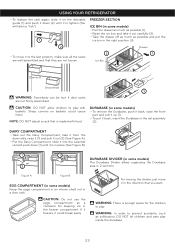
...the desirable guide (1) and push it down (1) until it is tighten (You will listen a "tick"). 1 FREEZER SECTION ICE BIN (in some models) • Pull the drawer as much as possible and put it could cause injury. WARNING: In order to play with food. USING YOUR ...right position (3). 2 Drawer 2 1 • To move it in the direction that is in place (See Figure B). 2 1 1 DURABASE DIVIDER (in some models) The Durabase Divider allows organizing the Durabase 2 area in the freezer compartment. Figure A Figure B EGG COMPARTMENT (in a door rack. For moving the divider, just...
...the desirable guide (1) and push it down (1) until it is tighten (You will listen a "tick"). 1 FREEZER SECTION ICE BIN (in some models) • Pull the drawer as much as possible and put it could cause injury. WARNING: In order to play with food. USING YOUR ...right position (3). 2 Drawer 2 1 • To move it in the direction that is in place (See Figure B). 2 1 1 DURABASE DIVIDER (in some models) The Durabase Divider allows organizing the Durabase 2 area in the freezer compartment. Figure A Figure B EGG COMPARTMENT (in a door rack. For moving the divider, just...
Owner's Manual
Page 25
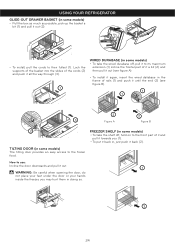
... it back (2). Lock the supports of the basket into the slides of the cords (2) and push it all the way through (3). 1 WIRED DURABASE (in some models) • To take the wired durabase off, pull it to its maximum extension (1) incline the frontal part of it a bit (2) and then pull it out... in doing so. 2 24 How to the front part of rails (1) and push it until the end (2) (see figure B). 1 1 2 2 3 Figure A Figure B 2 FREEZER SHELF (in some models) • To take the shelf off, hold on to use: Incline the door downwards and pull it out. 1 WARNING: Be careful when opening the door...
... it back (2). Lock the supports of the basket into the slides of the cords (2) and push it all the way through (3). 1 WIRED DURABASE (in some models) • To take the wired durabase off, pull it to its maximum extension (1) incline the frontal part of it a bit (2) and then pull it out... in doing so. 2 24 How to the front part of rails (1) and push it until the end (2) (see figure B). 1 1 2 2 3 Figure A Figure B 2 FREEZER SHELF (in some models) • To take the shelf off, hold on to use: Incline the door downwards and pull it out. 1 WARNING: Be careful when opening the door...

Owner's Manual
Page 27
... you feel it unsafe, dispose of it well. 4.Make sure the doors stay open the refrigerator; If you decide to leave your refrigerator on the model of the refrigerator, lift the top part of the refrigerator so it can roll with you use blocks or tape) in order to take your...
... you feel it unsafe, dispose of it well. 4.Make sure the doors stay open the refrigerator; If you decide to leave your refrigerator on the model of the refrigerator, lift the top part of the refrigerator so it can roll with you use blocks or tape) in order to take your...
Owner's Manual
Page 28
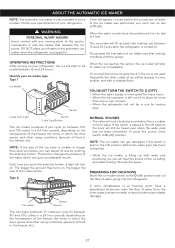
... on , the bigger the size of food in a 24 hour period), depending on . Throw away the first batch of water from the inner pipes (certain models) to O (off position the buzz will be heard even when the water pipe has not been connected. The bigger the amount that some... models. YOU MUST TURN THE SWITCH TO O (OFF) • When the water supply is interrupted for more than one or two minutes. • When the refrigerator ...
... on , the bigger the size of food in a 24 hour period), depending on . Throw away the first batch of water from the inner pipes (certain models) to O (off position the buzz will be heard even when the water pipe has not been connected. The bigger the amount that some... models. YOU MUST TURN THE SWITCH TO O (OFF) • When the water supply is interrupted for more than one or two minutes. • When the refrigerator ...

Owner's Manual
Page 29
... it will provide a better access. CAUTION: Connect to a vertical pipeline. Water pressure should be between 0,138 and 0,82 MPa or 20 and 120 PSI for models not containing water filter and between 40-60 PSI or 0,27 MPa (2,8 kg · f / cm ² ~ 4,2 kg · f / cm ², (2,8 kg · f / cm ²... install the ice maker pipes in the lateral or upper area instead of the lower area to the cold-water flow, the water pressure for models containing water filter. • A drill. Air located inside of sediment. 28 Call a qualified plumber to fix such hammering on the ends, ...
... it will provide a better access. CAUTION: Connect to a vertical pipeline. Water pressure should be between 0,138 and 0,82 MPa or 20 and 120 PSI for models not containing water filter and between 40-60 PSI or 0,27 MPa (2,8 kg · f / cm ² ~ 4,2 kg · f / cm ², (2,8 kg · f / cm ²... install the ice maker pipes in the lateral or upper area instead of the lower area to the cold-water flow, the water pressure for models containing water filter. • A drill. Air located inside of sediment. 28 Call a qualified plumber to fix such hammering on the ends, ...
Owner's Manual
Page 33
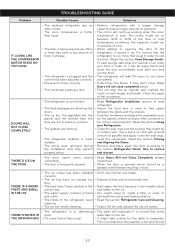
... not close . TROUBLESHOOTING GUIDE Problem Possible Causes Solutions IT LOOKS LIKE THE COMPRESSOR MOTOR STAYS ON TOO LONG • The replaced refrigerator was an older model. • The room temperature is hotter than usual. • The water will evaporate. To save energy, take what you took out the food. • The...
... not close . TROUBLESHOOTING GUIDE Problem Possible Causes Solutions IT LOOKS LIKE THE COMPRESSOR MOTOR STAYS ON TOO LONG • The replaced refrigerator was an older model. • The room temperature is hotter than usual. • The water will evaporate. To save energy, take what you took out the food. • The...

Owner's Manual
Page 2
LG Refrigerator / Freezer Warranty Period Product Parts Labor Refrigerator / Freezer 1 year 1 year [In-Home Service (Except Model GR-051)] Sealed System (Compressor, Condenser, Evaporator) 7 years 1 year [In-Home Service (Except Model GR-051)] No other express warranty is applicable to state. This warranty ... scratches, dents, or defects. A Copy of your Sales Receipt must be provided to LG in order to be defective in the U.S. Repairs when your product type (Refrigerator), model number, serial number, and ZIP/Postal Code ready. To obtain the nearest Authorized Call ...
LG Refrigerator / Freezer Warranty Period Product Parts Labor Refrigerator / Freezer 1 year 1 year [In-Home Service (Except Model GR-051)] Sealed System (Compressor, Condenser, Evaporator) 7 years 1 year [In-Home Service (Except Model GR-051)] No other express warranty is applicable to state. This warranty ... scratches, dents, or defects. A Copy of your Sales Receipt must be provided to LG in order to be defective in the U.S. Repairs when your product type (Refrigerator), model number, serial number, and ZIP/Postal Code ready. To obtain the nearest Authorized Call ...


